17. Automatic and Manual Management of the Air War
Focus: This section sets out how to control the air war either by manual control or using the AI-assistance options. It is split into two main sub-sections and discusses the various tools for assigning planes to air directives, redeploying your air force and managing the allocation of planes to support ground commands. It gives a general description of how to use the Air Operational Groups (AOGs). AOGs are a grouping of air units, using a hierarchy structure of Army, Corps and Low Level (Division/Brigade/Regiment) similar to that used by ground units. They can be managed entirely manually, or with the help of the AI Air Assist, The AI assist relies on several player inputs to then direct the operations of the AOGs.
17.1 Using the Automation Options
17.1.1 Automated AI Air Assist System
If this option is selected, then the AI air assist will automatically be used during each players’ turns. The effect of this is that the ‘AI air assist button’ well be automatically pressed once when a player ends their air planning phase, and once when they end their ground phase.
In effect, if you do not think you will wish to manually alter any air directives or the deployment of your air units then adopt this option.
If you do not adopt this approach you can still manage your air force using the tools in this section allowing for a mixture of AI-assistance and some manual control of the process. However, in this case during a MP/PBEM game your opponent can opt for full manual control if they so wish.
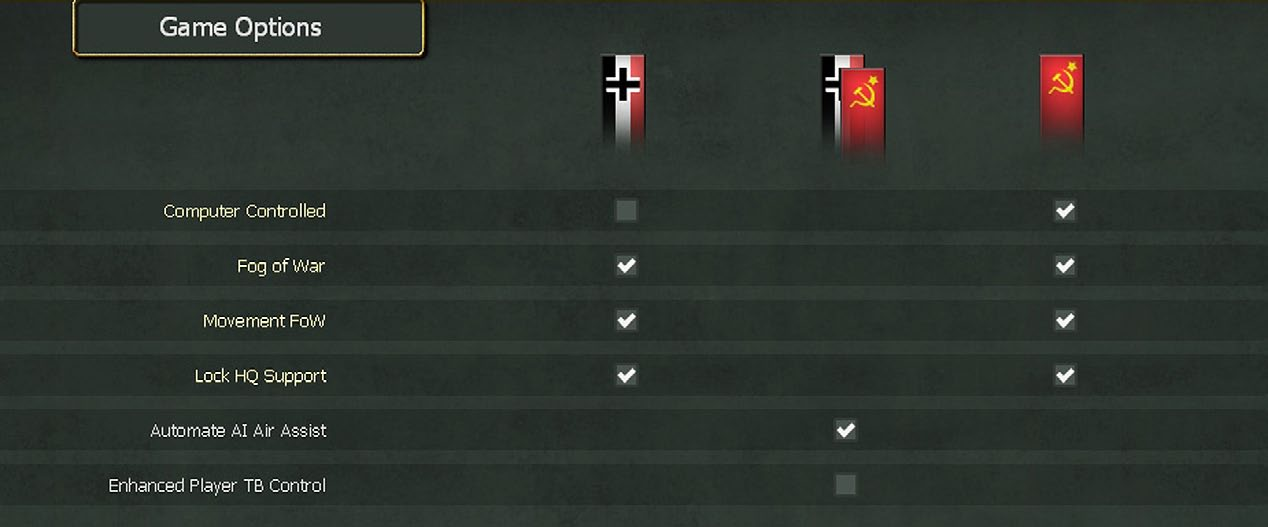
Here, a game against the AI has been set up to use the automated AI Air Assist routines.
This cannot be changed in a MP/PBEM game and the choice will apply to both sides.
Once this choice is made, the manual option to trigger the effects of AI Assistance will be disabled.

In this case, the players only need to adjust the AOG’s Stance, HQ Follow/Naval Ops, Asset Priority, and Supply Priority as below. The player can still build and expand new airbases if they wish (although the AI assist will expand existing airbases if it believes there is a need, it will not build new ones), and the player can decide to set air units to manual or auto upgrade (if manual, they need to do the upgrades themselves).
If you believe you will be operating in a region with few existing airfields then you will need manually to start the construction of at least level 1. Expansion can be left to the AI-Assistance or done manually. A strong piece of advice to Soviet players is to start to expand the airfields behind Moscow from early August 1941 as you will need them as the front line approaches the city. They are also useful to base your longer ranged bombers even if the immediate threat has ended.
They may also want to build depots at or near major airfields (unless also using the AI depot management, which will do this for airbases).
17.1.2 AI Assistance in Other Cases
If you do not select the automate option, you can still use the AI Assistance. You can set stances and priorities according to the rules below.
In this case, you will need to remember to depress the button to trigger AI air assist actions.
You can mix using the AI assistance with manual control of the various functions in this case. However, be careful as pressing the AI-assist button will over-ride any manual changes (deployment, air directives etc.) you have made.
Using this mixed approach can be effective when you want to carry out a lot of actions such as transferring damaged/depleted air groups to the National Reserve or have few choices as to how to use your air force and find that a mixture of Ground Support and Reconnaissance missions are adequate to your immediate needs.
17.1.3 AI Assistance and Air Doctrine Settings
When it creates air directives (or delivers ground support), the AI-assistance routine will use the settings in your air doctrine screen (37.16.9). This will determine factors such as mission height, days of operation, intensity of commitment and the type of weather conditions suitable for the mission.
While the default settings should be adequate, if you are encountering heavier than expected losses or your missions are not operating as you would expect, it may be worthwhile amending some of these settings.
17.1.4 Using the AI Air Assist to Move and Direct Your Air Operational Groups
If you want to automate the air war you need to use a combination of the air commands (army level AOGs each with a corresponding ground air command HQ) and lower level AOGs (corps AOGs and low level AOGs like divisions and regiments) to do so. The one page guide in section 4.6.1 sets out the main steps involved in doing this.
Basically you can use either the air commands or the lower AOGs to set the relative allocation of air groups across your front and to tell the AI how, and when during the turn, to deploy those AOGs and generally how and when to move the air groups.
The air command level is used to create a link between the AOGs and a ground HQ. Normally all AOGs will then be assigned to the same HQ. In the case of the Axis side, the Luftwaffe Fliegerkorps can be set to follow a different HQ to the Luftflotte if desired.
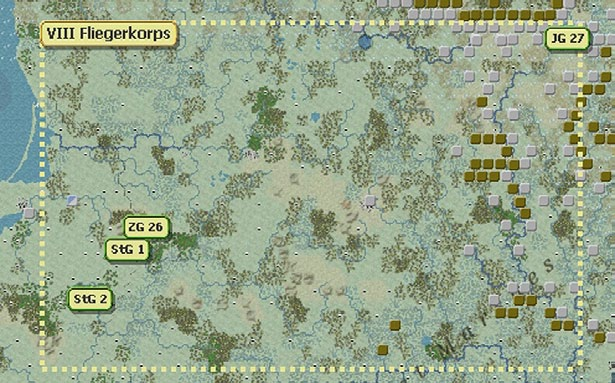
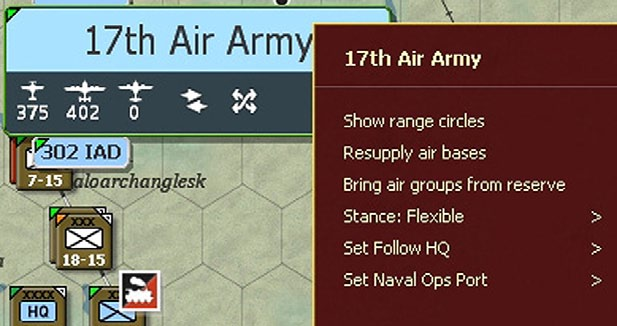
To access this function, ensure that the AOGs are shown on the map and then left click on the label (in this case for the VIII Fliegerkorps as set out in section 17.1.5).
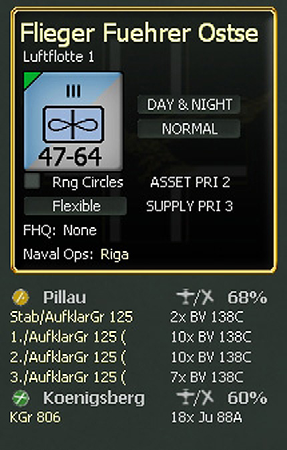
That will then bring up this display on the right hand side of the screen:
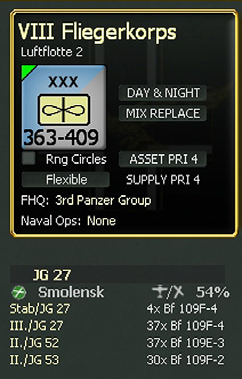
For all air commands you can use this screen to:
- Assign it to a higher command if appropriate (in this case the Fligerkorps is assigned to Luftflotte 2).
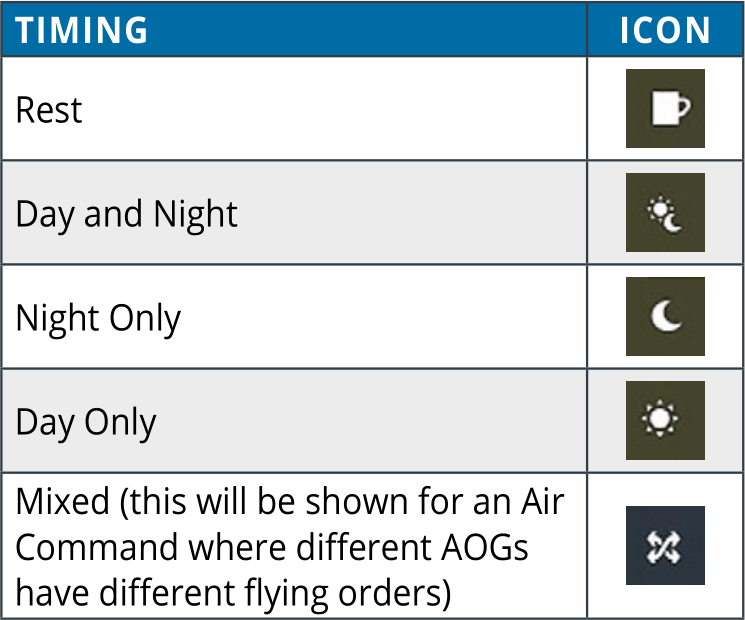
- When to fly air missions (rest, day and night, day only, night only).
- How to accept replacement pilots (16.7), the options are normal, restricted, priority and trained.
- See which ground command it is following (but see the rules in 17.1.6 below for the options).
- Set the AOG to conduct naval operations (but see the rules in 17.1.9 below for the options).
- Whether the range of its assigned air units are shown on the map (Rng Circles).
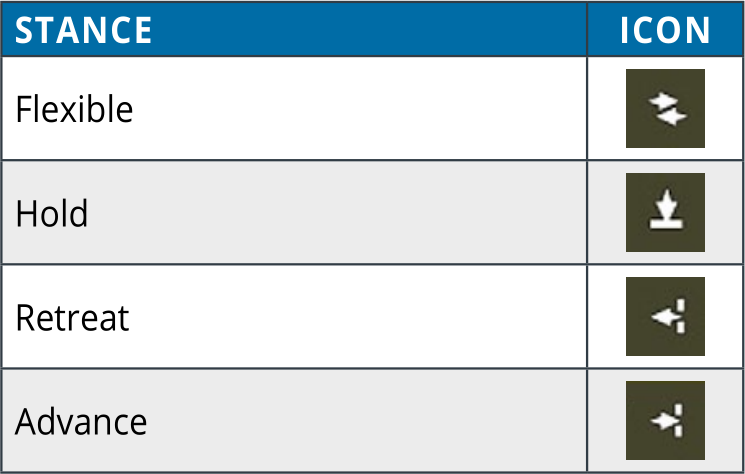
- How and when you want the air units to move on the map if directed by the AI Air Assist (17.1.6), in this case the options are flexible, hold, retreat or advance. This can be set at any level in the command chain and will over-ride the assignment for lower commands (so if you want one AOG to be different to say the controlling Air Army set this after choosing the Air Army).
- Asset priority which will tell the AI air assist how to determine how many planes are assigned to the command. This ranges from 4 (the highest priority to 0 (no planes will be allocated). This can only be set at the Army or Corps level in the command chain and will over-ride the assignment for lower commands (so if you want one corps AOG to be different to say from the controlling Air Army set this after choosing the Air Army).
- Supply priority works as the asset priority and determines the supply importance of that HQ. This can only be set at the army AOG level, with all units under the army assuming the same supply priority as the army.
- A list of the assigned air units and their air bases will be shown beneath the unit counter.
Axis-Allied AOGs can only be set to follow HQs of either German or their own nationality (so, for example, a Hungarian AOG can report to a German Luftflotte or its own national commands but not to a Rumanian air command).
The display on the Air Command label will change both according to how zoomed out you have the screen and will reflect the changes above. When zoomed in the label will show the number of fighters, bombers and utility aircraft, and the other information above. In addition, the bar and % on the right hand side will show how many planes are ready for operations out of all those in the relevant air group units.
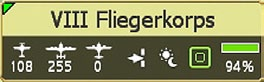
The icons will change as follows:
For when to fly:
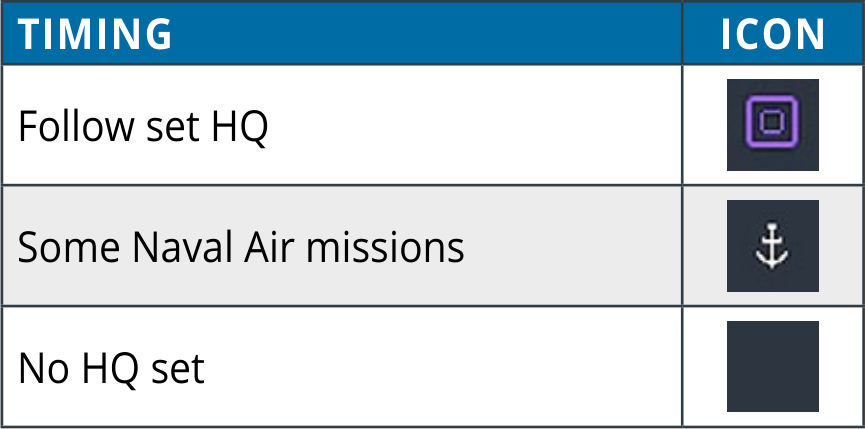
Naval air missions and Ground HQ assignment:
17.1.5 Differences Between Soviet and Axis AOG Options
In addition to the rules above, there are some important differences between how Soviet and Axis AOGs can be assigned to ground HQs or naval operations.
For Soviet AOGs the decision as to which ground HQ to follow and whether or not to conduct naval operations must be made at the Air Army level. Once this choice is made, the same options apply to all subordinate AOGs. In addition the Soviet Long Range Air Command will generate city bombing Air Directives following the priorities set by the player using the air doctrine screen (17.1.3). Note in this case, only the highest priority target will be selected.
Soviet air commands can only be assigned to either Front or Military District (Type 2) ground commands.
For Axis AOGs, only army or corps level AOGs can chose which command to follow and all lower level commands will assume the same option.
There are three exceptions to this rule for the Axis side:
- Any level of AOG can be set to conduct Naval Operations, if this is subsequently cancelled, the AOG will resume following the ground HQ of the relevant army or corps HQ;
- Any transport AOG can be set to follow any ground HQ;
- Any recon AOG can be set to follow any ground HQ.
German Air commands must be set to follow type 2 (Army Group) or type 3 (Army) ground HQs. Axis Allied Air commands can follow either a German or their own national type 2 and type 3 commands and in addition can be set to follow a type 4 (corps) HQ of their own nationality.
17.1.6 Setting AOG Stances and the Implications
A major part of using the AI assistance is setting the stances of your AOG. Your choices will determine how, and when during the turn, the AOG allocates its assets and whether or not it will move to follow the HQ it is assigned to. There are four stances:
- Flexible
- Hold
- Retreat
- Advance During the Air Planning Phase (or at the end of it if using Auto AI air assist) an AOG in a flexible stance may:
- Send air groups to the reserve (if they are deemed to be too weak to be capable of combat operations).
- Acquire air groups from the reserve.
- Gain air groups from other AOGs (this is based on asset priority and the transfer can include a complete AOG if that is appropriate).
- Transfer air groups to other AOGs (depending on priorities).
- Follow move, the AOG will redeploy to the location of the HQ they are following.
- Carry out Naval Ops against a port, the AOG will redeploy to better operate against the port.
There are further notes on how to use the stances in section 17.2 but in general use ‘Flexible’ when the front line is basically stable as this allows air units to adjust their size and deployment but broadly within the current geographical area. Advance and Retreat should be chosen when you are looking for your air force to redeploy as the front line shifts. ‘Hold’ will keep your air force deployed at their current bases (which can be efficient in terms of the demand for support squads and supply).
During the Air Planning Phase an AOG in a hold stance may:
- Send air groups to the reserve (if they are deemed to be too weak to be capable of combat operations).
- Acquire air groups from the reserve.
- Gain air groups from other AOGs (this is based on asset priority and the transfer can include a complete AOG if that is appropriate).
During the Air Planning Phase an AOG in a retreat or advance stance will undertake no particular actions but will still generate Air Directives as appropriate.
During the Movement Phase (and at the end of the turn if this is automated), an AOG with transport assets in a flexible or hold stance will:
- Air supply units (if following a HQ).
- Air supply airbases (if not assigned to follow a HQ). During the Movement Phase (and at the end of the turn if this is automated), an AOG in a retreat or advance stance will:
- Send air groups to the reserve (if they are deemed to be too weak to be capable of combat operations)
- Acquire air groups from the reserve.
- Gain air groups from other AOGs (this is based on asset priority and the transfer can include a complete AOG if that is appropriate).
- Transfer air groups to other AOGs (depending on priorities).
- Follow move, the AOG will redeploy to the location of the HQ they are following.
- Air supply units (if following a HQ).
- Air supply airbases (if not assigned to follow a HQ).
- Carry out Naval Ops against a port, the AOG will redeploy to better operate against the port.
17.1.7 Constraint on AOG Allocations
In addition to the rules above, there are some additional constraints on how AOGs might be used or allocated.
- The AI assist will not re-assign any AOGs from an air command (HQ or Corps AOG) that is set to priority 4 regardless of the relative demand for air groups across the front.
- Reconnaissance AOGs will not be assigned to a higher level AOG that has a different ‘follow HQ’ order. They can, however, remain attached to one that has a different HQ target (this allows you to adapt your reconnaissance effort without having to re-assign the AOG).
17.1.8 Air Transport AOGs
If using the AI automation /air assist, these will always move to depots with freight so they can then undertake supply missions during the ground phase. If they are following a HQ, they will position themselves to resupply units of that HQ. If they are not following a HQ, they will seek to resupply airbases.
In the example below, the Transport group will resupply airbases rather than support a particular ground command as FHQ is set to ‘None’.
17.1.9 Transfer Depleted Air Groups to the Reserve
The AI-assist will send depleted (16.4.12) air groups to the reserve if they meet any of these requirements:
- U-2 Rcn and R-Z
- All in AOGs set to priority 0
- Any Axis air group with experience below 45 after 7/43
- Any Axis air group that meets the conditions: (depleted or (morale + ready < 50)) and ready a/c < 2 (REST if condition met but ready a/c > 1)
- Any Soviet air group that meets the conditions: (understrength or (morale + ready < 60)) and ready < 4 (REST if condition met but ready a/c > 3) In this respect, the detailed rules are:
- For the Axis side, an air group is depleted if it has less than 25% of its planes and understrength if this is under 33%;
- For the Soviet side, an air group is depleted if it has less than 33% of its planes and understrength if this is under 50%.
17.1.10 Transfer of Air Operational Group Units
The component air units will be redeployed as they follow the ground HQ that their Air Operational Group or Air command is assigned to follow, or will move as appropriate to execute their naval ops or transport missions. This will happen when you press the AI-Assistance button unless you are using the Automated Assistance (when it happens at the end of the air or ground phase).
17.1.11 Creating Naval Air Patrols
An AOG can follow a HQ or conduct Naval Ops around a port, not both. If set to Navel Ops, the AOG will try to locate itself so it can fly Naval Patrol ADs and AS ADs off the coast of the port, with the intention to gain control of the sea hexes near the port.
In this case, the AOG may have a different focus (naval patrol) to its controlling air HQ.
If you select Naval Ops, a list of the possible targets will be shown as:
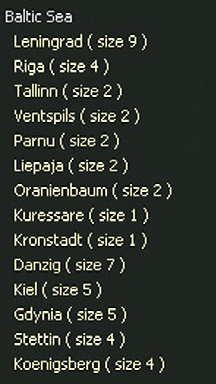
Select the port you wish to target (in this case Riga), and the AOG counter will no longer follow the HQ set by its Air Command and will show its focus on Riga:
If you subsequently cancel the naval mission you will need to reset the ground HQ the air command is to follow. If the naval operation was set using an AOG, then it will revert to the HQ being followed by its controlling air command.
17.2 Examples of How to Use the AI Assist
This short section tries to place some of the formal rules above into context. In the main the flexible stance is probably the most useful but it may not always give the desired effect.
17.2.1 Retreat and Advance Stances
The ‘retreat’ stance will be useful for an army conducting a strategic retreat as it will pull the air units back to the area where the HQ being followed is located. For the Soviets, in some instances you may want to link the air groups to a rear area Military District to achieve this in 1941 and 1942.
In turn the advance stance is useful if you carrying out a major offensive and want to keep the air force close to your spearheads. In either advance or retreat, this gives the player an opportunity to move his ground HQs before the AI air assist moves the units toward those HQs in the ground phase.
17.2.2 Specialised Support
Especially in 1941, the German player may find it useful to assign a Fliegerkorps to each Panzer Army. This will both ensure air support for your key formations and that the air force advances as rapidly as possible. Although it is possible for the Axis to have an air army or corps support an entire Army Group, this is not the recommended method.
For the Axis, it is usually better to have them support a specific army that is bearing the brunt of the fighting.
Fighters will always defend against any enemy air attacks or ground support, but given the limited Axis bomber forces, they are usually best assigned to the main assault armies. Given the number of Armies and Corps AOGs, it is possible to cover many different armies by having some low level AOGs report directly to each Luftflotte if desired.
For the Soviets, there are usually enough air commands/ air armies to attach one to each Front, although in the early war period, it may also be best to concentrate most of the Soviet air force in just a few of the air commands.
17.2.3 Bringing Air Units From the Reserve
The automatic system will send and remove air units from the National Reserve. Once they are on the map, they will be assigned to air commands depending on the priorities you have set.
17.2.4 Relative Priority
It is worth bearing in mind that the asset priorities are relative. If you set everything to #4 then the air force will try to be evenly divided across your commands. Especially for the Germans, you will need to ensure your air force is concentrated on specific sectors.
In effect, an AOG set at #4 will try to acquire twice the number of planes as one set at #2. However, the actual number of planes assigned will also be affected by the level of the chosen HQ. So a corps will try to get more than a low level AOG, and armies will be assigned more than a corps at the same priority level.
17.2.5 Triggering Redeployment and Reallocation
If you are not using the Automated AI Assist routines then you will need to press the AI assist button at least twice in a game turn (before air execution and before the end of the ground phase).
However, you can do it more often and this might allow you to fine tune both air unit allocation and deployment as you conduct your ground phase (especially if the situation is rapidly changing). Usually this is not advised as it will generate air transfers that take up air miles and reduce the available airpower supporting your ground operations.
If you don’t plan on doing any manual intervention in AOG movement or air directive creation, then it is advised you use the Automated AI air assist. If you think you might want to on occasion make manual adjustments, you should turn the automated game option off.
If you do this, you can, for example, press the AI assist during the air planning phase and then tweak some of the air directives that the AI has set up. Just keep in mind that if you press the button again, your changes will be wiped out as the AI clears the slate and creates new air directives.
Note that the game will pause while this action is carried out.
17.3 Manual Control
17.3.1 Manually Assigning Air Unit Groups from the Reserve
There are two basic ways of doing this. The first option is to select an airbase and the second is to use the Air Command labels.
It may be good practice to review the air groups in the reserve using the Commander’s Report before starting to move any to the map. You mostly will want to leave low experience and/or low morale formations in the reserve.
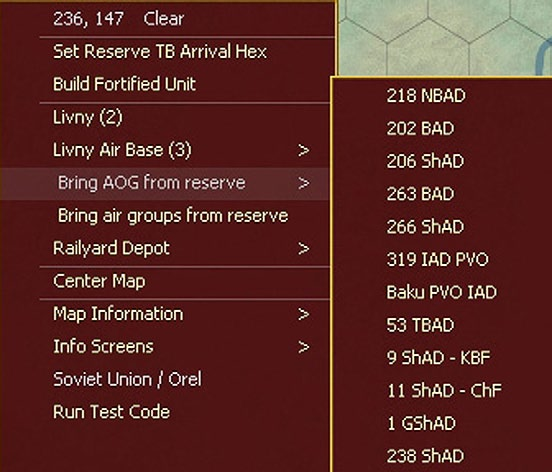
One option is to right click on an airbase on the map and then select the option ‘bring AOG/air groups from reserve’. In the example, below, the AOG option has been chosen
Select one (in this case the 206 ShaD) and the list of suggested air groups will be shown as:
By default, this will attach itself to the nearest Air HQ but that can be changed. You can tell it just to use Livny (as shown) or click ‘Multiple air bases’ and any planes in excess of air base capacity will be deployed nearby.
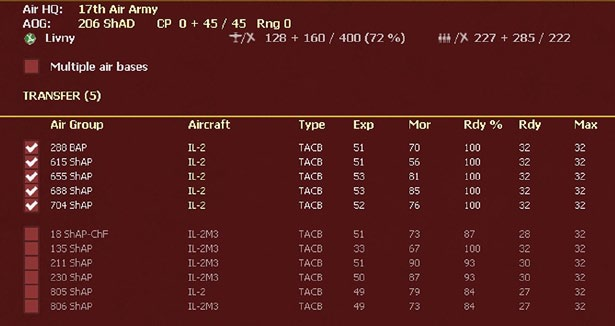
Air groups will not deploy if the air base is full, if the AOG is full or if the AOG is of a differently nationality.
Finally you can accept the suggested list, remove some (if you do not want to fill up the AOG) or replace them with other suitable air groups. Note that this type of Soviet AOG can only contain ground attack formations. Once you are content with your choices, click on TRANSFER.
If you chose the option, bring air group from the reserve, you will be taken to a screen that allows you to select any air unit that is currently available. You can filter or sort this tab in various ways to ease identification of the units you want.
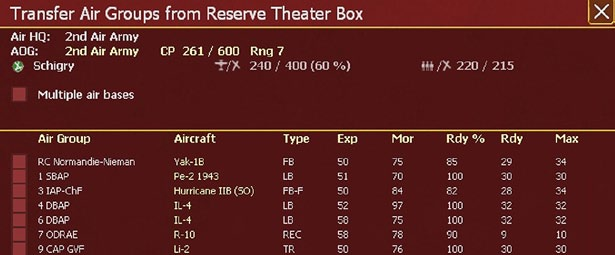
Select one or more air groups and click on TRANSFER (before doing so you may want to review the proposed AOG – here the 2nd Air Army – to a more suitable target). In these cases, you can also open the Air base tab and assign new air groups from there (37.16.2).
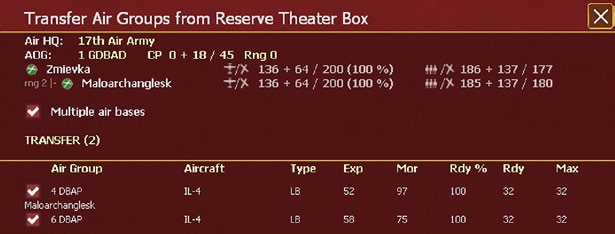
Alternatively you can bring new AOGs or Air units to the map from the Air Command label. In this right click on the Air Command and the routine to bring Air groups from the reserve will be shown.
You can alter the screen to link them to an existing AOG, spread over multiple air bases as:
A variant to using new AOGs is to use one already on the map. Right click on any existing AOG and if it has spare capacity it will be shown as the suggested command for that air group. Note what is available may be limited due to the restrictions on which plane types can be in which AOG (16.4.6).
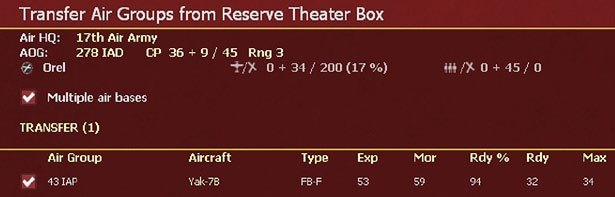
You can bring up a list of AOGs through the AOG tab on the Commander’s Report (35.4.2). This way you can see what air groups are already assigned to a particular AOG, what aircraft they have and how much capacity is available. This is helpful if you want to collect aircraft with similar characteristics under one AOG, of if you want to size your AOGs so that they will fit onto a particular type of airfield (16.6.6).
Here a single fighter air group will be added to the 278 IAD:
17.3.2 Sending Air Groups to the Reserve
There are several ways you can use to manually send air groups to the national reserve.
You can do so one by one by opening the air unit tab (37.16.3) or in bulk using the Commander’s Report (35.4.1).
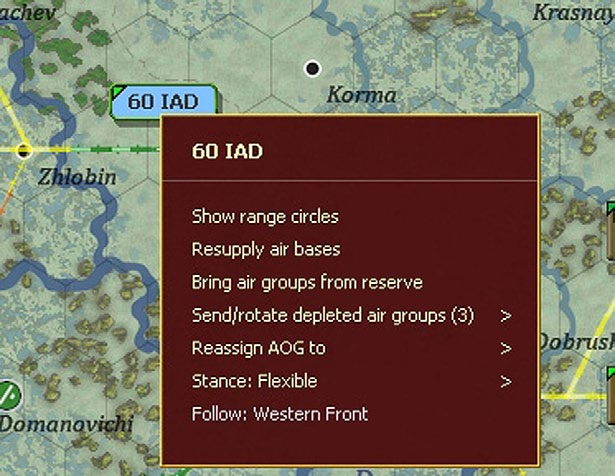
In addition you can use the AOG on-map label (37.16.4). In this case, right click on AOG label and select “Send/Rotate Depleted Air Groups”.
This will send back all the depleted units in the AOG (and down the chain, if you have selected a higher command) and tries to replace each with an air unit from the reserve with a similar profile. The AI chooses what it thinks is the best unit from the reserve. When you roll over the Send/Rotate option a window will appear showing all the units that will be returned and any units that will come from the reserve for each of these. The player can select the option to return the depleted or the option to rotate in the replacement units (which sends and then rotates in a replacement).
17.3.3 Maximum Air Units for Each Air Operational Group
There is a limit to the number of air units in each AOG.
Each air units costs a certain number of command points based on its size:
- Group = 9
- Squadron = 3
- Flight(Stab)= 1
AOGs, in turn, have limited command points determined by their type:
- Low level (regiment/brigade/division) = 45 points
- Soviet Corps = 120 points
- Axis Corps = 180 points
- Armies = 600 points
So, a Soviet Division or Axis Regiment AOG will only be allowed to have 5 groups, or 15 squadrons. Soviet corps can have up to 13 groups and the Axis corps 20 groups. An Army will max out at 66.
17.3.4 Manually Moving Air Operational Groups
Using manual control, you can redeploy your air units. You can opt to move them by individual Air Operational Group or the complete command.
To do this, first left click on the desired AOG/Command;
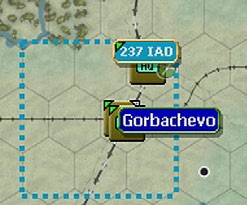
- If you want to keep the same shape then press and hold shift and move the rectangle on the map to the group of airbases you want to assign the AOG to, then right click.
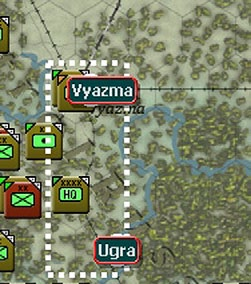
- If you want a different shape, then press and hold CTRL and left click on the map and then draw a shape around the airbases you want to use (a pop up will tell you how many airbases are in the selected box) and then release the left click.
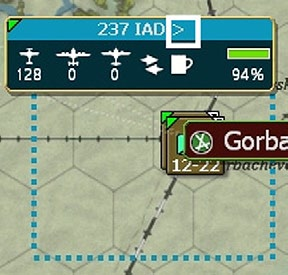
- Once you have selected the target, the plotted move will be shown on the map. If you wish the transfer to occur immediately (as opposed to waiting for the next logistics phase), you can right click on the AOG and then select an immediate transfer. The AOG will now have an > after its name to indicate it is ordered to move.
- If you select the wrong target air base by mistake then you need to cancel that transfer before selecting a new target air base
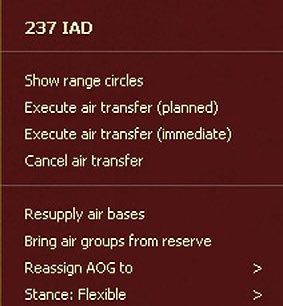
- To trigger the move, right click on the AOG and tell it to execute the transfer:
If you order ‘immediate’ transfer this will happen regardless of the situation at the target airfields (so you may find your planes lack supplies and supporting ground crews). If you order ‘planned’ transfer this might be delayed till the target airbases have sufficient support squads, supply and fuel to enable operations (usually during the logistics phase). A pop up will tell you how many air units were moved.
In this example, the AOG is now set among the AOGs of the 15 Air Army, Depending on the missions you wish to set, it might be easier to convert it from 1 Air to 15 Air.

If you want to leave some air units on existing bases but to spread out others to new bases then:
- Left click on the desired AOG
- Click on the air base – this will bring up a list of the air units at that base
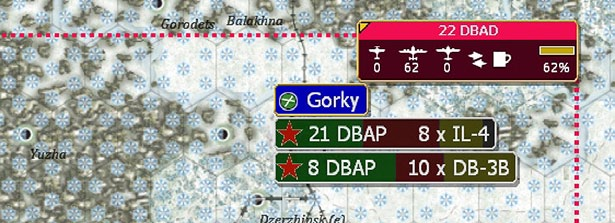
Here we have the 22 DBAD and its formations at Gorky airbase.
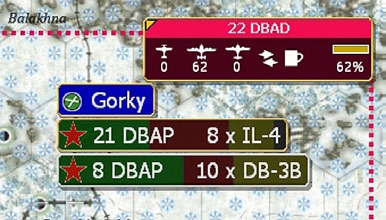
Select the units at the airbase you want to transfer by left clicking on each (or select none in which case all units at the airbase will be ordered to move). In this case, we only want to move the Il-4s, by left clicking on that air group (the display will show a gold box around the chosen formations).
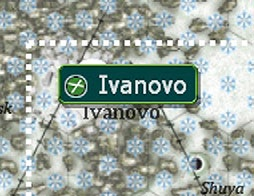
- Press down CTRL+left mouse to draw a box around the intended target airbases (here the move is ordered to Ivanovo).
- Indicate how you want the transfer to progress.
- Once you have determined the desired redeployment you can order it to happen immediately or only if the target airbases can support the incoming planes.
In this case any air groups that could not be moved immediately will redeploy in the logistics phase when the airbase has sufficient support elements. The move options are now the same as for the transfer routine above.
17.3.5 Creating New AOGs
Technically neither player can create AOGs. They are allocated (and removed) using the reinforcement system. However, if an AOG has no air groups then it will not be shown on the map.
As such it can be brought to the map either as part of transferring new air units from the reserve (as above) or to allow air group units to change their command to a new AOG,
17.4 Manually Setting Air Directives
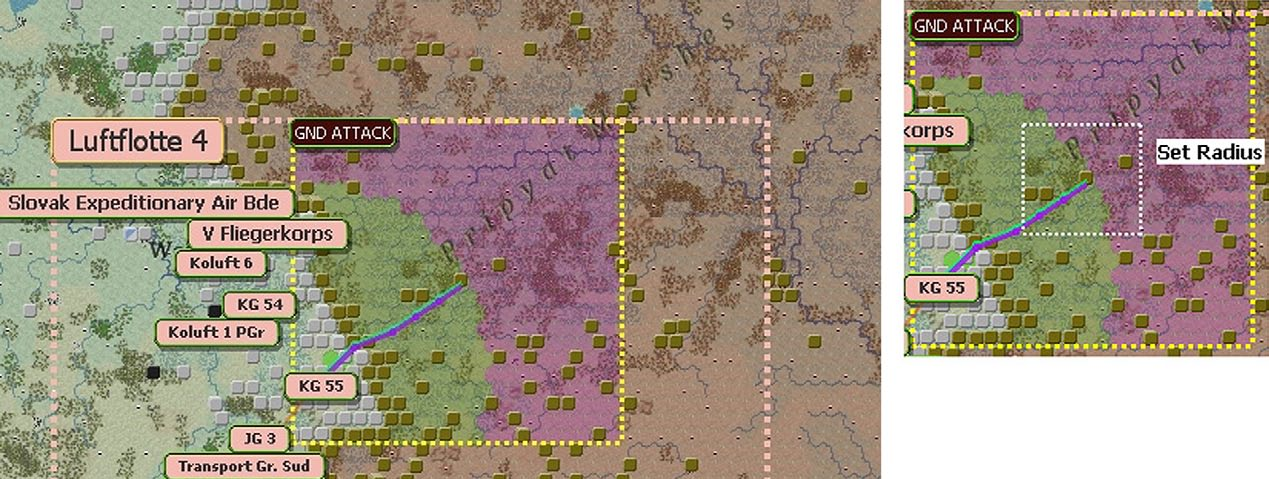
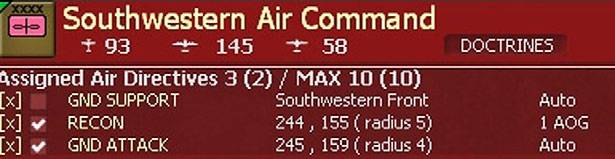
If the player wishes to create a completely new air directive the first step is to select the relevant mission filter (F2-F7) and then select the air command you wish to use.

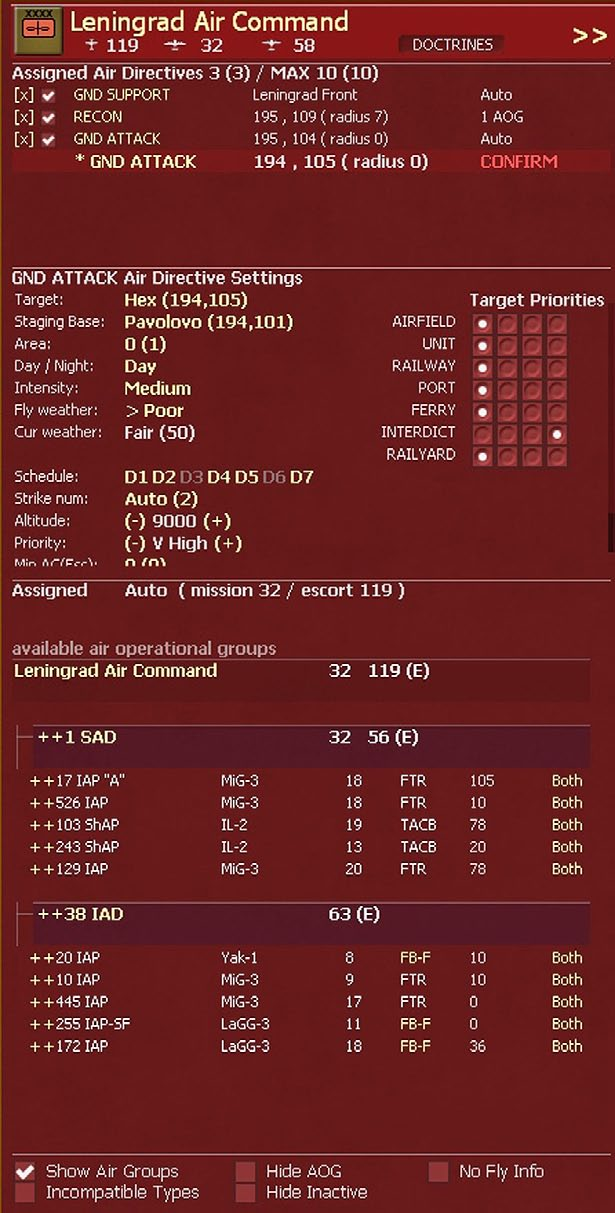
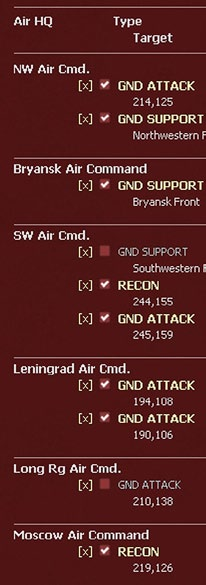
In this case the F3 (ground attack) option was selected and then the Leningrad Air Command label, giving a view such as the screenshot on the right:
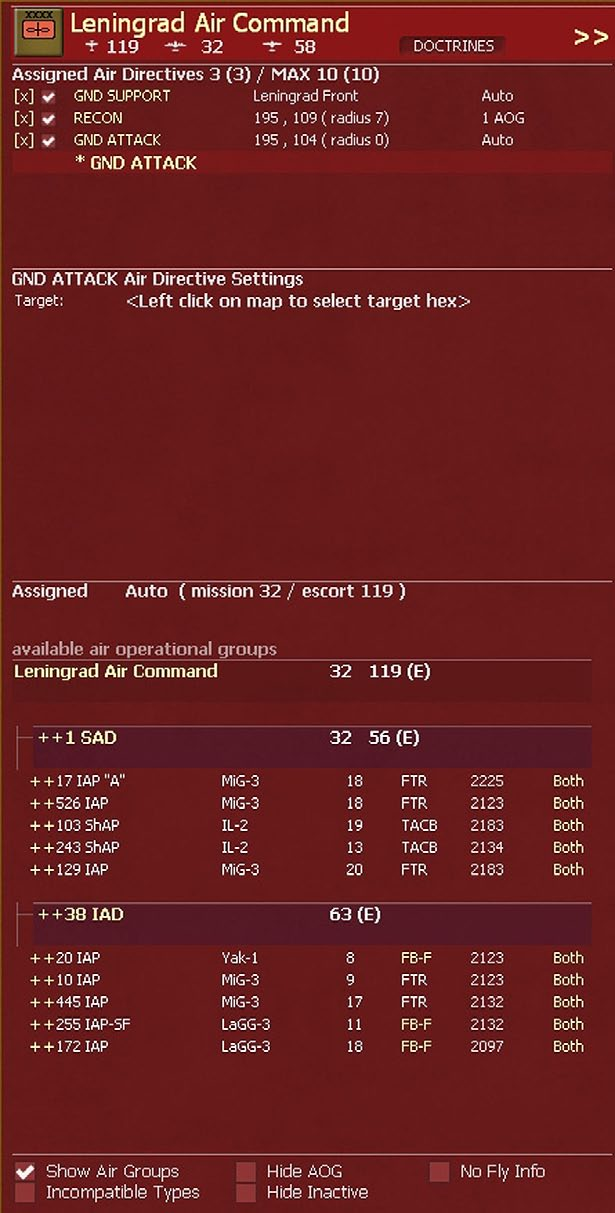
This shows all the existing air missions for that command and the AOGs that report to it.
The focus of each mission is set out in 18.1. Once you have selected a type, and target, assign the relevant air groups and, if needed, adjust the flight path.
17.4.1 Manual Options for Setting Up an Air Directive
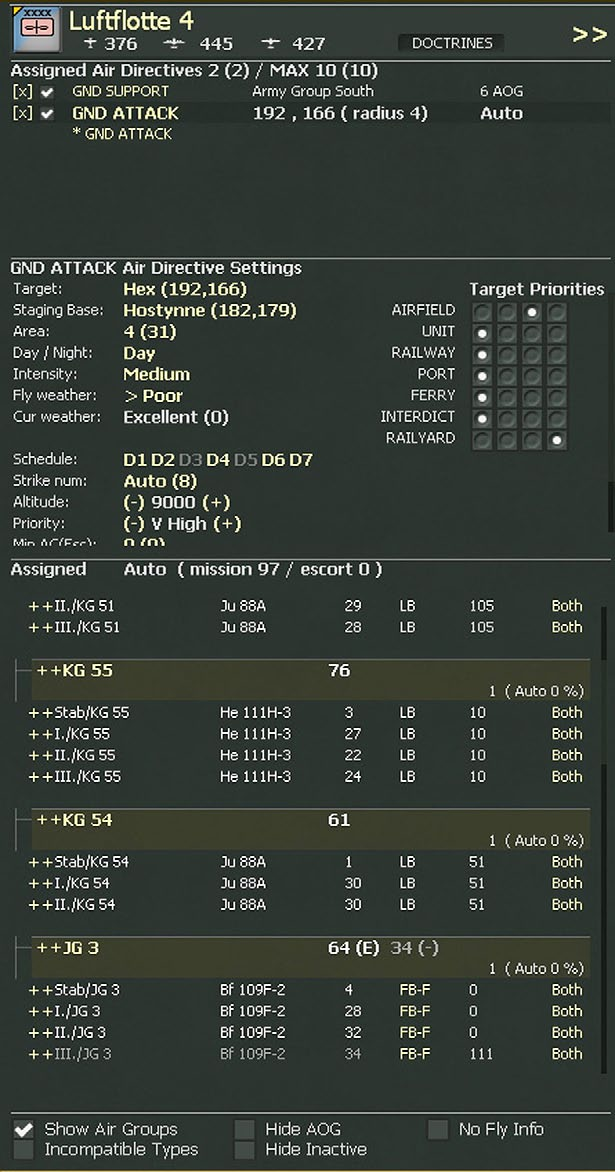
To create a new AD, select ‘GND ATTACK’ and then click on a hex as the centre of that mission: The map and the display will change to:
You can click on CONFIRM and the mission will take place as shown using the default settings or you can adjust the variables.
Type is set by the air directive you have selected and cannot be modified in this screen.
Target determines the central hex of the mission. Note that for a Ground Support (18.1.3) Air Directive this will be replaced by a display showing all the available HQs that can be the focus of the mission. Note that reconnaissance missions (18.1.6) can only be set up to target an enemy held hex, and naval patrols can only be set up to target water hexes.
Staging Base determines the intermediate air base that is used to gather the planes used in the mission.
Note manually adjusting this can increase or decrease the number and type of planes available to a mission.
Area sets the size of the mission target area around the target hex. If this is set to 0 then only the target hex will be the focus of that air directive.
Day/Night determines if this mission will take place during the day or the night. In turn this might influence the type of planes available depending on if air groups have been set to day or night only missions.
Intensity will determine how aggressively the mission will be conducted (and how quickly pilots will gain fatigue). Weather is used to set the worst conditions that the mission will take place. Beneath this is an indicator of the current weather conditions for the region selected for the mission.
Schedule will determine which days of the week a mission will take place. Clicking on a day will deselect or select that day for operations.
Strike Num will be either automatically determined using the strike intensity set above or can be manually set by the player. It will set the number of missions that particular air directive will try to carry out during the air execution phase.
Altitude determines the altitude at which planes will fly to the mission area and their altitude when conducting the mission. Remember that fighter bombers and tactical bombers will actually attack at a much lower altitude. It can be adjusted using the (-) or (+) in increments of 1,000 feet.
Priority will determine the order in which missions are flown and this is particularly useful if you use the auto- allocation routine for assigning aircraft. It can be adjusted using the (-) or (+) to alter the priority (from very low to very high).
Min AC (ESC) sets the minimum number of bombers/ fighter bombers and the minimum number of escorts that must be available in order for a mission to be launched. A text box for each type of aircraft will be displayed sequentially. As long as the minimum is available, a mission will be flown.
Req AC (ESC) sets the requested number of bombers/ fighter bombers and the requested number of escorts that the player would like to have fly the mission if available. A text box for each type of aircraft will be displayed sequentially. If no player input, then REQ AC(ESC) will match MIN AC(ESC). If MIN AC(ESC) is available, a mission will be flown.
Follow Path: Toggle Yes or No. When Follow Path is set to Yes, the missions will fly along the flight path until they reach the last waypoint, and then fly from that waypoint to the specific target hex for the mission. When set to No, the mission will fly directly from the staging base to the specific target hex for the mission.
Part ESC: Toggle link to yes or no partial escorts. If set to yes, than escorts that cannot fly all the way to the target are counted as escorts for meeting the minimum and requested number of escorts for the strike. If set to no, then only escorts that can fly to the target will count for these purposes.
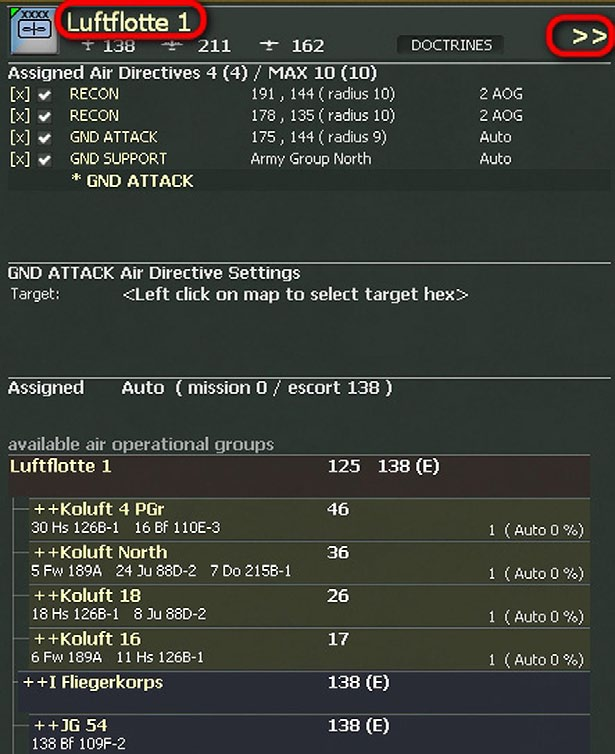
To exit from this screen, either click on the air command title or the » arrows at the top:
17.4.2 Assigning Air Group Units to Air Directives
Once you have created an air directive you can assign the air groups in various ways. There are three choices in this regard: Automatic; manually using air groups; or, manually using AOGs.
If you manually assign air groups or AOGs to a particular Air Directive they are then not available for any other AD in that turn.
This can actually be a very efficient option as the same planes can take part in both a ground attack mission and fly ground support in the ground movement phase.
By default this will be set to Auto, here the AI will select appropriate air units from those in the Air Command and use them for this (and other) Air Directives till they have used up all their air mileage for the turn.
When manually assigning air groups to air directives you have the choice of using the AOG or the Air group (you cannot mix this but you can tell a given AOG to split its assets between missions).
If you want to use the Air group option you can do this from the normal display (just select air groups rather than AOG) or by selecting Hide AOG at the bottom of the screen and all the eligible air groups will be shown. In either case, click on ++ to assign the groups you wish to use:

If you display the AOG, then you allocate using the ++ buttons next to the AOG title:
You can alter this by removing air units with the (–) button.
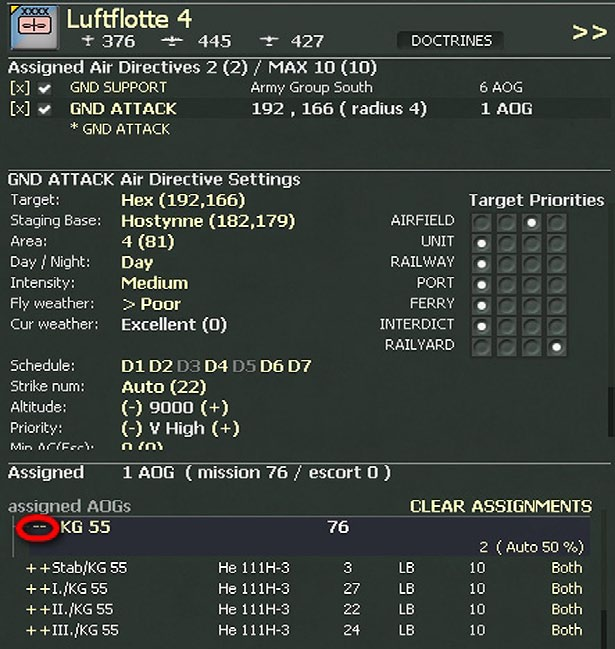
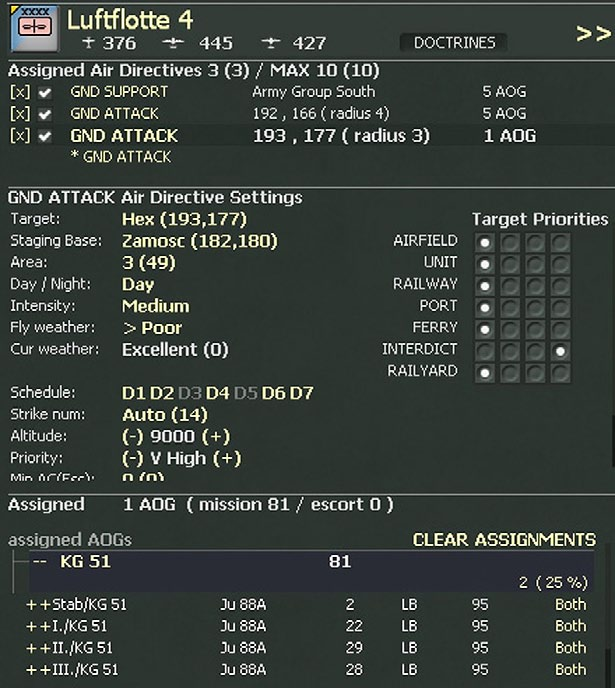
You can assign a given AOG to support more than one air mission. So using the example above if KG51 is now allocated to a new mission, by default it will seek to split its planes 50/50 between the two.
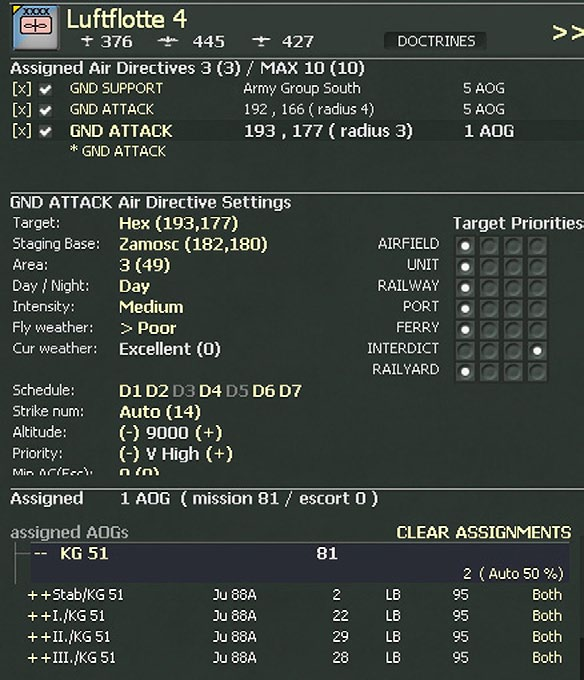
If you want to change this default allocation, click on the text Auto 50% and this dialogue will appear:

In this we want 25% of the planes on this particular AD, so the assignment for KG51 alters to:
When assigning air units to an AD, you must decide to either do so using the AOG system or by assigning individual air units. If you try to add an individual air unit to an AD populated with AOGs then they will be removed.
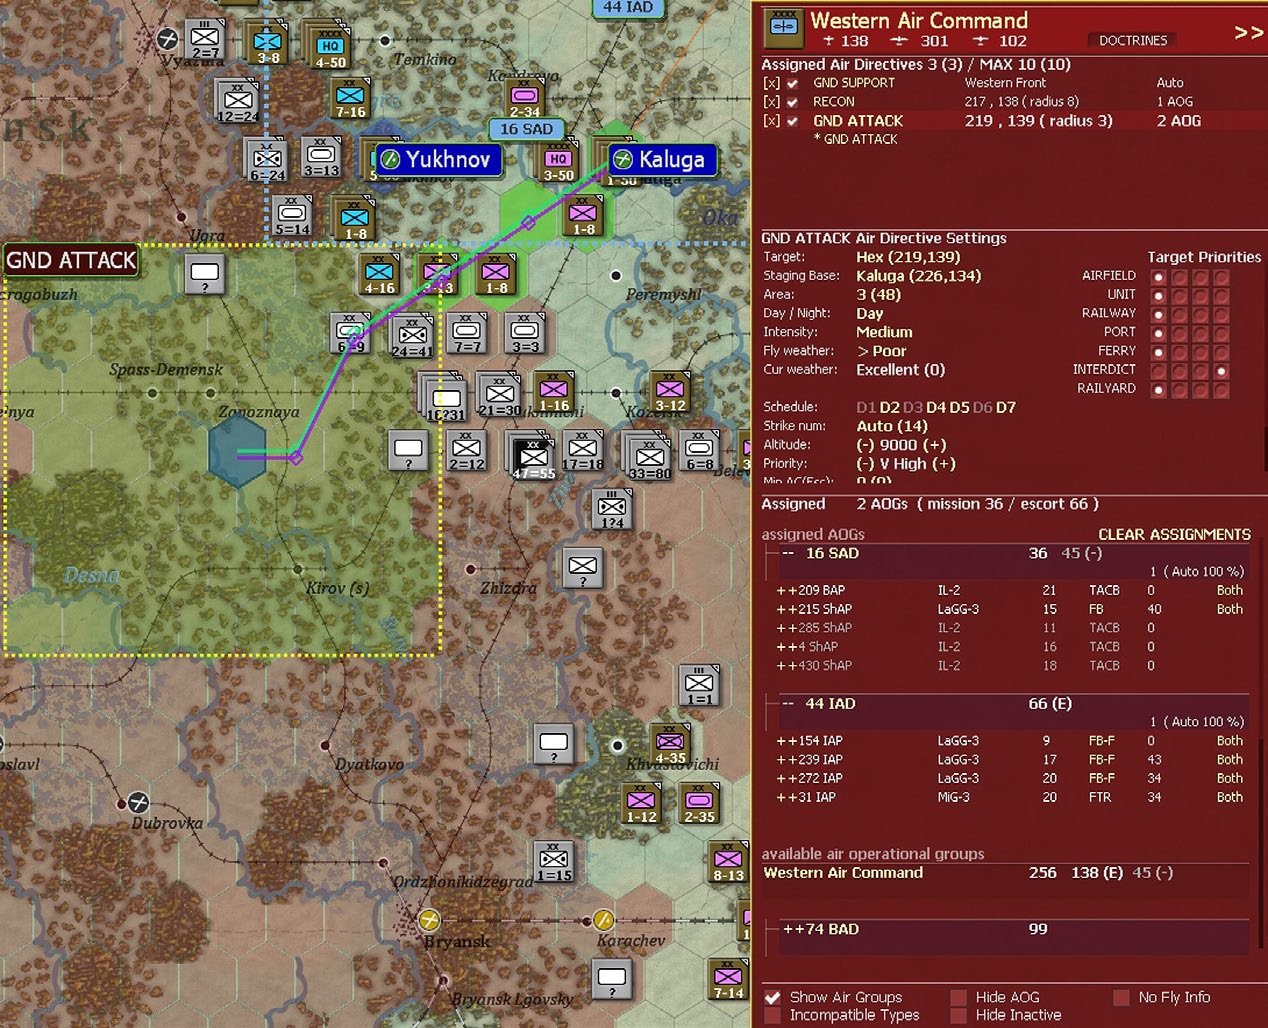
On screen the display of an AD will alter according to how it will operate. If either no planes can reach the designated zone, or part of it is out of reach, then it will appear as transparent on the on map.
At certain zoom levels the label in the top left hand corner will expand to show how many AOGs are involved and whether they were manually or automatically assigned and how many eligible planes can reach the target area.
The AOGs that actively contribute to a given AD will be highlighted when that AD is selected and the others become more opaque, as:
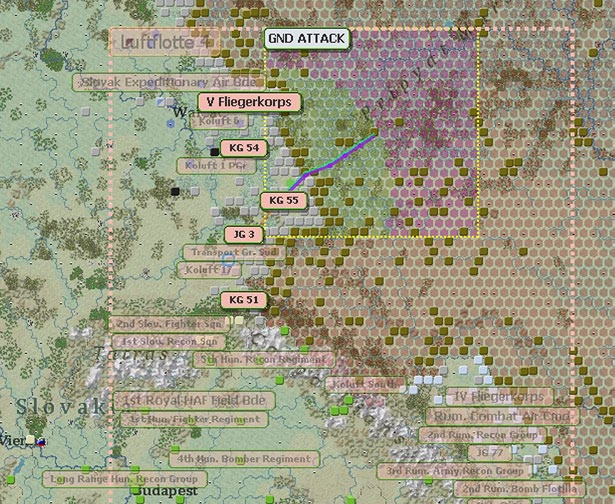
If no planes can reach the set AD, then this background will become reddish.
17.4.3 Altering Existing ADs
You can change existing AD using all the steps above. Such changes can be made to AD created in an earlier turn, those set to be dormant for a turn (or more) or those created in the current air planning phase.
Note that you can amend existing AD either using this screen or the on map display, this can be used to reset the target area or to access the AD screen as above.
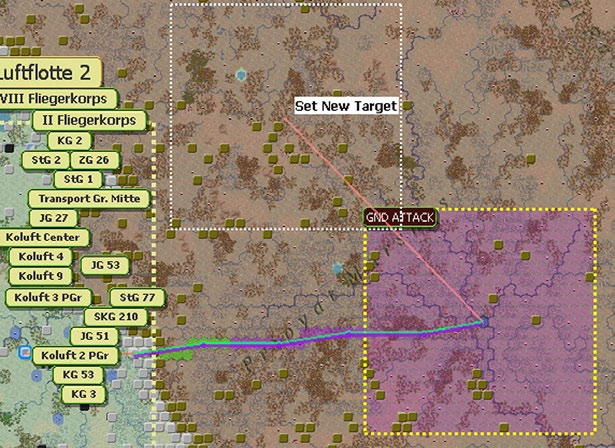
Note that you can amend much of the details of an AD from the map as well. If you left click (and hold this down) on the border then you can adjust the size (bigger or smaller) of the target zone for that AD, as:
Alternatively, if you left click anywhere within the set area, you can move the AD to a new location, such as:
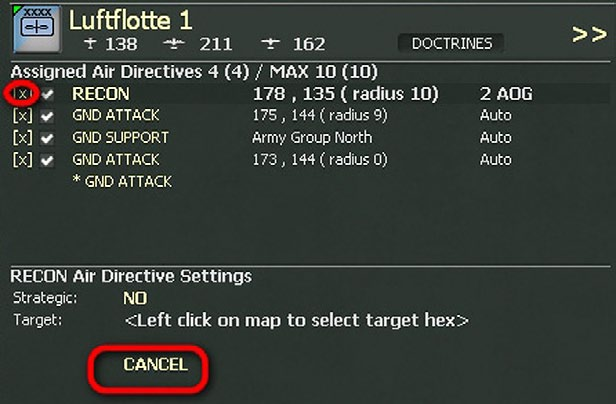
If you want to remove an existing AD, you can do so using the [x] button on the left hand side. If you start to amend an AD and then wish to stop the CANCEL option will come up (if you have starting by amending the target hex or staging base), as per the bottom left screenshot.
In addition, if you have an AD displayed on the map you can click on the current staging base and drag it to a new location.
17.4.4 Air Doctrine
When you create a new Air directive by default it uses the parameters set in the Air Doctrine screen. You can overwrite these as you see fit.
The Air doctrine can be accessed from the Air Directive box above or from the tabs. If you move from the Air Directive by default it will open with the Air Doctrine screen for that particular Air Command (see figure 17-36 opposite).
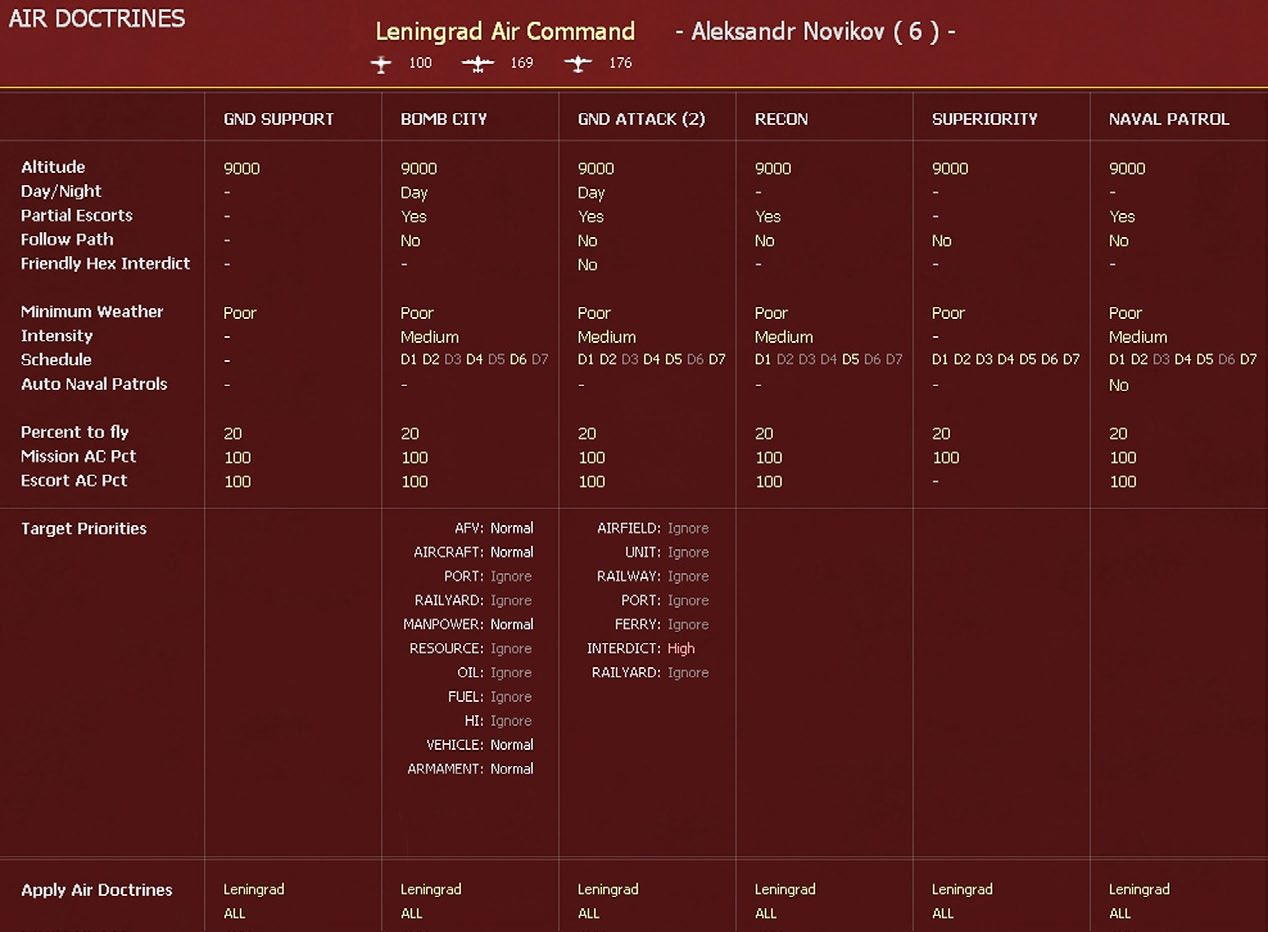
It can be used to create the basic rules for how each air command can carry out any air directive. The ground support tab maybe particularly important as that will always follow the criteria set here.
You can amend these variables as you see fit and chose if they will apply just to the current Air Command or all your entire air force.
17.4.5 Manually Adjusting the Flight Path
The map will display a green line showing the path to the target, and a purple line showing the return path. The green hexes indicate the part of the path protected by escorts, while the purple hexes show hexes without escort on the path to the target. The waypoints on the paths can be adjusted. Left click selects green path waypoint (or both if in the hex) and right click select purple path waypoint. Once a path is selected, left click in hex to move waypoint(s) to the selected hex.
Note that changing the staging base can also adjust the automatically generated flight path.
17.4.6 Manually Cancelling and Suspending Air Directives
The player can cancel or suspend an existing air directive. Note this action can also be carried out using the air directive screen.
Alternatively it can be done using the air planning screen. In either case, if you click on the [x] this will cancel the air directive and it will be removed from the potential list. Alternatively if you click on the [√] then the mission will not operate in the current game turn.
The advantage to just suspending the mission is you can easily set up the mission in a later turn without having to create a new Air Directive.
17.4.7 Summary of the Air War UI
Much of this exists in section 6, especially 6.8.3 for how Air Directives are shown, 6.8.4 for interpreting the display of AOGs (also covered in 16.3) and airbases (6.4.7). The information on HQs can be found in 6.5.7.
Information on how to use the on-map functions to resize and move AD can be found in section 17.4.3 and on how the map display alters as the air turn is resolved in both Chapter 6 and section 18.4.
Section 37.16 in the appendices covers all the boxes, tabs and displays.
In addition, the two one-page guides are invaluable in covering the key mechanics.