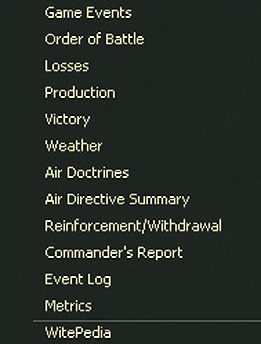
6. User Interface
Focus: This section sets out how the game interface works and how to access key information on the map and from the background reports.
Key Points:
- The different available sets of tabs across the top of the screen
- How to set, change and interpret the soft factors on each unit counter
- The different sets of tabs that are available during the air planning and ground movement phases and how you can use these to carry out on-map actions with your air and ground units
- Information that can be displayed on the playing map
- Information that can be accessed about individual units
- How to access the information in the various Theatre Boxes
- Some indications of how to bring together all the information on specific topics
- Note that almost all the information can be accessed using the tabs, a relevant hot key or by right clicking on any map hex
The interface consists of a top panel, map area, unit bar (when units are selected) and a number of associated screens and windows for providing information and conducting various actions.
As previously discussed, with the exception of some actions in the map area, selecting is done by left clicking with the mouse on buttons and selectable text links.
6.1 General Conventions
This section sets out some of the conventions used in the UI, more detailed information as to what each option means is set out in section 6.2 onwards.
6.1.1 Top Panel Boxes and Buttons
The buttons along the top rows allow you to do one of five things:
- Access another screen, an example of this is the option to open the detailed Order of Battle Display (36.1);
- Carry out in-game actions, an example of this is the F1 tab in the ground movement phase which allows you to move ground units using tactical movement;

- Alter how the map is shown, an example of this is the option on the map information screen to show enemy held hex

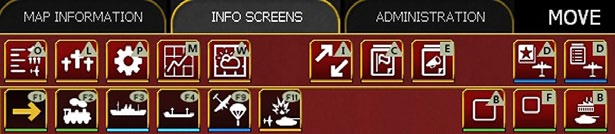
- Some buttons lead onto a secondary set of options to select. An example if the battle indicator tab (F11) on the map information display that in turn is sub-divided to show all battles, air battles only or land battles only;
- If the hex selected contains a depot, the right hand side of the display will show the depot and its current priority. The priority can be amended directly from the display. If no depot exists, then this display can be used to order the creation of a depot. A similar set of options exist for airbases.
Note that the panel is shaded brown when the Soviet side is active and grey if the Axis side is active.\
6.1.2 On the Map Display
Placing the cursor over any hex will see a pop-up box. The information shown will vary substantially according to what is in the hex and any other choices (such as having selected the logistics display 6.9). This will always show the weather, terrain, any physical features such as towns or rail lines and if the hex is adjacent to a river. If units are in the hex, some information will usually be shown (again varying according to the Fog of War (10.2) and other display choices).
Right clicking on a hex will give access to further options in terms of on-map information, the ability to access various information screens) and some information about the country and region of the hex.
6.1.3 Tabs, F-Keys and Hot Keys
Almost all the information options can be accessed either via the various tabs at the top of the screen, right clicking on the map, using the F# keys on your keyboard or via hot keys.
So if a given option is described as the F1 tab, this can be accessed via the tabs at the top or depressing F1. A full list of the hot keys can be found in Section 36.
In addition to these options, many functions (and map views) can be accessed by right clicking on any hex on the map.
In the main, any action can be conducted using any of these options so you can interact with the game as seems most logical. In a few instances, some options may not be available due to how the various elements of the UI interact. The available methods for each option are set out in detail in the rest of this chapter.
6.1.4 From the Information Screens
This is discussed in more detail later in this chapter and in the relevant annexes, but you can return to the map from the various information screens at a particular hex (and for example have the relevant detailed battle report showing) or to the location of a given unit.
6.2 Top Panel
The top panel both provides information and allows interaction with the map area and on-map units.
It is best described as being divided into four rows of information:
- The top row is a standard windows style toolbar, on the left side will be information about the current build, the scenario being played and the last save generated, on the right are the standard windows tabs for minimising a screen, reducing screen size or to exit the program.;

- The second row from left to right gives 3 tabs that in turn affect what is displayed in the row below, some information about the game turn, status of ground support and other information (this will vary according to whether the phase is the air planning phase or ground movement. The example below is from the ground movement phase (indicated by MOVE) and the player has Ground Support (18.1.3) off.

- On the right hand side will be a box that will contain information on how many administrative points (Chapter 9) are available, game turn by date and turn number. This box may also include a city/location name, an airfield indicator and information about a depot if these are present in the selected hex;

- The information in the third row is a series of tabs, these will vary according to choice made in the row above but mostly will allow to access other screens or change the on-map display.

- On the right hand side is the option to change the ‘soft’ filter (6.5.11) which will change the information shown on the unit counters;

- The fourth row contains tabs that can be used to carry out game actions or access information, this will vary depending on whether it is the air planning phase or the ground movement phase (the example below is from the ground phase):

- On the far right hand side will be the key to execute the air directives or to end the turn.

With the exception of the title bar, the top panel colour will be grey during the Axis player turn and brown during the Soviet player turn.
6.2.1 Title Bar
This is a standard MS Windows title bar with minimize, maximize and close buttons. It will display the game version number and the name of the scenario currently loaded.
Note that the player must use the title bar close button (X) in the upper right corner to exit the program during the computer AI turn as there is no other way to close the game while the AI is running its own turn.
6.2.2 Second Row

On the left hand side here are three tabs. These give access to the detailed tabs in the row below and the available set will vary depending on if ‘map information’, ‘info screens’ or ‘administration’ is selected. Some options will only appear during either the air planning or ground movement phase, others are available in both.
The centre will show the type of orders you are giving to your air units or ground units depending on which tab you have selected during the relevant order phase (see the information on the Fourth Row below). Next to this it will show whether or not Ground support missions will be flown. The image below shows how this information will appear in the ground phase (1) or the air orders phase (2).

On the right hand side is a box with variable information. In every case, this will show:
- The number of unused administrative points available to the player;
- The game turn (by date);
- The game turn (by turns since the start of the particular scenario).
If a hex on the main map has also been selected, one, two or all of the following information may be shown:
- Location name – most likely the name of the town or city in the hex. Clicking on this will open the detailed tab for that location (37.13);
- If the hex is also a port, either a permanent built structure or a temporary port generated by a naval invasion (24.7), then an anchor will be shown to the right of the name
- Airfield – this will be coded as it appears on the map. Again, clicking on this will open the detailed tab for that airfield (37.16.2);
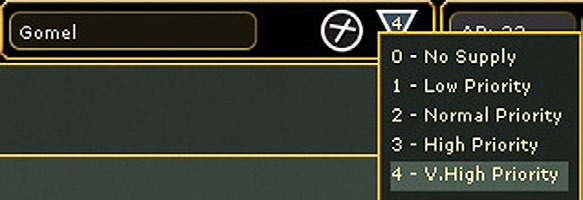
- Depot – this will indicate the type and the current supply priority (25.7). Supply priority can be amended from a pop-up menu. If you want to open the detailed tab, you need to click on the location name to the left.
Note that if an airfield or a depot could be built in the hex, the option to do so will be shown here.

6.2.3 Third Row
The information here will vary according to which of the menu tabs (above) you have selected. The bulk of the line is made up of a series of tabs that allow you to access information either on the main map or from the detailed information screens. On the far right is a drop down menu that allows you to change the information on the game counters to show information such as supply state or other useful information.

Map Information Tab

The tool bar buttons associated with this tab allows you to amend the main map display to emphasise information you currently wish to see. Clicking on most of these buttons will turn on or off the additional information and they can often be used in combination.
In general if a tab is shown as white it has not been selected, if it is shown with a yellow image it is currently selected.
From left to right, the options are:
- View Units on Map: Hides all on-map units when toggled to allow a clear view of the map area
- Zoom Map in: Five zoom levels available.
- Zoom Map out: Five zoom levels available.
- View Enemy Hexes: Distinguishes between friendly, pending friendly and enemy hexes (7.3). Friendly hexes will be clear. Enemy hexes will be shaded rose, and hexes you have captured this turn will be shaded grey.
- View Fort Levels: Displays a circular symbol with a number in hexes that have a manmade fort level (20.1) (this will show any hex with a fort > 0). The inner ring of the symbol is grey for Axis fort levels and brown for Soviets fort levels and the number indicates the current fort level;
- View Rail Damage Info: Displays status of railroads in friendly and recently captured friendly hexes.
- Combat Delays: This will show the additional movement cost to leave a hex if there was a battle in that hex this turn (22.2.7);
- Show on map command links: This gives two options and determines how the command links between units are displayed; Command Efficiency and Command Quality (6.5.2).
- View Unit Modes/Isolated: Highlights on-map unit counters with a colour border according to one of five different modes. This will also identify units that have just arrived that turn or are due to withdraw in the next 5 turns;
- Supply priority: This will show the relative supply priority (from 1 to 4) of each HQ and their attached combat units (6.9.3);
- View Logistics Information: This function can be toggled in conjunction with other functions, and will display detailed information about depot locations, rail usage and the supply system (6.9);
- View Factory Locations: Town, City and Urban hexes with factories, to include manpower, ports, railyards and resource production have their hex shaded red and display symbols for each type of factory present.
- City Capture dates: Shows the historical dates that key cities changed hands. The information is used as part of the Campaign game victory conditions (29.1);
- Road Display: Changes the on-map display to clearly show the location and quality of the road network;
- Weather display: Brings up further options to variously show air and ground weather, ground weather only, air weather only or to turn off the weather information on the main map;
- Victory Locations: this shows the on map victory locations (both for campaigns and scenarios) and the basic value and any potential extra points for early capture;
- Show interdiction levels: shows the interdiction level of a given hex, note that interdiction can be generated both by air attacks and Soviet partisan actions;
- Air recon values: shows the air reconnaissance value for each hex, can be filtered to show the reconnaissance that is used for ground attack missions or for strategic bombing;
- Show air directive targets: Displays the layout of current air directives, can be filtered to all of these or only those aimed at ground targets;
- Show map flak: Displays the flak value of a given hex, can be limited to only show flak generated by AA units in cities or all the flak affecting a hex;
- Show Air Operational Groups: Displays the locations of AOGs on the map (16.3);
On the far right side of this toolbar is the option to set the ‘soft factor’ for the on-map counters. Clicking this will bring up a further set of options and each allows you to change the look of the on-map counters to display information about a particular aspect (6.5.11).
Info Screens Tab

The majority of the screens accessed through the set of tool bar buttons on this tab are informational only. Note that all these functions can also be accessed via right clicking on any map hex.
Information on how to interpret these screens can be found in both the referenced section of the manual and in appendices.
- Display Order of Battle Screen: This screen provides the phasing player a complete Order of Battle down to the individual unit level and also provides a summary of the status of each country’s army and air force (36.1).
- Display Loss Screen: This screen provides the phasing player a summary of each side’s current casualties (disabled and destroyed) and permanent losses in terms of men, guns, AFV’s, vehicles, and aircraft (36.2).
- Display Production Screen: This screen displays production information for aircraft, ground elements, vehicles, ships, supply, manpower, and various other inputs to the production process. The phasing player will only be able to see information for their side (36.3).
- Display Metrics: This will take you to a series of charts that allow you to track various aspects of the game over time (36.4);
- Display Weather Screen: The weather screen displays the prevailing weather conditions graphically super- imposed on the map area and provides link to the dominating weather conditions table (36.6).
- Display Unit Reinforcement and Withdrawal Screen: This screen lists reinforcements and withdrawals for the phasing player (36.7). This will include all movements between Theatre Boxes.
- Display Commanders Report Screen: This screen is, in turn, a multi-tabbed list of information on units, leaders, equipment and battles that can be sorted and filtered in numerous ways. In addition, many unit settings can be changed for both individual units and groups of units using this screen (35).
- Display Logistics Phase Event Log Screen: Provides information on numerous events that have occurred during the most recent logistics phase as well as reporting on some actions that occurred during the previous ground and air execution phases (36.9).
- Display Air Doctrines Screen: The air doctrines screen lists each air command and applicable current settings for each air directive type (ground support, bomb city, ground attack, recon, air superiority, and naval patrol) (36.10)
- Display Air Directives Screen: This will show you the current set of air directives by Air HQ (36.11)
- Go to Theatre Box screen: This will take you a detailed listing of all the units assigned to each off map Theatre Box (36.12)
- Display Victory Point Screen: There are two different types of victory screens, one for campaign scenarios and one for all other scenarios. Both types of victory screens provide a running tally of current victory points, to include displays how victory points are earned for each side during a scenario (36.13).
- Display WiTEpedia: This will provide historical background on the various historical formations represented in WiTE2 (36.14)
- Display Events: This will allow you to see events that have already occurred in the game after you dismiss them at the start of the turn (36.15)
- Display Turn Summary: Brings up a useful quick summary of major changes in the last turn to both sides OOB, identifies units that maybe low on supply and the current situation in respect of the victory conditions (36.16).
Again, on the far right side of this toolbar is the option to set the ‘soft factor’ for the on-map counters. Clicking this will bring up a further set of options and each allows you to change the look of the on-map counters to display information about a particular aspect (6.5.11).
Administration Tab

The following screens are included in the Administration tab toolbar:
- Quit and Exit to Main Menu: Exits the current scenario and returns the player back to the main menu screen (2.2).
- Show Preferences Screen: Allows the player to review and change the user and map preferences (36.17).
- Show Game Options Screen: Displays the Game Options Screen and allows the player to change options if not locked out due to PBEM mode (36.18).
- Show Hotkey List: Displays the complete list of Hotkeys available (36.19).
- Show Save Game Screen: Allows the player to save the current turn (2.7).
6.2.4 Fourth Row
The options available here will vary depending on if it is the Air Planning Phase or the Ground Phase. The same set of buttons will appear regardless of if the Map Information, Info Screens or Administration group are showing in the third row.
The majority of the buttons in these toolbars allow the player to select the different modes used to plan air directives or conduct actions in the map area. Most of these tabs enable you to carry out particular actions and all can be accessed by depressing the appropriate F# button on the keyboard.
Only one mode can be selected at a time. The mode currently selected will be displayed on the second row of the panel.
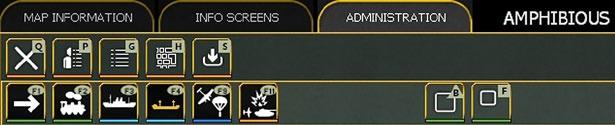
In this case, the amphibious planning mode from the ground phase has been selected. You can see this as the tab is now coloured yellow and the information ‘AMPHIBIOUS’ shows on the second row.
These buttons are found on the row below the tabs already described and do not change according to whether the player has selected the map, information or administrative tool bar.
Note that some buttons are available in both the air planning and ground movement phase. For convenience, the information is repeated where this is appropriate.
Air Planning Phase Mode Toolbar


- No Air Directive Selected (F1): Default standard mode that allows the player to move around the map and select, though not to move, units during the air planning phase. No air planning screen will appear on the right hand side of the playing area (37.16)
In general, all the tabs from F2 to F7 are only of importance if you are manually setting your air directives, this is covered in the manual especially in sections 17.3 and 17.4.
- Ground Support Air Directive (F2): Mode used to manually add new or modify existing ground support air directives by accessing an Air HQ unit listed in the right hand unit bar.
- Ground Attack Air Directive (F3): Mode used to manually add new or modify existing ground attack air directives by accessing an Air HQ unit listed in the right hand unit bar,
- Strategic Bombing Air Directive (F4): Mode used to manually add new or modify existing bomb city air directives by accessing an Air HQ unit listed in the right hand unit bar.
- Air Recon Air Directive (F5): Mode used to manually add new or modify existing air reconnaissance air directives by accessing an Air HQ unit listed in the right hand unit bar.
- Air Superiority Air Directive (F6): Mode used to manually add new or modify existing air superiority air directives by accessing an Air HQ unit listed in the right hand unit bar.
- Naval Patrol Air Directive (F7): Mode used to manually add or modify new naval air directives by accessing an Air HQ unit listed in the right hand unit bar.
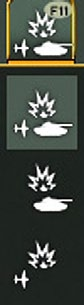
- Battle Locator Mode (Hotkey F11): This mode will add battle location indicators to the map. You must opt to show one of three different views from the drop down menu: 1) show all battle sites, 2) show ground battle sites, 3) show air battle sites.
- Display Air Doctrines Screen: The air doctrines screen lists each air command and applicable current settings for each air directive type (ground support, bomb city, ground attack, recon, air superiority, and naval patrol) (36.10)
- Display Air Directives Summary: The air directives summary screen lists the current air directives by air command. Air directives in this screen can be accessed and edited during the air directive planning phase (36.11).
- Toggle Air Execution Phase Detail: This determines the level of detail of the combat resolution report window during the air execution phase. There are four levels annotated by the number of aircraft symbols highlighted, with each providing additional detail. Values available are None, Low, Medium, and High.
- AI Depot Management: Triggers the AI automation for depot placement and creation (25.7.3);
- Activate AI Assist: Used to have the computer manage and move the player’s Air Groups automatically, this is different to the F12 option as it can be done as the air planning phase progresses (17.1).
- Factory Navigation: Shows the list of factories producing the various ground and air frames and other key resources (discussed in Chapter 28). For the Soviet player this will show which factories will automatically relocate and when (37.14).
- Shift and Control: Since many game functions require the player to use the Shift or Control keys these options are provided. If one is selected then it is on by default for all future game play instructions until it is removed. Use of these buttons is optional but may make some game operations easier to carry out.
On the right hand side is the option to end this phase.).
- Execute Air Directives (Hotkey F12): End Air Planning Phase and Execute Air Directives.
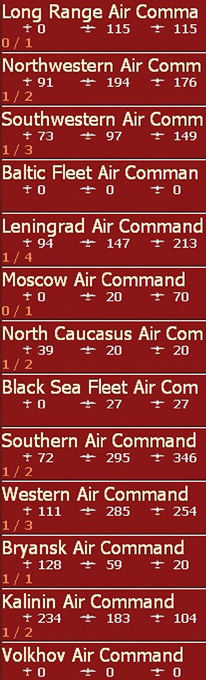
If you select the options to set air directives (F2-F7), the right hand side of the screen will be modified to show air commands and how many of that directive type have already been set.
In figure 6-14 the F2 (Ground Support) button has been depressed and a full list of the Soviet air commands is shown. Under each command can be seen the number of existing air directives of this type and the total number of air directives of that command. So, for example, the North Western Air Command has 1 Ground Support mission and 2 Air directives in total.
Action (Move) Phase Mode Toolbar


The left hand four buttons on this toolbar access the main methods available for moving ground units on the map. As you change this selection, the second row of the toolbar will show the mode you are currently using.
The rest of the toolbar contains other move options, actions that you can carry out or information you can display on the map.
Pressing F1 will also clear all the other map modes and any information they have placed on the map (such as battle sites).
On the left, the four options are:
- Move Mode (F1): Mode used to conduct tactical movement of ground units, and ground battles (22.2 and most of Chapter 23).
- Rail Mode (F2): Mode used for the strategic transport of ground units using the rail network (22.4).
- Naval Transport Mode (F3): Mode used to for the strategic transport of ground units between friendly ports via water hexes (24.3). This is also used if you want to just move the naval HQ on the map.
- Amphibious Transport Mode (F4): Mode used for the strategic transport of combat units from a friendly port to an enemy controlled coastal hex via amphibious assaults (24.6).
- Air Transport Mode (Hotkey F9): Mode used to conduct air transport of supply and units (22.50 and 37.16.10).
- Battle Locator Mode (F11): This mode will add battle location indicators to the map. You must opt to show one of three different views from the drop down menu:
- show all battle sites, 2) show ground battle sites, 3) show air battle sites.
The next group of options enable you to issue specific orders or carry out certain actions.
- Combat Unit Buildup and Breakdown: Select this button after selecting the hex containing combat unit(s) to build up or breakdown (21.3.2). Selecting the button again will reverse the action just taken.
- Create Fortified Unit in Selected Hex: Creates a fortified zone or region combat unit (20.5). Select this button after selecting an eligible hex on the map where the fortified zone is to be built.
- Build unit menu: Soviet player only - this provides access to the build unit screen (37.5) to create new combat and support units. This option is not shown for the Axis player as they cannot build new units.
- Undo Move: This button will only appear on the mode toolbar when the last ground unit selected in move (F1) or rail mode (F2) is eligible to undo its previous move. This cannot be done if the unit entered an enemy hex or next to an enemy unit.
- Auto Assign Unit(s) to Nearest Headquarters: Automatically attaches combat and headquarters units to the nearest eligible headquarters unit while the units are selected in Move mode (F1) (21.11.10).
The next set of options allow you to automate some actions, change the map display or to turn Ground support on or off:
- AI Depot Management: Triggers the AI automation for depot placement and creation (25.7.3);
- Activate AI Assist: Used to have the computer manage and move the player’s Air Groups automatically, this is different to the F12 option as it can be done as the air planning phase progresses (17.1). The value during the ground phase is if you move the HQ an air operational group is set to ‘follow’ this will trigger an on-map redeployment (if appropriate) of the relevant air units.
- Factory Navigation: Shows the list of factories producing the various ground and air frames and other key resources (discussed in Chapter 28). For the Soviet player this will show which factories will automatically relocate and when (37.14).
- Toggle ground support: This button turns ground support on and off, the current choice is also shown in the middle of the second row.
- Shift and Control: Since many game functions require the player to use the Shift or Control keys these options are provided. If one is selected then it is on by default for all future game play instructions until it is removed. Use of these buttons is optional but may make some game operations easier to carry out.
The final option is to end the turn.
- End this Turn (Hotkey F12): Selecting this button ends the phasing side’s player turn.
6.3 Using the Right Click Option
In WiTE2 there are often multiple methods to access information or to carry out actions.
Section 6.2 has discussed how to use the various tabs and information presented across the top of the playing area. A useful alternative is to right click on any hex.
Depending on the hex you select, the actual options will vary but can be broken down into actions and information specific to the hex or that allow you access the various in- game information reports.
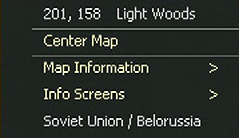
Every version of the pop up menu will give you the hex location and terrain type. Equally you can centre the map on the hex you have selected.
In addition, you will see the name of both the country and the region where the hex is located.
6.3.1 Actions You Can Carry Out
These, and the resulting display, will vary slightly depending on the hex selected.
Options for an empty hex
The theatre arrival hex will be used by all units ordered from the national reserve until a new target hex is selected (13.2.1). Note that units may not be able to arrive at the chosen hex due to stacking limits and the other relevant rules (13.2.1). So in some instances, this option will not be shown.
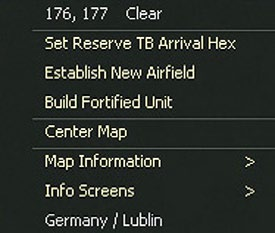
The other options will create either a new airfield or establish a fortified unit in the hex. Some options will cost you administrative points (9.2) so you will be asked to confirm your choice before the action is carried out.
If the hex is empty but contains a rail line then you may also create a new depot in that hex (there is a per-turn cap on the number of such depots that can be created).
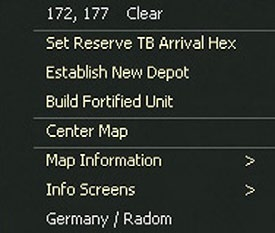
Options for a hex with a named location or an existing airbase
If you select a hex that contains a named location (i.e. a town, city or urban hex), depot or airbase you will see the name and an indication of the population size (town) or airbase size.
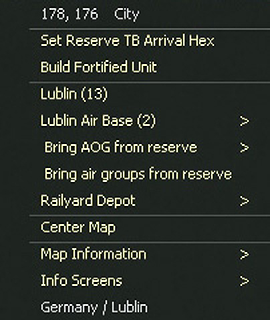
Depending on what is present, you can use the options at the top right hand side of the screen to adjust depot priority or access the location or airbase detailed screen. In addition if the hex contains an airbase, the airbase unit summary tab will appear on the right hand side of the screen if you have selected the hex by left clicking on it.
Clicking on the name (in this case the text Lublin 13) will take you to the detailed city display box (the same as clicking on the name on the top right corner of the map).
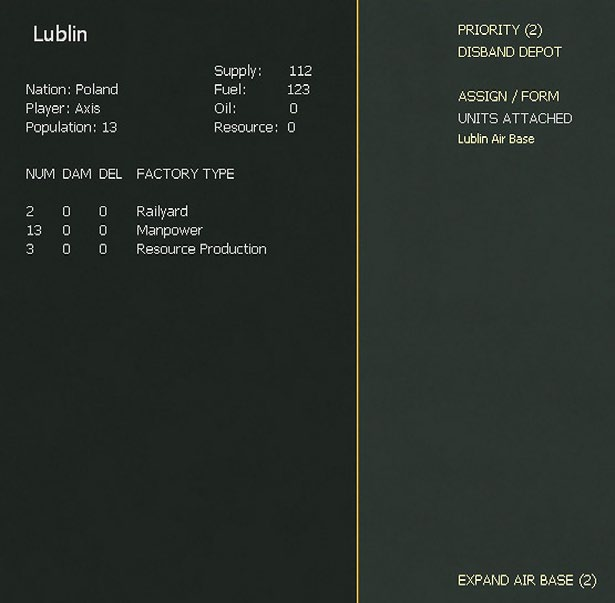
If the hex has no depot, the option to ‘build depot’ will appear. If the hex has an existing depot then the type (25.7.1) will be shown together with an option > moving the mouse over this will access a menu that allows you to change the priority (25.4.4) of the depot or to disband it.
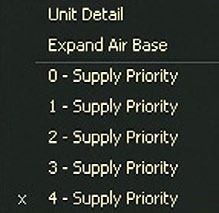
If the hex has an existing airbase the option > will allow to move onto the detailed information screen, to expand the air base (unless it is already at the maximum size of 3) or to change the supply priority.
6.3.2 Information You Can Access
If you right click on any hex you can the move onto one of two further menus. Map information is a different way to change the information presented on the map (and all can be done by using the tabs at the top of the playing area or by hot keys).
Map information option
Map information options are:

If you have any of these selected, it will be marked by an ‘x’ to the left hand side of the option.
Info screens option
This option mostly allows
you to access much the same
group of information screens
as you can using the tabs at
the top of the game area.
6.4 Hex Pop-Up Information
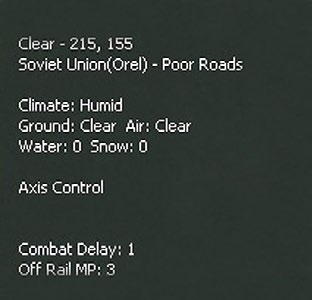
Every hex in the map area will display a text box when the mouse cursor is located over it. This feature can be disabled by setting the hex pop-up delay to zero in the user section of the preferences screen (36.17).
If you enable different map views the precise information will change (usually to provide more information) and this section will concentrate on the data shown using the default map preferences unless otherwise noted).
Note the goal in this section is not to set out in detail how to read (or use) all the displays but to show what can be accessed. Where appropriate links are included to later sections of the manual for more information.
6.4.1 Basic Information (Always On Display)
The following information will be shown for all hexes:

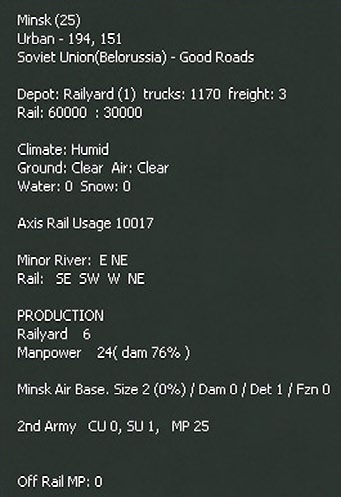
The country and region of the hex will always appear as either the second or third line (when a depot, town or airfield is also present).
Every hex on the map is rated for the quality of its road network (poor, average or good). The presence of an average or good road is also indicated by the hex art and can be seen more clearly if the road display overlay (7.2.6) is selected.
If the hex contains a rail line, then the owner and status of the rail line will be shown (7.2.5) as well as the amount of freight (usage) that has passed through that hex in this game turn. If the rail hex is damaged then the current level of damage will be shown (from 1-100) if you are viewing a friendly hex (this information is not shown for enemy hexes unless you have sufficient reconnaissance).
The pop up will also show the direction (using a compass) of any directly connected hex that also contains a rail line.
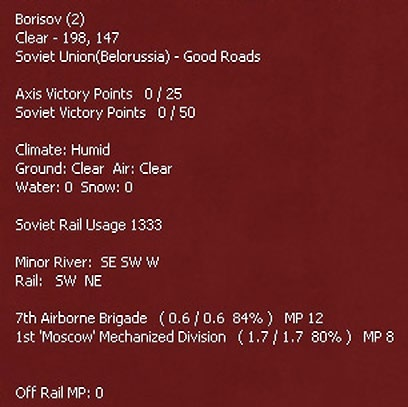
If the hex has a river in any hexside, then the display will show whether it is a minor or major river (or if the hexside is impassable) and in which direction (using a compass) the river lies. After the compass indicator will be a number from (0) to (9). This tells you how frozen (if at all) the river is (8.5.3).
If the hex contains a Victory Objective (Non-campaign scenarios): Information about points for victory objectives will be in the format xx/xxx, where the first number is the amount of points received by the applicable player every player turn for control of the hex and the second number is the amount of points the applicable player will receive for control of the hex at the end of the scenario.
6.4.2 Hex Dependent Information
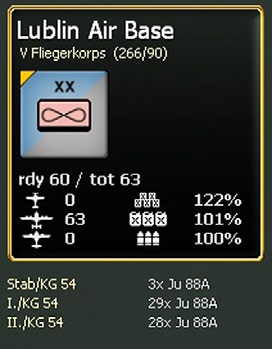
The information will also vary according to what is in the hex. If the hex contains an airfield the information will include:
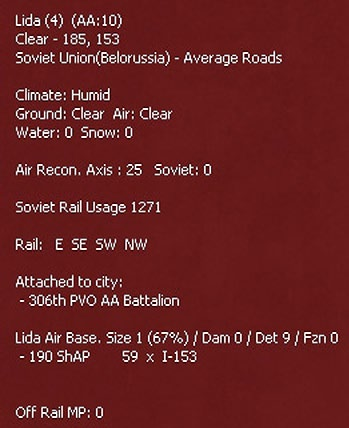

The name of the airbase, its size (in brackets how much of the potential capacity is in use) and how damaged with a number indicating the level of current damage.
If there are air units present (in areas you control these bases will show as a green), then a list of the formations by name, number of ready planes and types of planes.
If the hex contains a fort, then the current level of the fort (from 1 to 5) will be shown. As units improve a fort a percentage in brackets will be shown indicating how much progress has been made towards the next level.
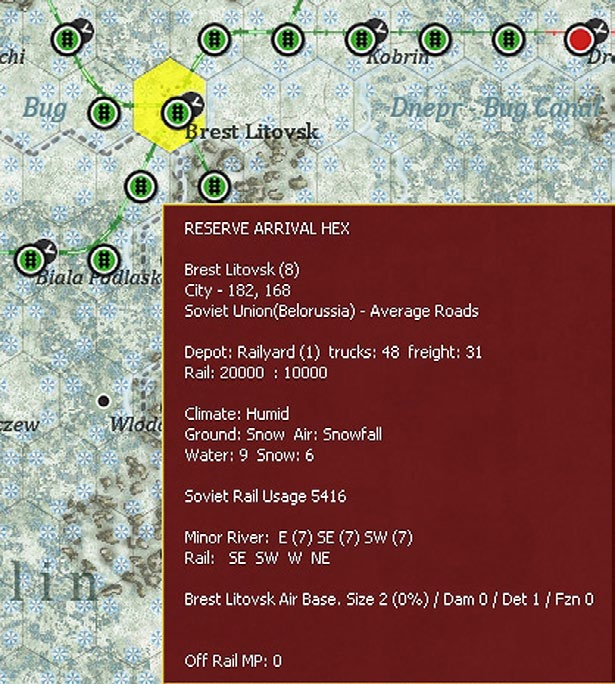
If the hex contains a depot then the pop up will display: type (25.7.1); number of trucks; and, the total freight currently stored at the depot as well as other information about the workings of the logistics system (6.9)
Beneath the depot, the following information is shown:
- Received: # – % where # is the freight received during logistics phase and % is the percentage of total depot capacity that was received.
- Stored # – % where # is the current freight stored, (#) is the amount of freight that was at the depot at the start of the logistics phase, and % is the percentage of capacity that was stored at the beginning of the logistics phase.
- Sent Out: # is the amount of freight sent out from the depot during the current turn.
- Capacity: # is the maximum amount of freight that can be stored at this depot.
- Below that will be information on where the freight was sent from (in the shown example all this came from Bryansk but in some situations two or more locations will be listed.
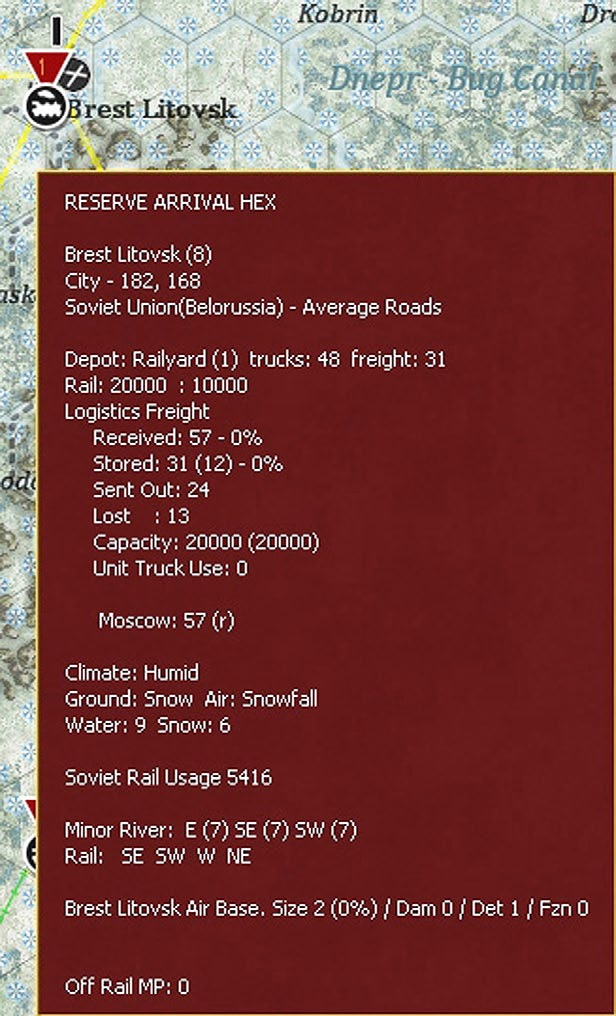
If the hex has been set for units to arrive from the Reserve Theatre (13.2.1), the pop-up display will look as in figure 6-28.
If the rail repair mode is enabled, then such a hex will be marked in yellow as seen below.
6.4.3 If a Unit is Present
If a ground unit is present additional information will be shown and a detailed separate pop up on the types of equipment in the complete stack.
For combat units, you will see the unit name (attack CV, defensive CV and percent of ToE), MP (number of current movement points). If the unit has a directly attached support unit (21.5), this will be listed just below the unit title of the on map unit.
If applicable, information will also show for how long a unit is frozen or till it is withdrawn.
If a HQ is present you will see the name, the number of combat units (CU) it commands, the number of support units (SU) attached to the HQ and its current movement allowance (MP).
In addition, it unit(s) are present, then hovering over the hex will see a summary of the elements in the hex appear at the base of the screen.

6.4.4 Information on Player Activities
If present, you will see both enemy and friendly interdiction values in a hex. This may show for one or both sides as Axis (number) Soviet (number).
Note that while this refers to air interdiction, in this case the most likely reason for the low level of Soviet interdiction is partisan activity (13.4).
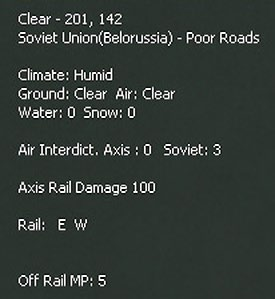
If a battle has taken place in the current player turn then Combat Delay will show at the bottom of the pop up.
6.4.5 Impact of Fog of War
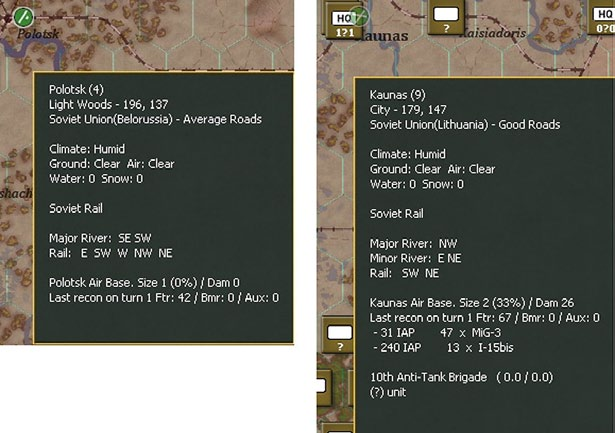
If you place the mouse on a hex in enemy territory you will see the basic information and any rail usage and the state of the rail line.
Depending on your level of reconnaissance you will always know if there is an airbase present and you may see how many planes (by type not detail) are present. The pop up information will also tell you when you last flew a reconnaissance mission over this hex and how high is your reconnaissance level.
If you select a hex with a known enemy unit the amount of information will vary according to the detection level. This cannot exceed det:10 at which stage you will know the unit title, its attack and defence CV and the detection level. At lower detection levels this information may become less reliable or disappear altogether.
6.4.6 Mode Dependent Information
If you select different map modes the information presented may change. This section only discusses a few of these variations.
Display Units. If you toggle the unit display off then information about combat units will not appear on the hex pop up.
In the Action (Move) phase, if naval transport (F3) or amphibious transport (F4) mode is selected, then the impact of control of sea hexes on those modes of travel will be indicated as follows:
- Friendly controlled – nothing displayed
- Neutral – SHIPPING CONTESTED
- Enemy controlled – SHIPPING HEAVILY CONTESTED
- Enemy amphibious HQ unit and adjacent hexes – SHIPPING PROHIBITED
Factory Locations: If ‘View Factory Locations’ has been toggled on, than the hex pop-up will include information about the specific factories in the hex, to include, port, manpower, railyard, resources and other production factories. Factories that are not yet producing will be listed. Any factories with damage will have the percentage displayed in parentheses next to the number of factory points of that type in that location.
If you are playing one of the limited area scenarios, some of this information will be missing as it is not relevant to gameplay.
6.4.7 Air Base Display
The information shown for airbases will vary according to ownership and whether or not the logistics display tab has been selected.
Friendly airbases, no logistics tab:
- Green – Has air units
- Green with red circle - Airbase has air units, but less than 50% of needed support or over 100% of airfield capacity
- Yellow – Empty but with air units ordered to transfer there
- Black – Empty airbase
- Orange – Under construction airbase not yet size 1
In figure 6-36 below, air base 1 has planes and is under capacity, 2 is over capacity, 3 is empty and 4 has just started construction.
Enemy airbases, no logistics tab:
- Green – Has air units and has been covered by reconnaissance flights this turn
- Blue – Had air units when last covered by reconnaissance flights but has not been covered by reconnaissance flights this turn
- Black – Empty when last covered by reconnaissance flights
- Yellow – Has never been covered by reconnaissance flights
- Orange – Under construction airbase not yet size 1
- Friendly airbases, when logistics tab selected:
- Red – Fuel or ammo <=40% of need
- Orange – Fuel or ammo <= 55% of need but neither <=40
- Yellow – Fuel or ammo <= 70% of need but not neither <=55
- Green – Fuel and ammo >70%
- Enemy airbases, logistics tab selected:
- Black – All
If the air base is overloaded then it will have a red outer circle in addition to the indicators above.
In all modes, a pop up box will appear if you hover over an enemy airbase telling you when you last flew reconnaissance over the hex and the types of planes (fighters, bombers etc.) that were there at that time.
The screenshot overleaf is taken from T1 where the Axis player is given information about Soviet air deployments nearer the border. Note the higher detection level (10.2) at Kaunas means the Germans are aware not just that Soviet planes are present but what they consist of.
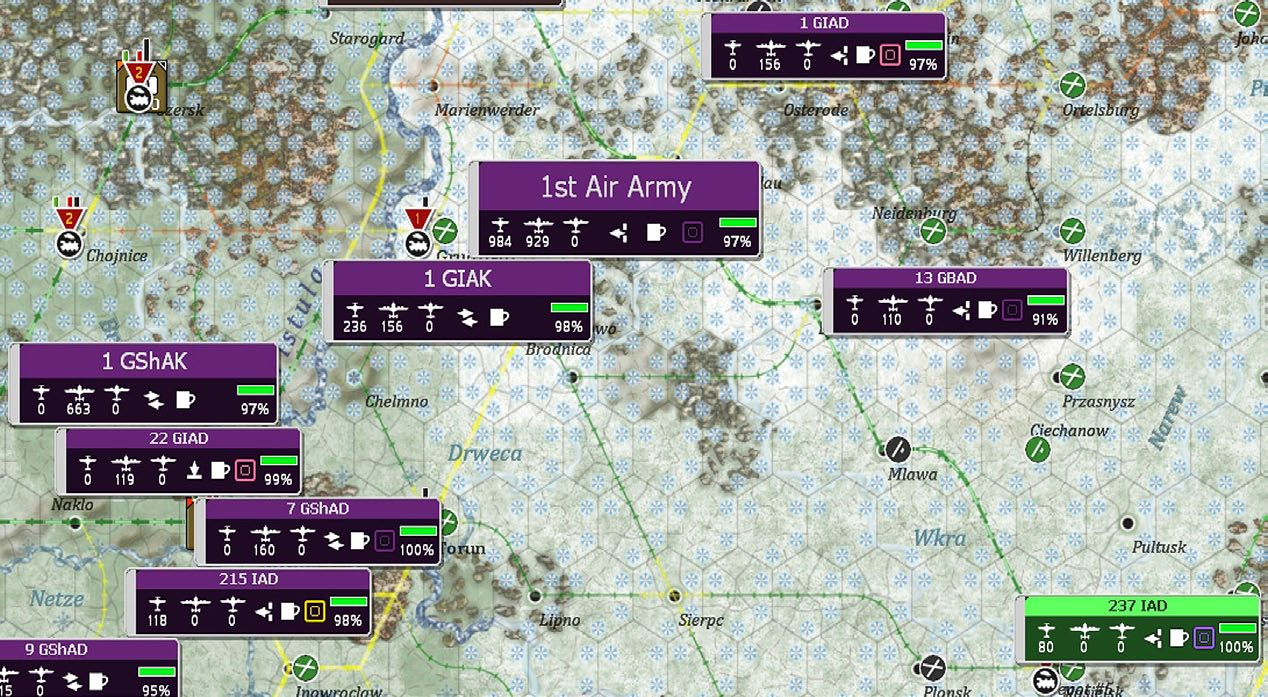
6.4.8 Air Operational Group and Air Command Display
The information on these displays is discussed in more detail in chapters 16 and 17 as it needs to be placed in the wider context of how to manage the air war.
When displayed, the information on the Air Command/AOG labels will vary according to how the map is zoomed, as:
- Max-Out zoom – Show small Army and Corps AOG labels only
- Out zoom – Show small AOG labels for all AOGs
- Medium zoom – Show large AOG labels for Army AOGs, small for others
- In zoom – Show large AOG labels for Army and Corps AOGs, small for low level AOGs
- Max-In zoom – Show large AOG labels for all AOGs When shown at a level of detail, each AOG label will show:
- Number of Ready Fighter a/c (includes down the chain of command)
- Number of Ready Bomber a/c (includes down the chain of command)
- Number of Ready Utility a/c (includes down the chain of command)
- Stance of AOG
- Mission setting (rest/day/night/day&night
- HQ Follow (small counter coloured like formation being followed)/Naval Ops or no icon if neither
- Percent of Max a/c in the AOG (down the chain) that are ready
- Coloured Bar that indicates the Percent Ready with different colors from Green (best) to Red (worst)
This example shows the AOG labels when zoomed in.
The colours that border the label, indicate:
- Yellow – selected
- Red – all air units under this AOG are depleted (depleted for Axis is < 1/4 of max a/c of unit is ready, for Soviet < 1/3)
- White – all air units under AOG are set to rest
- Green – normal/none of the above
When air bases are displayed, they will be coded as:
- Yellow – at least one item is relatively low
- Red – depleted of at least one item (ammo/fuel/capacity)
- Green – normal/none of the above
Here Milowitz is relatively short of ammunition.
For Air Groups, the codes are:
- Yellow – selected
- Red – depleted (depleted for Axis is < 1/4 of max a/c of unit is ready, for Soviet < 1/3)
- White – rest
- Green – normal/none of the above
Finally when you roll the mouse over an AOG it slightly expands in size. When you roll over an Army or Corps AOG, AOGs that are not directly attached to the AOG will become transparent.
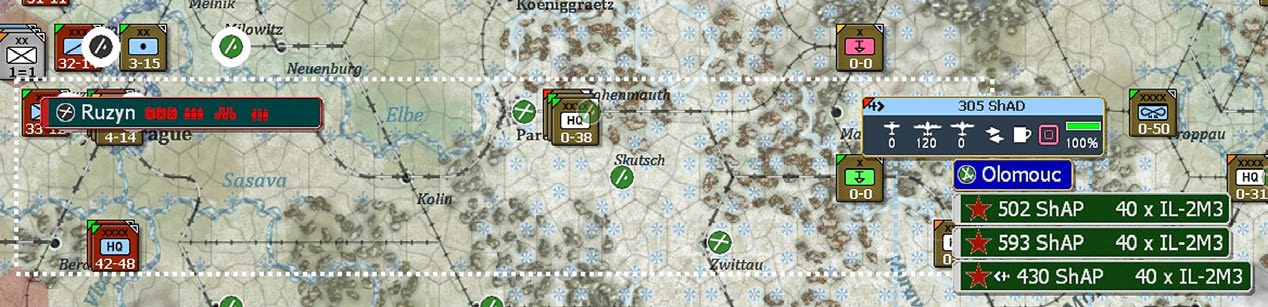
If any part of an air group has been ordered to move (but will complete the move at during the logistics phase) then a > symbol is put next to the name of the AOG. When viewing units under an airbase label on the map, units that are leaving the airbase have a < symbol.
In the case of figure 6-40 below, some of the 305 ShAD (the 430 ShAP) is ordered to deploy to Ruzyn. Since that air base lacks fuel, ammunition and supporting manpower (the red symbols), ideally the move is delayed until the next logistics phase. This future move is marked on the AOG displays with the arrow symbols.
6.5 Information on the Counters
The UI allows you to alter the information displayed on the various counters and to access further information from the more detailed screens.
6.5.1. Counter Display
For ground combat units you change how some of the information is displayed. Assuming you are at zoom levels 1 or 2, then each counter will show:
- Its national affiliation (the dominant counter colour), some units such as German SS or Soviet Guards formations are coloured differently to other units of the same nationality;
- Its size (the labels above the unit box) (34.1)
- Its type (using the standard NATO symbols) (34.2)
Below this the display can be varied.
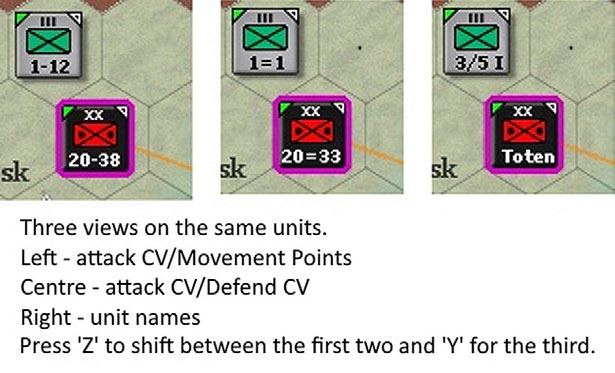
The default option (assuming you selected the standard set up options) is to show the attacking CV and Movement allowance. You can also change what is displayed by using the ‘Z’ or ‘Y’ keys.
Selecting ‘Z’ will toggle through two modes: attack CV- movement; attack CV-defend CV (note any enemy counters will always display this mode).
In any of the modes you can change the view again using the ‘Y’ key. In this case the information will toggle between the CV/MP information and the title of the unit at the top of the stack. Selecting ‘Y’ again will return you to the CV/MP display.

6.5.2 HQ Units and Command Links
If you select a HQ, this will both highlight subordinate units (21.11) and also show the links using on map lines. The line linking to subordinate combat units is show as blue, to subordinate HQs is in turquoise and to the higher HQ in orange.
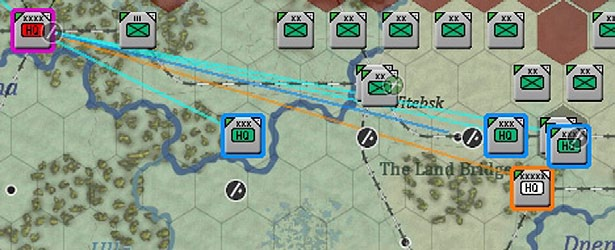
In addition, you can view the command system using the options to show Command Efficiency and Command Quality (36.5) and these will provide a rough view of the effectiveness of your OOB and command arrangements.
6.5.3 Unit Modes
If this option is selected then the status and mode of units will be indicated on map.
Isolated units will be bordered in red, units in Refit mode (26.3) will be bordered in blue, Withdrawing units (27.4) in orange, Reserve units (23.7) in purple and Static units (21.8) in white while Green is used to indicate newly arrived units.
6.5.4 Information Displayed on the Combat Unit Box
Selecting a hex with units in it will display the unit bar on the right hand part of the game screen. The unit bar contains a separate unit box for each unit in that hex.
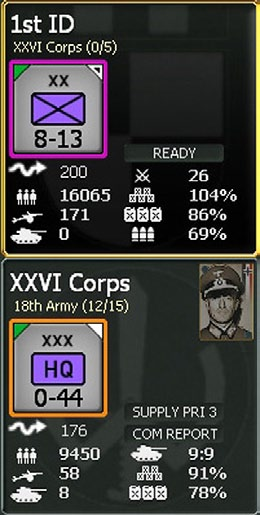
If a unit is currently selected, its unit box will have a yellow outline (so in the example above the Infantry Division is currently selected and the Corps command not).
The unit box provides a range of information. It is best thought of as being divided into a top half (where the information is similar regardless of the unit type) and the bottom half where the display will change substantially depending on the unit type.
Upper Portion
Unit Name: Selecting this will display the unit detail window
(37.3). The unit detail window can also be displayed by
right clicking in a blank part of the unit box.
HHQ: Name of headquarters unit that unit is attached to and command range information in the format (x/xx) where the first number is the range in hexes of the unit from its headquarters unit and the second number is the range in hexes over which the applicable headquarters unit can provide that unit with ground element support squads (21.2.2).
Note, this range is different to the effective command range. In effect a HQ can provide support squads over a far longer range than it can provide either effective command or combat support units to help out in combat.
Selecting the HQ name will shift map view to centre on the headquarters unit and change selected unit to that headquarters unit.
So in the example above, the infantry division is within 0 hexes (out of 5 if they were to be in command) of the relevant HQ (in effect they share a hex with their HQ) and the XXVI Corps is within 12 (out of 15) hexes of the 18 Army HQ.
Unit Graphic: Displays the same information as on the counter in terms of combat and movement factors. In addition a movement status is in the small triangle located in the right corner of the unit counter. If a unit has not moved, then it will be a white triangle with a smaller black triangle inside. If the unit has moved and still has movement points remaining, there will just be a white triangle. If the unit has expended all of its movement points, there will be nothing in the right corner.
On the top left hand side of the counter display will be the same ‘soft’ factor (6.5.11) selected for all units on the map.
Lower Portion
The information here will vary according to the unit type.
For Ground Combat Units, the following information is
displayed:
Unit mode. Units can be in ready (the default setting), reserve (23.7), refit (26.3), unready or depleted modes. Unready and depleted units set to refit will be marked as refit.
If the unit is can be airdropped (23.9), and is currently located on a hex containing an airbase, the option to ’target’ will appear. This will allow the player to set up an airborne operation for subsequent turns.
Static Toggle Button (21.8): If unit is in static mode, ‘STATIC’ will be displayed under unit graphic and unit mode button will be greyed out. If an already static unit is eligible to be reactivated, then the ‘REACTIVATE’ button will be displayed. If the unit is eligible to be converted to static status this option will appear on the unit counter.
If the unit is eligible to enter (or create) a city fort, this will be indicated on the unit counter (20.6).
SMPs (22.4). The number of Strategic Movement Points is shown directly beneath the counter after the symbol ~. If the unit has not moved by rail or sea this will remain at the default 200. If the unit is moved normally the SMP will drop according to the distance moved. If the unit is not entrained or at sea then unused SMP will be used to help recover lost combat preparation points.
CPrep (23.2). The Combat Preparation Points currently stored by the unit (a value from 0 to 100) is shown after the crossed swords symbol.
On the lower left hand side will be displayed the number of men, guns and tanks in the unit including any SUs directly attached.
On the lower right hand side will be displayed the proportion of needed supply, fuel and ammunition currently held by the unit.
6.5.5 Information Displayed on the Air Base Unit Box
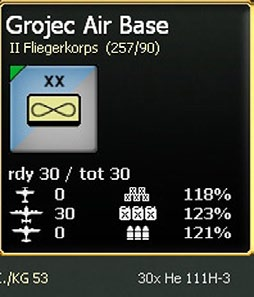
While air base units are fixed on the map, in some ways they act as a particular form of combat unit.
On the top left hand side, an air base unit will display the selected soft factor.
The following information is displayed in the lower portion of the display.
- Ready Planes/Total Planes;
- Ready night fighters, fighters and fighter bombers;
- Ready tactical and level bombers;
- Ready support planes (recon, transport, patrol and torpedo planes).
In addition, outside the unit display will be a list of the individual air formations at that airbase. If you click on the name of any of these you will be taken to the detailed information for that air unit.
The air command that is responsible for sending support squads to the airbase is also shown. This simply reflects which air command has the most planes at that base and will vary as air units are moved on the map.
6.5.6 Information Displayed on the Ground HQ Unit Box
Ground HQs are the corps, army, front, army group and higher command HQs used to organise your Order of Battle.

At the top is the unit name and the HQ it reports to. The numbers after this tell you how many hexes this higher level command is distant (so 5 in this case) and how far it can be and still provide some command functions (so 45 in this case).
On the right is an image of the commander officer and mousing over this will bring up an average leadership score for them (15.3). Clicking on this image will take you to the leader display (37.7) and you can use this to change the commander if you wish.
For these units, the following information is displayed:
Supply Priority (25.8): Clicking on this will open a drop down box and this can be set to a desired value between 0 and 4.
Assault Mode (21.11.2). Whether or not the command has been set to assault mode (this is shown for Axis armies or Soviet Fronts only) but will affect all HQs that report to that command.
SMPs (22.4). The number of Strategic Movement Points is shown directly beneath the counter after the symbol ~.
Com Report. Clicking on this will take you to the section of the Commanders Report that details all the units that report to this particular HQ.
On the lower left hand side will be displayed the number of men, guns and tanks in the unit. Note this will include the values for any Support Units directly attached to the HQ.
On the lower right hand side will be displayed the Command Points (next to the tank symbol and will show used command points:command capacity) of the unit (21.11.6), and the proportion of supply (including ammunition) and fuel for all units under that HQ’s command at the moment (this will possibly change as units move or fight during the Ground Phase).
Information Displayed on Air HQ Unit Boxes
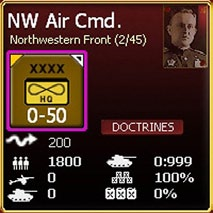
For Air HQ Units, there are some small differences. It is possible to access the air doctrine screen (17.4.3) for that command from the unit tab and this replaces both the ‘assault’ indicator and the commander’s report tab on ground HQs. Otherwise the information is similar to that shown for a ground HQ.
If the show AOG filter is selected (and this will be done automatically during the air planning phase), then information about the wider layout of your air force will appear on the game map.
Full information on these options is in section 16.3 that covers using the AOG system to manage your air force.
6.5.8 Information Displayed on Naval HQ Unit Boxes

For Naval HQ Units, again there are some small differences. On the lower right hand side is an indicator that allows you to ’target’ an amphibious invasion in a future turn (if the HQ is currently in a port). Below this is a measure of the damage incurred by the naval assets in the command (a range from 0-100).
The target button is used to set the amphibious invasion hex for the amphibious HQ unit and combat units stacked with it and will change to display the coordinates of the current target hex and add text to display the current number of preparation (P) points once a target is selected, and can be pressed again to change the target.
The invade button will display once the amphibious HQ unit has the minimum required 50 prep points.
Selecting invade will take the map to F4 mode.
6.5.9 Information Displayed on the Rail Repair HQ Unit Box
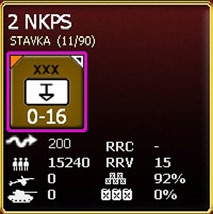
For Rail Repair HQ Units), again there are some small differences. Beneath the counter you will find the values RRC and RRV.
Rail Repair Capacity (RRC) is a measure of how much rail repair capacity the unit has left. If you can repair a rail hex, click on this number and the hex will be repaired for the next turn. In the air planning phase the RRC value will be shown as ‘–’.
Rail Repair Value (RRV) is a more permanent measure of the intrinsic level of engineering assets in the unit.
6.5.10 Multiple Hex Unit Selection
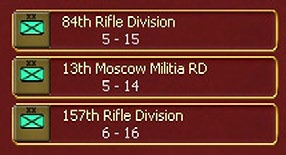
If you select units in multiple hexes in preparation for an attack (23.4.3) then a full list of all the selected units will appear on the right hand side. In this case a small box will appear for each unit listing the unit CV and movement points.
If the selection includes any non-combat units then the unit counter icon on the left will not be shown.
You can deselect any of the other units by left clicking on the unit icon and they will be removed from the attack. A unit can be included also by left clicking.
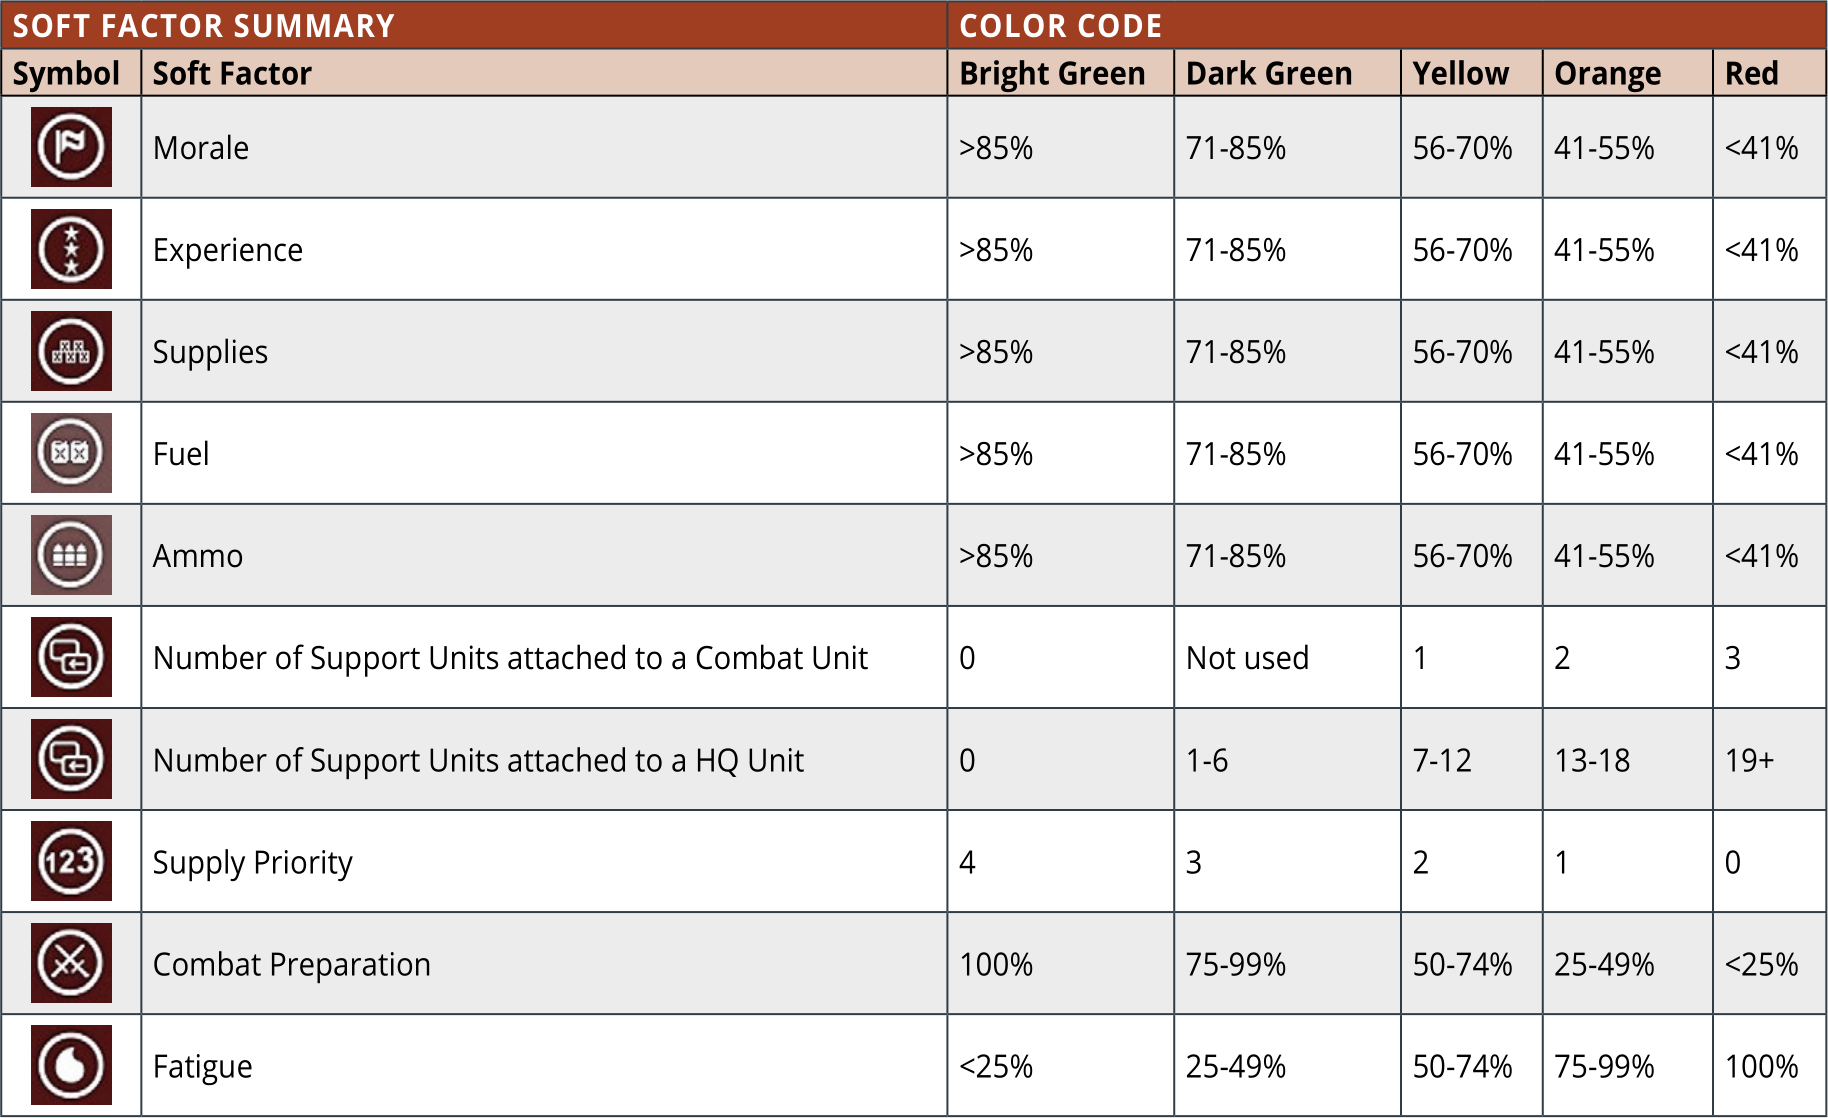
6.5.11 Display of Soft Factors
This button, which is located on the far right of the third row of the menu tab toolbars (6.2.3), allows one of seven different factors to be displayed in the left corner of the unit counters. If the soft factor button is depressed, a drop down list of the options will be shown as per the image on the right:

The top option will mean that no display option is chosen, the other options are in order:
6.6 Changing Map Display Mode and Implications
As noted above, not only does changing the map display alter the information available it can also alter the actions you can take or how they occur.
6.6.1 Show Battles
If this mode is selected then no other actions can be undertaken until this display is removed.
6.6.2 Show Rail Damage
If this mode is selected then the movement pathing routine (i.e. showing you the movement costs along a chosen move path) is disabled. The units will still move to a selected destination (if they can reach the hex) and will simply appear in that hex regardless of whether you have the ‘show move’ (36.17.1) option selected or not.
6.7 Changing the Counter Order
If you repeatedly left click on a stack of units, this will alter the one that is shown at the top of the stack.
Depressing the shift key and left clicking will select all the units.
Equally units in a hex can be selected and deselected as set out in 6.5.1.
6.8 Interpreting the Information on the Main Map Area
The sections above have identified the various ways you can change the information on the map (including as displayed on the counters). Later chapters in the manual will provide detailed explanations on issues such as logistics (chapters 25-28) so the aim here is to enable you to interpret what you are seeing when you use the various display options.
6.8.1 Zoom Level
The zoom level chosen will both influence how much of the map can be seen and what information is shown about on map counters and the on-map displays.
At Zoom levels 1 and 2 ((Max-In and In)) the ‘Y’ key can be used to display different information on the counters (attack-move; attack-defend or the unit title). At zoom level 3 only the unit type can be seen and at zoom levels 4 and 5 (Out and Max-Out) all the information is blank (all you will see is a rough indication that a unit is on the map).
Soft factors and movement status can be viewed in zoom levels 1 through 3 and unit type and size at zoom levels 1 through 4. At zoom level 5, only unit nationality and whether the unit is German SS or Luftwaffe or Soviet Guards will be displayed by the colour of the unit.
Rail lines will also not display at zoom level 5.
In each case, the centre of the display will be determined by the location of the mouse cursor.
6.8.2 Combat Related Information
Two different types of combat related information may be accessed by a pop up box.
If the F11 (show battle sites) tab is depressed than the relevant set of battles (chapters 19 and 23) will be shown on the map.
Hovering over one of these will tell who attacked, and with how many men, guns and tanks as well as any air activity. The same information is then shown for the defender.
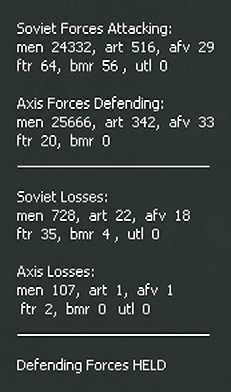
Below this will be the losses and then the outcome. If more than one battle took place, only the first can be seen using this pop up but you will see how many battles took place on the top of the pop up screen. The second is as a predictor when you are planning a ground attack.
With at least one friendly combat unit selected, locating the cursor over an enemy unit that the friendly combat units are eligible to attack displays a possible battle icon (hasty or deliberate), the following text is added to the pop-up text:
- Attacker CV: 45.1
- Defender CV: 23.2
The predictor gives you the adjusted CV values of the units that accounts for all known factors (terrain, forts, dense modifiers, weather, etc.) with the exception of leader values. This value is fogged up for the enemy if FOW is on. Since hasty attack CV values are x1/2, this will be reflected in the total if a hasty attack is what is showing (i.e. shift key isn’t held down for deliberate attack).
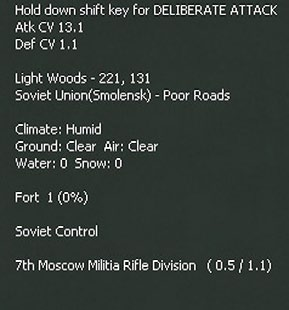
The main advantage of this is that since it knows what hex is being attacked, all modifiers can be applied correctly based on target hex(side) terrain and weather.
Players Note: The predictor is an important tool as it’s the only way to know how a unit’s Combat Values are going to be impacted by the terrain in the hex being attacked.
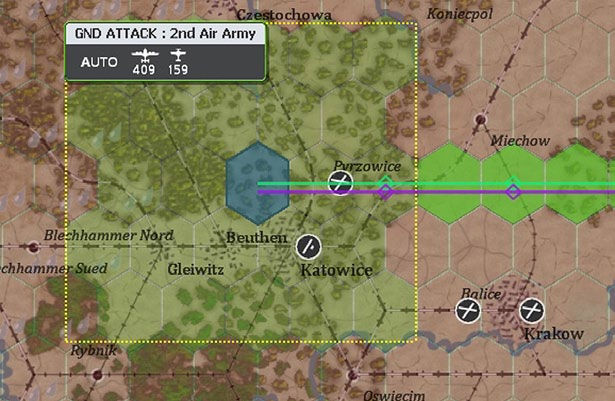
6.8.3 Displaying Air Directives on the Map
If this option is selected either all air directives will appear on the map if the F1 button is depressed or just those relevant to the air mission type (Ground support, Ground attack, Strategic Bombing, Naval interdiction, Air Superiority or Reconnaissance).
How the air directives display will depend on both the type of mission, if the mission is currently active and if escorting fighters have been assigned.
On map display of Air Directives
Ground support missions will show as a single hex box
surrounding a HQ that has been assigned ground support.
The hex will also be shaded green.
Other missions will be shown on the map as a box of one or more hexes wide.
Within the box, if fighters have been allocated, the area they can provide escorts to will be shaded green, areas outside their escort range is in purple. If no fighters are allocated, then the box will be purple. If none of the assigned bombers cannot reach a particular hex, the background will revert to the current map mode. If none of the air groups that are available can reach any hex in the AD, then this background will have a reddish hue.
If you click on the mission type and air command (top left hand corner of the mission box), you will also be able to access the air directive screen on the right hand side of the map screen.
This shows some of the default missions for Army Group North on Turn 1. Note the Ground Support mission is linked to the relevant HQ. For the other missions, the green hexes are where the assigned escorts can reach and purple is where only the bombers or reconnaissance planes can reach.
If you zoom into level 3 or closer, the mission summary box (e.g. GND ATTACK) will expand to show which air command is in charge and how many planes have been assigned.
When the mission is being executed, green lines are the route taken by any escorting fighters and purple lines those by the bombers. If planes must first move to a staging base, their direction will be shown as a black line. Any intercepting fighters will be shown with a green line.
Active and Inactive Air Directives
If the air directive is inactive the surrounding box will be black
or white and the area within the box will be left uncoloured.
Air directives can be inactive if they target an invalid area (such as reconnaissance in your own controlled hexes), there are insufficient planes in range or the player has opted to suspend the mission for this turn.
Accessing further information about Air Directives
If you left click on the text at the top left hand corner of a
box (mission type and air command) you will access the
detailed air directive creation screen. This will show you how
the air groups are being allocated (see section 17.4.2 for the
options) and how many planes can reach the target box.
Information on how to interpret this information and to change the composition of your air directives is in chapters 17 and 18.
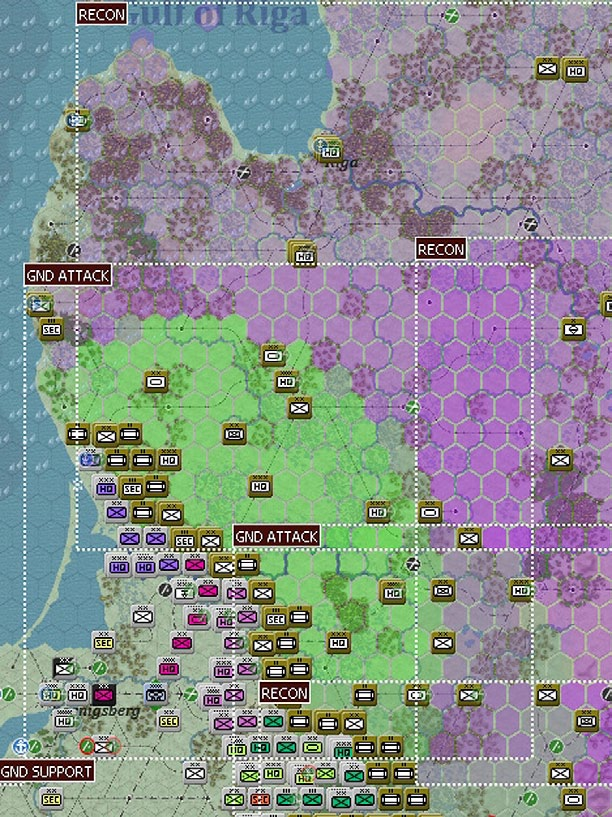
6.8.4 Displaying Air Operational Groups on the Map
By default, the game map will show the location of Air Operational Groups during the air planning phase and this map mode can be selected during the ground movement phase (here it is useful if you are manually redeploying your air units (17.3.5).
On map information will show you the rough deployment of each air command level.
In addition, all AOGs are colour coded to show which air HQ controls them.
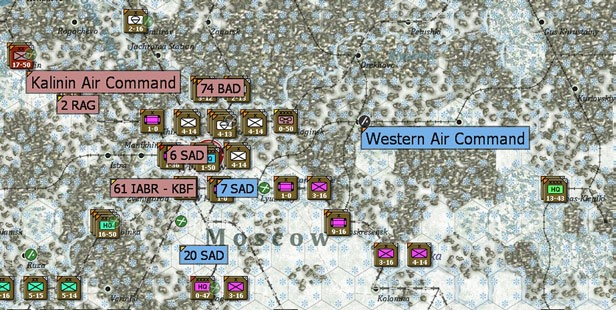
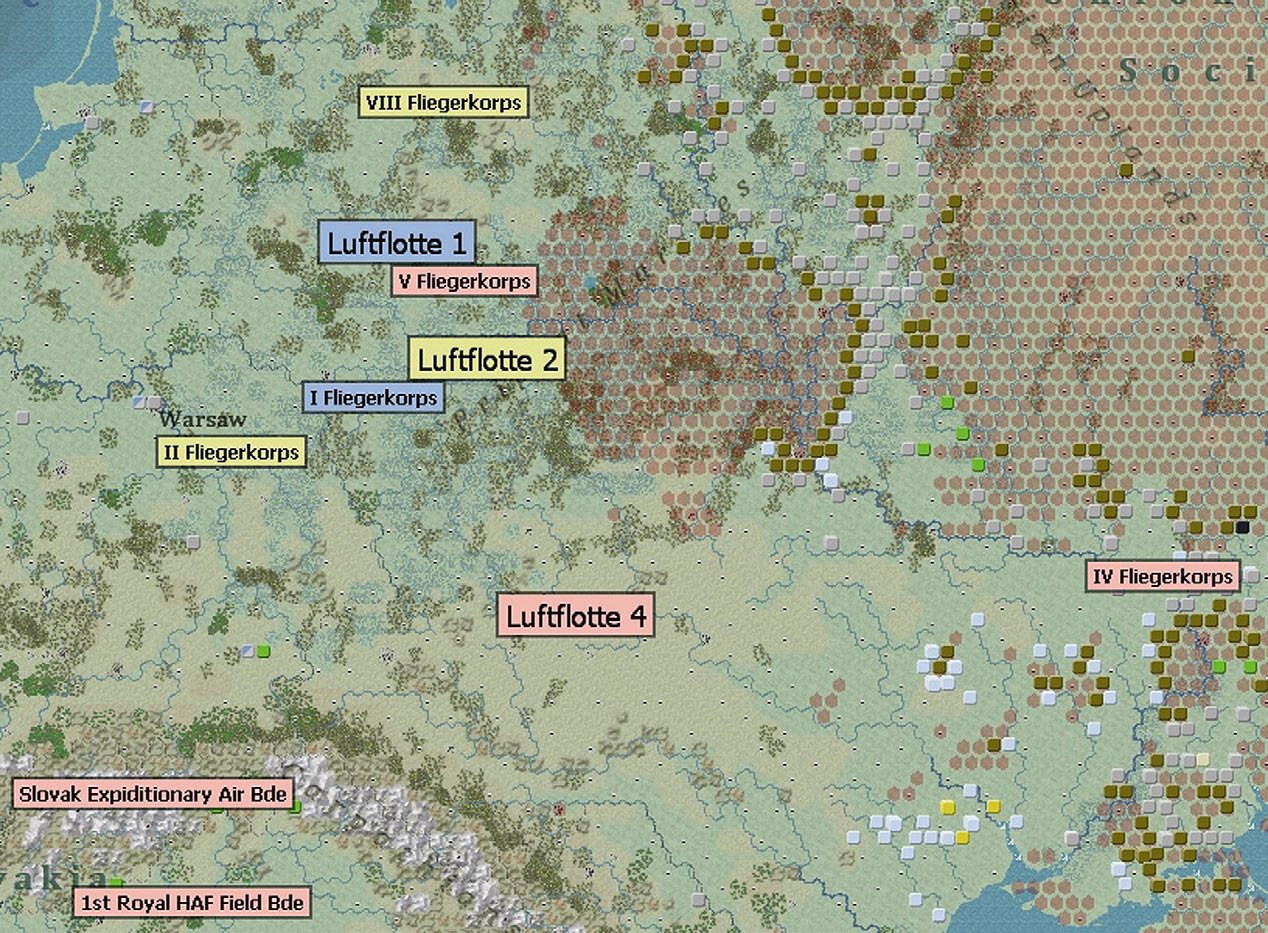
The example above shows the Luftwaffe at the end of August 1941 (so many air units are well behind the front due to supply shortages). 3 top level Air Commands (16.2) are in use: Luftflotte 1; Luftflotte 2; and, Luftflotte 3 and each has one or more Flieger Korps and these in turn have Air Operational Groups (16.3) reporting to it. The location on the map is at the centre of the spread of airbases in use by that command (note that since the map is zoomed out, the individual AOGS are not shown in this case).
Clicking on any Air Command will bring up the detailed air command tab on the right hand side (37.16.4) and provide more information about the airbases used to base the attached air units.
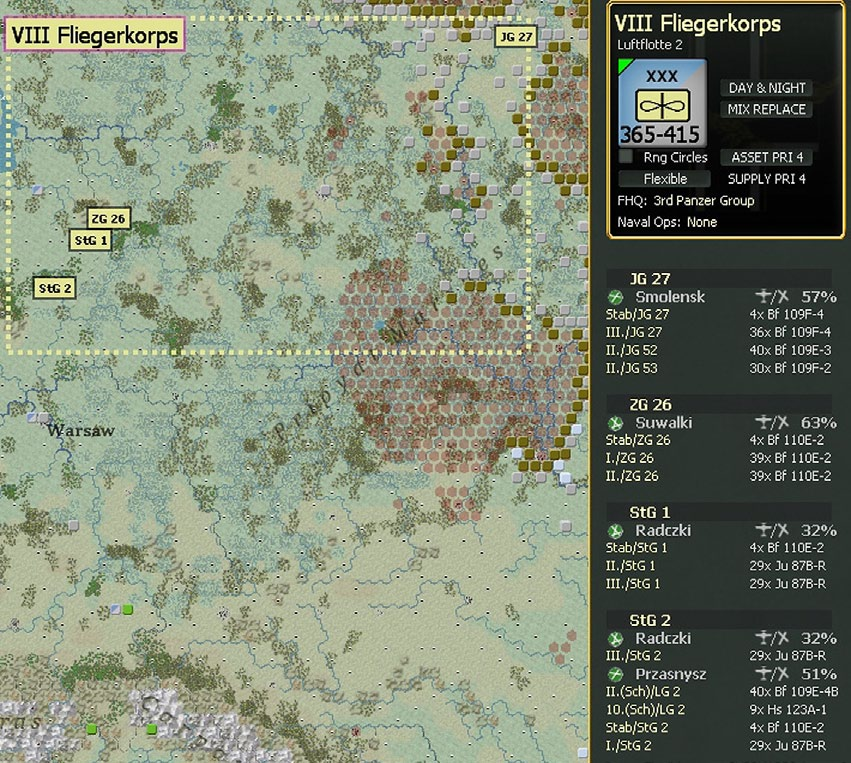
In the case of figure 6-56 opposite, VIII FleigerKorps has been selected. On map, you can now see where its component AOGs are based (again this is shown at a centre point of the air bases in use). The right hand screen now shows the Air Command HQ tab and below that a list of all the air units and airbases they use. Note that for example StG 2 is spread over two airbases. More information about how to interpret this information and to manage your air assets is in chapters 16-19.
In terms of game play this layout reflects a desire to ensure that supplies are going to the front line formations. The advanced fighter AOG provides air protection for the combat units and for any bombers being redeployed. If the bombers are needed, it will take a turn to bring them up and have them combat ready at their new bases.
6.8.5 Hex Selection and the Unit Counter Border Color
In addition to the information above, selecting a unit will change the information provided on the map.
Selecting more than one unit
For the phasing player, selecting a hex in one of the
movement modes (F1-F4) with a unit present will also
select that unit. If there is more than
one unit in the hex, a single left click
on the stack will select only the top
unit. Repeated left clicks will select
the next unit on the right unit bar
and move it to the top of the stack
on the map. Double left clicking on
the stack or using the Space bar will
select all the units in the stack.
Relationship between selected unit(s) and other counters
As you select units you will see
other units on the map become
highlighted and their surrounding
border change colour.
The box around the selected unit(s) will change to purple.
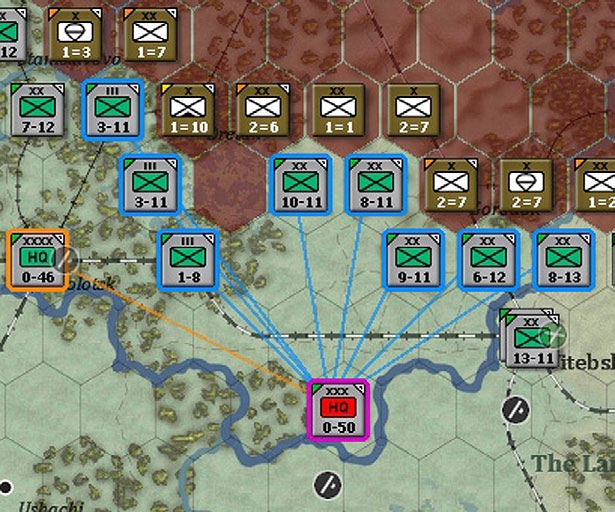
In addition, other units in other hexes on the map and deselected units in the same hex will change their border colour according to their relationship to the selected unit(s):
Next Higher Headquarters Unit: Orange
Peers: Yellow - these units all share the same HQ as the selected unit(s)
Subordinates: Blue or Red – these units directly attached to the selected unit.
If units are less than 5 hexes from the selected HQ they will be shown with a blue border. If they are five or more hexes away then the border will be red.
Here a Soviet army has been selected. All its subordinate units are in command range (outlined in blue), other HQs in the same Front are outlined in yellow (as would any combat units that reported directly to the Front HQ), the Front HQ is outlined in orange. The connecting lines match the colour surrounding the relevant units to show the direct command relationships.
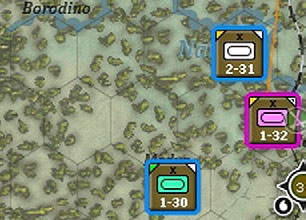
A broken down combat division or corps will be displayed in a slightly different way. If one part is selected, then all the others will have a border colour of blue rather than the yellow normally associated with peer units (even if they now report to a different HQ).
Here a Soviet tank corps has been broken down and one element now reports to a different HQ. However, all 3 brigades are highlighted in blue in order to identify them on the map as coming from the same original formation.
Note that this is very useful when seeking to organize your on map forces. However, if you select units associated with multiple commands or HQs at different levels in the Order of Battle the resulting display can become very hard to read.
Here, units of 2 separate Soviet armies have been selected (so two army commands are highlighted in orange). However, all the combat units in the two armies are shown in yellow as all they have in common one or the other shared HQ.
6.8.6 Movement Path
When you select a unit the possible movement paths will be shown by a lighter colour than the rest of the map (if you have set the show movement path option under game preferences).
In enemy held territory the identified path(s) will be accurate but not complete. In effect you can move to any hex shown but maybe be able to move to other hexes. As you move a unit and reduce the fog of war you may find new movement options appear. Equally you may find yourself moving adjacent to a previously undetected enemy unit.
Note that under some circumstances you can lose MPs during a turn. This is most likely to happen if you exit a hex with a high level of enemy air interdiction and in this case you may not be able to reach a hex that was shown earlier in the movement phase. This can also happen in the opening turn of a 1941 scenario if you pass the boundary dividing action in Bielorussia from that in the Ukraine (11.2.2).
The move options are shown as:
- No Shading – Friendly hex that can be moved into.
- Light Grey – Pending friendly hex that can be moved into.
- Light Red – Enemy hex that can be moved into.
- Very Dark Grey – Movement to that hex is not possible.
- Very Dark Red – Enemy (or impassable) hex that the unit cannot move into.
In the example above, the quickest (in MP) movement path is shown for the unit and the dark grey hexes to the west of that location indicate it lacks the MP to move into that zone.
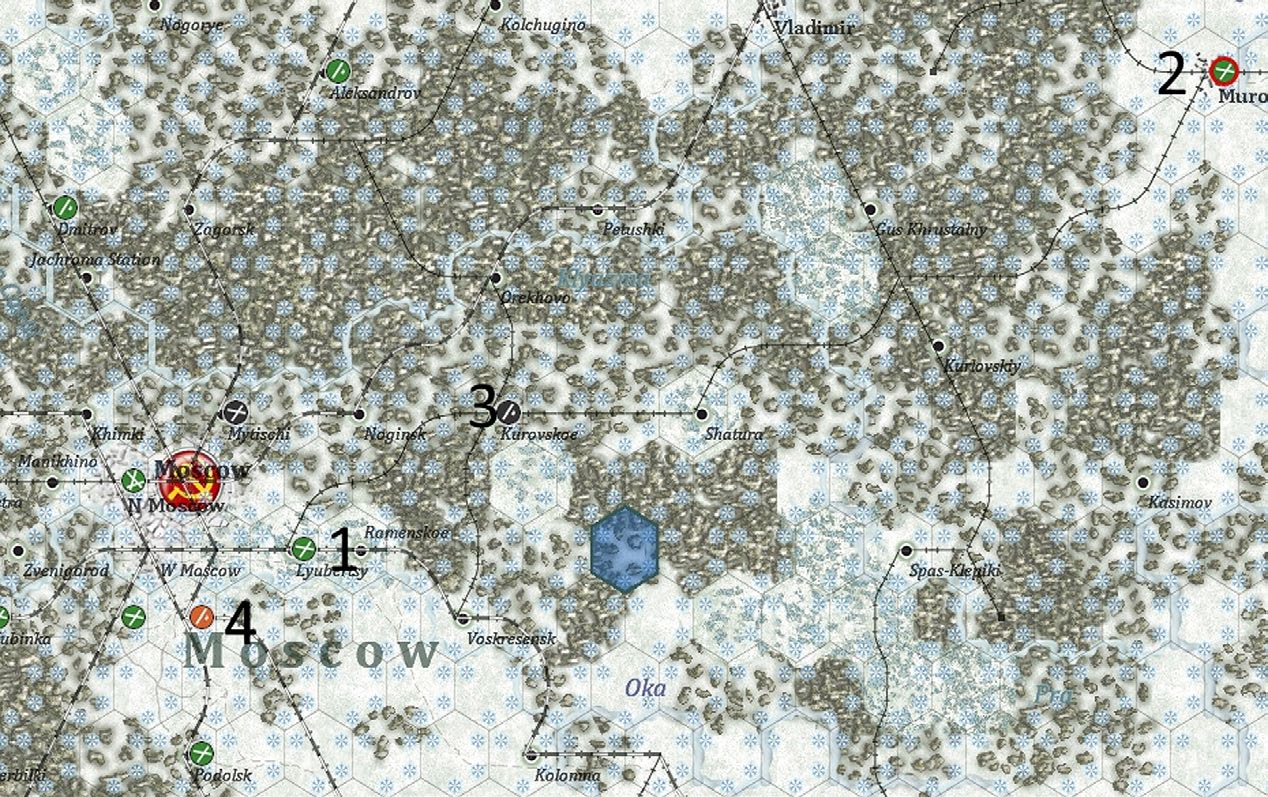
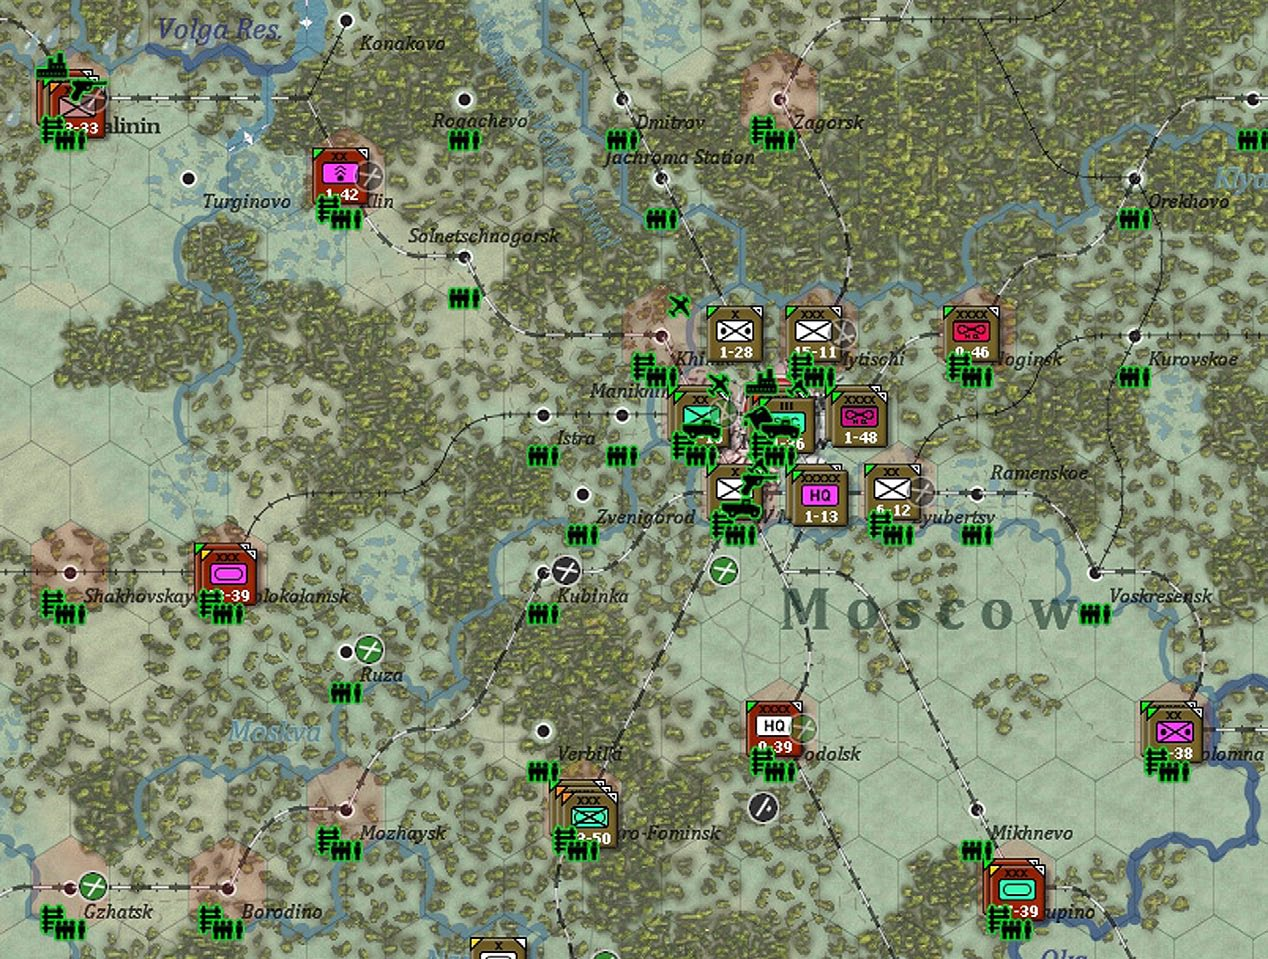
6.8.7 Factories
If this mode is selected, factory locations in friendly hexes will be displayed.
This shows the factories in the Moscow area. Hovering over any hex with a green production symbol will show information about what is produced and how large the relevant factory is.
If you want more information about the factories, this can be accessed either via the city display (37.13) or selecting the Factory information tab (from the ‘INFO SCREENS’ tab).
Further information on how to read these tabs is in chapter 28.
Factory symbols will also display on the map when a Strategic Bombing air directive is active (18.1.5). The map pop up information will provide data on the type, size and damage of the factories in a hex (subject to fog of war).
6.8.8 Reconnaissance and Interdiction
View Air Recon Levels: When enabled, enemy controlled hexes are shaded based on current tactical air reconnaissance values. The larger the recon value, the lighter the shade, with the shades ranging from very dark (no recon value) to clear (large recon value). In addition, numerical air recon values greater than zero will be displayed in the hex pop-up text. Air interdiction values (see below will also be displayed in the hex pop-up text.
View Air Interdiction Level: When enabled, air interdiction of ground hexes and air and naval interdiction of sea hexes will be displayed on the map area using a colour coded roundel symbol, brown for Soviet and grey for Axis, with a white aircraft.
The number in the roundel is the interdiction value divided by ten and truncated, so an actual value of 39 would be displayed as a 3. For ground air interdiction, only the phasing player’s symbol will be displayed and information about enemy interdiction may be inaccurate.
This low level interdiction is most likely the results of Soviet partisan operations. In game terms, the main effect is to deny the Axis player Administrative Movement (22.2.1) in those hexes and this will mostly increase the difficulties of supplying the front line formations and bringing up fresh, rested, reserves. This shows Soviet interdiction behind the German lines in September 1941. Only a few hexes (those with the 1 indicator) have enough to have a direct impact (38.7.2) but the red stars indicate there is some interdiction (above 0 but less than 1) in many hexes.
For air and naval sea interdiction, the symbols for both sides will be displayed for comparison purposes. The hex pop-up will display the numerical interdiction values for both sides in ground and sea hexes. Control of sea hexes will be indicated by shading with enemy controlled hexes shaded red, friendly controlled hexes unshaded, and contested hexes slightly darkened. Can be used in conjunction with naval transport (F3) or naval amphibious (F4) movement phase modes to determine hexes where naval movement will be contested (24.5).
This shows the naval interdiction off Riga after the German air phase on T1. A naval air directive has allowed them to take control of the hexes immediately around Riga (even where there is also Soviet interdiction the German value is at +2).
6.8.9 On Map Display During the Air Execution Phase
The air execution phase will be shown on the map in different levels of detail. If you set the combat resolution level to 1 or 0 then no battles will be shown during this phase.
In addition, you can set certain mission types not to be shown as battles regardless of the combat level (by default all reconnaissance missions are set as OFF) using the Air Directive screen (37.16.8). Equally altering the air execution phase (37.16.7) level of detail will alter the display. At the higher levels you will see the flight paths used by each air directive and the phase will be run more slowly At the lower levels, the only information shown will be any battles (if you have set the combat resolution high enough).
In effect, to see combat report windows appear during this phase, you must have a detail setting above None (and the actual AD not set to None), and a combat resolution message level of at least 2. The execution detail level will impact the number of messages that come up during the resolution phase.
You can use the F12 (battle location tab), the air execution phase summary and the information in the logistics event report (36.9.3) to review all the actions that took place in the air execution phase.
6.9 Logistics
The map and supporting information screens can be used to display a great deal of information about the logistics system in WiTE2. On map there are three main ways to influence what is displayed:
- Select logistics from map information tab (or press ‘N’);
- Press the ‘8’ key (you need to be in the ground movement phase for this)
6.9.1 Logistics Map Information Tab
If this is selected, you will see information about your depots and the current rail usage.
Depots:
Hexes with depots are marked on the map area with an
inverted triangle and a white symbol denoting the type of
depot (25.7.1). Type 1 depots (railyards) are marked with
a rail symbol, type 2 depots (that will import supply over a
sea connection) with an anchor symbol filled In blue, type
3 depots (a port that can export freight) with an anchor and
filled in white, and type 4 depots (national supply source)
with a star.
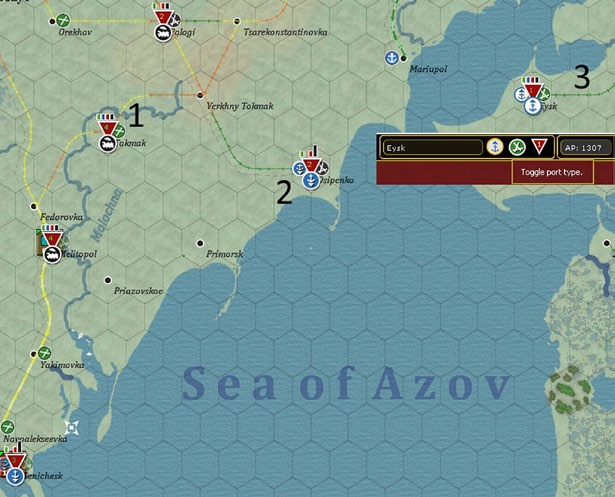
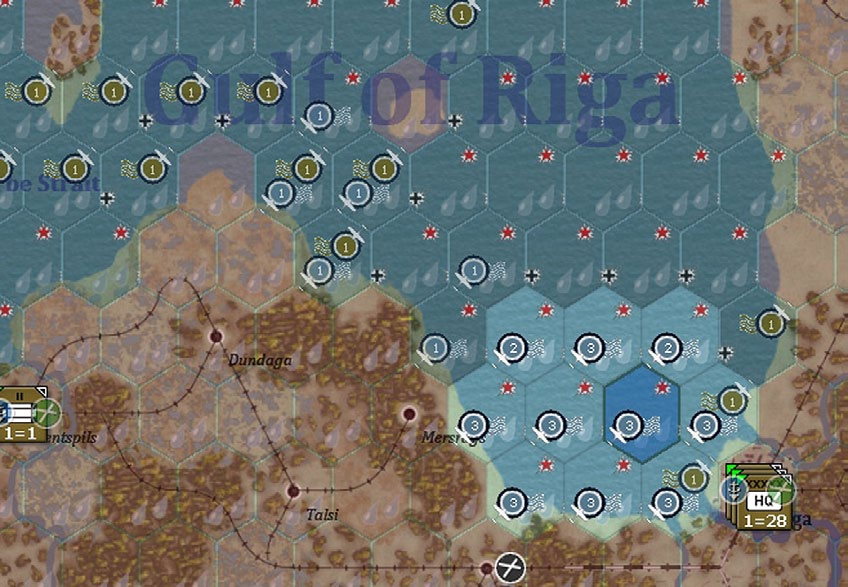
In this instance, the bulk of the Soviet depots are based on rail yards (1), Osipenko is set to receive freight (2) and Eysk to send freight (3). Note that if you click on a port hex you can toggle it between receiving and sending use the top of the game screen (shown as an inset). Depot supply priority levels (25.7) are indicated by a color coded number in the middle of the depot symbol with bright green=4, dark green=3, yellow=2, orange=1, and red=0).
The depot priority level can be opening the location tab, by right clicking on the hex and selecting depot to access the priority options or from the tab on the left hand of the top row. In the example above, Eysk can be changed from priority 1 by clicking on the depot symbol and selecting a new priority level from the drop down menu. This can also be done from the city view screen or using the right click drop down menus.
Bars are shown at each depot. The Green bar represents the amount of freight received during the logistics phase, the blue the amount of freight currently stored at the depot, the red bar the amount of freight that has been sent out by the depot this turn, and the black bar the total storage capacity of the depot (25.7.2).
Each segment of the bar represents 10k tons of freight, while the depot must have at least 100 tons to qualify to show any part of the bar. The maximum the bar will show is 20 increments which is 200k tons, so anything over 200k will display the same bar height.
Rail Usage:
Hexes with rail lines are colour coded based on tons of rail
usage but only give a broad guide to the impact on the
strategic movement point penalties in a hex. The exact
usage of a given hex can be found by hovering the mouse
over the hex.
Remember that dual track rail lines have a capacity of 30,000 tons per hex compared to 12,000 for single track rail lines.
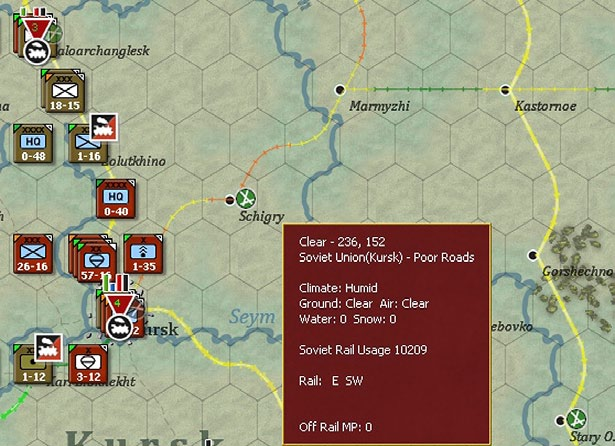
Here the Soviet rail net around Kursk is heavily used due to a build up of forces. Most of the rail lines are shown as yellow, a few are orange (reflecting the extra supply demands of the large air base at Schigry. The map pop up shows the usage of a particular hex.
Note that what is shown is the residual usage after the logistics phase, this value reflects congestion that occurred and was not totally cleared, so will affect the next logistics phase. In effect, actual usage would have been higher than the 10,209 shown.
Hex pop-up: If you hover over a depot, a pop up text box will appear with the actual numerical values used to generate the bars at each depot. Also included in parentheses next to the stored amount is the amount of freight that was stored at the start of the logistics phase. The hex pop- up text also displays the percentage of maximum capacity for the Received and Stored (at start of the logistics phase) values, as well as the capacity of the depot.

From the same area, Kursk is a key depot and is operating close to its capacity. The information also shows that it receives its freight from Moscow.
The deployment of the Soviet rail repair unit (the NKPS shown towards the bottom of the image) is important as it makes it more likely for freight to be sent to Kursk than any other local depot (25.7.9)
6.9.2 The Supply Net (‘8’)
This adds information about the supply lines between units and depots. Links between units and the main Depot to have supplied a unit are shown using a red line (but note that units may draw supply from more than one depot). Links between depots are shown as white lines (if overland) or blue (if any part of the path involves sea transport).
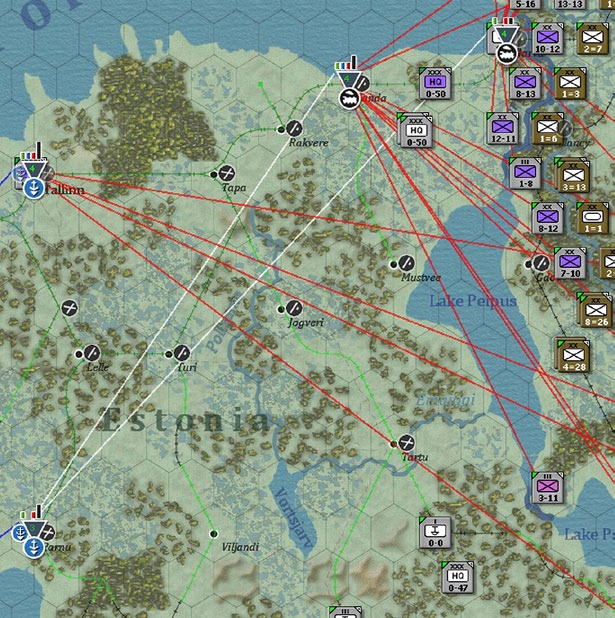
This shows the Axis supply net in Estonia. Both Talinin and Parnu are receiving freight by sea (the blue lines), Parnu can send freight onto Sonda and Narva (the white line) as they both are at a higher priority than Parnu.
As a gameplay note, it might be better to lower Talinin to priority level 3 and then it could send its supplies onto the priority 4 depots closer to the front line. On the other hand, setting it at 4 means it attracts the bulk of any freight being shipped in the Baltic.
Talinin cannot send to another depot (a priority 4 depot cannot supply another depot) but is supplying a number of Axis combat formations (the red lines). These concepts are covered in section 25.7 in more detail.
6.9.3 Supply Priority Map View
This can be accessed from the Map Information tabs. It provides an overview of the relative supply priorities of combat units and headquarters.
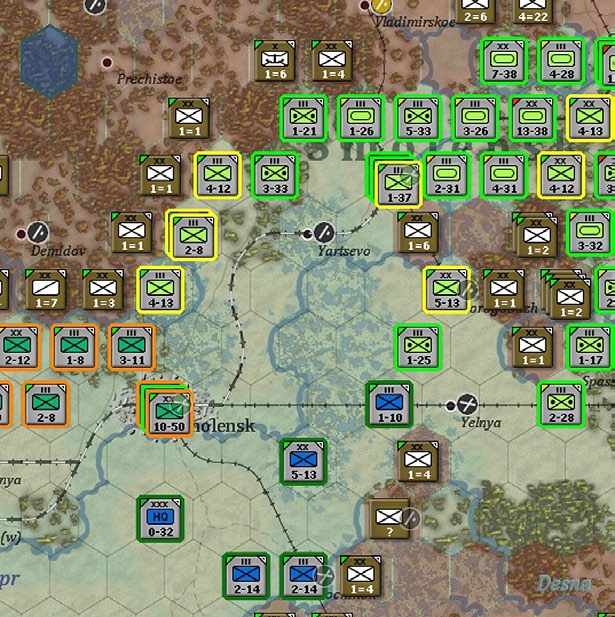
In this map view, units surrounded in orange are at priority 1, yellow is priority 2, dark green is priority 3 and light green priority 4. If any units were at priority 0 they would be outlined in red.
6.9.4 Further Information
If you are trying to understand the flow of supplies to your units in more detail then the following secondary screens may provide additional information:
- The supply details tab on the detailed unit information screen (37.3) will show how the unit tried to access supply in the last logistics phase and may give you an idea why it failed to do so.
- The logistics log (36.9) will show information both on supply distribution and production.
- The commander’s report has two screens that may be useful. The ‘units’ tab (35.2.2) can be set to show either the current supply levels for a unit or the amount of supply it received in the last turn. The ’locations’ tab (35.7) can be set to show the freight stored in every depot and the location of your trucks.
- The turn summary chart (36.16) can give a quick overview of any supply problems. Clicking on the ‘supply alerts’ button will mean that any units with less than 75% of their needed supply are shown on the map bounded in yellow.
Interpreting this information is complex and this level of detail is not usually needed for game play. You will also need to consult chapter 25 to interpret the displays but this may enable you to ensure your limited resources are being allocated in the most optimal manner.
6.10 Theatre Boxes
WiTE2 uses a number of Theatre Boxes (13.1) to reflect the commitment of troops away from the main area of operations. Theatre boxes appear on the map if you select Ctrl-t (or right click on any hex). They contain three tabs.
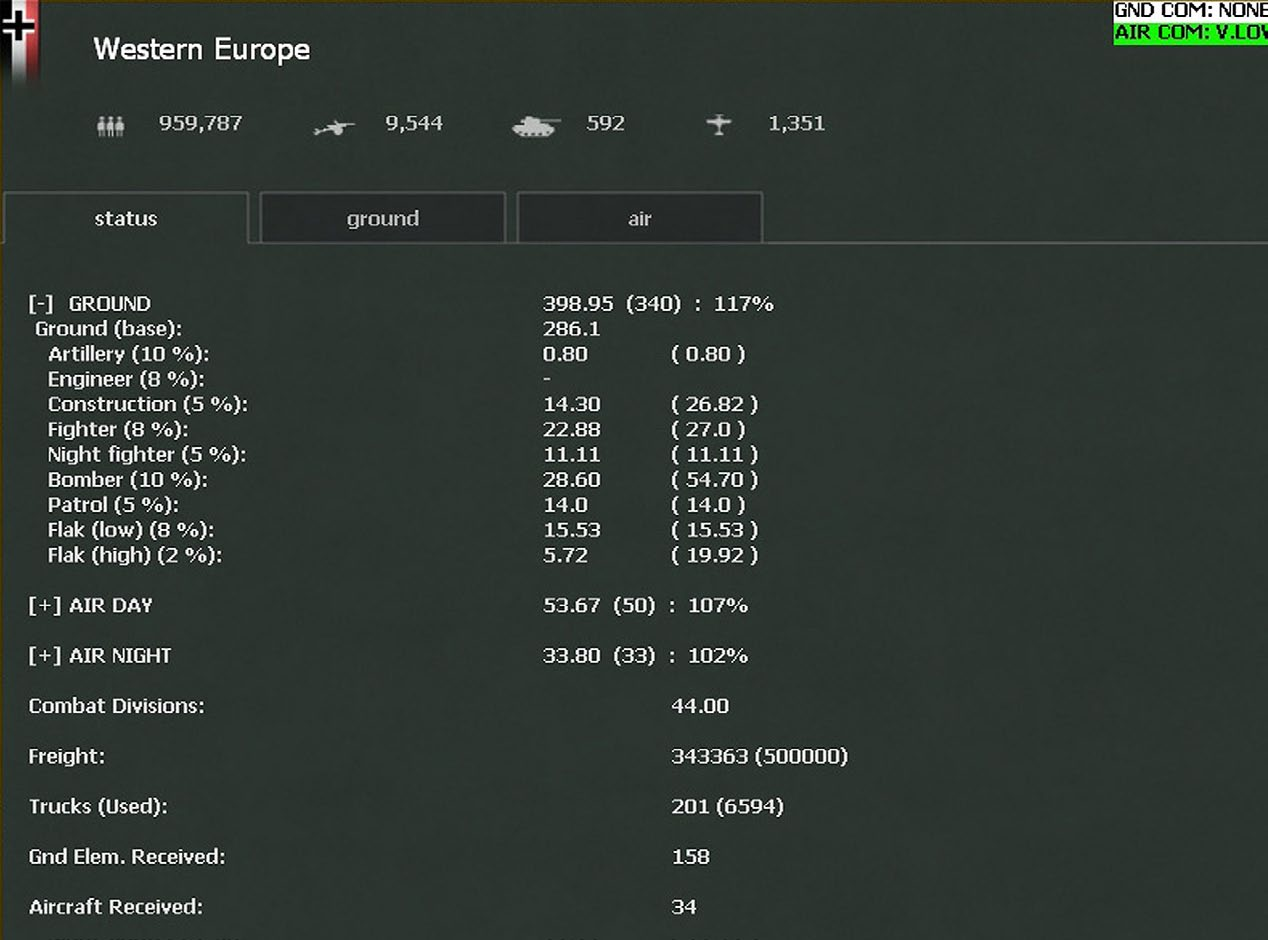
Status. Shows the land and air combat values of the units currently deployed in that theatre, the numbers of fighter, bomber and patrol aircraft. If you click on the [+] key, the full break down of how this cv is made up will be shown.
You will also see the number of combat divisions allocated.
The amount of freight that was received and, in brackets, needed. The number of trucks deployed to that theatre permanently and the number used to supply units in that Theatre.
Finally the amount of replacement ground elements and aircraft received by that Theatre.
The second and third tabs will show more detail on the ground and air units in the theatre.
The amount of detail for each individual unit shown will depend on the map zoom level.
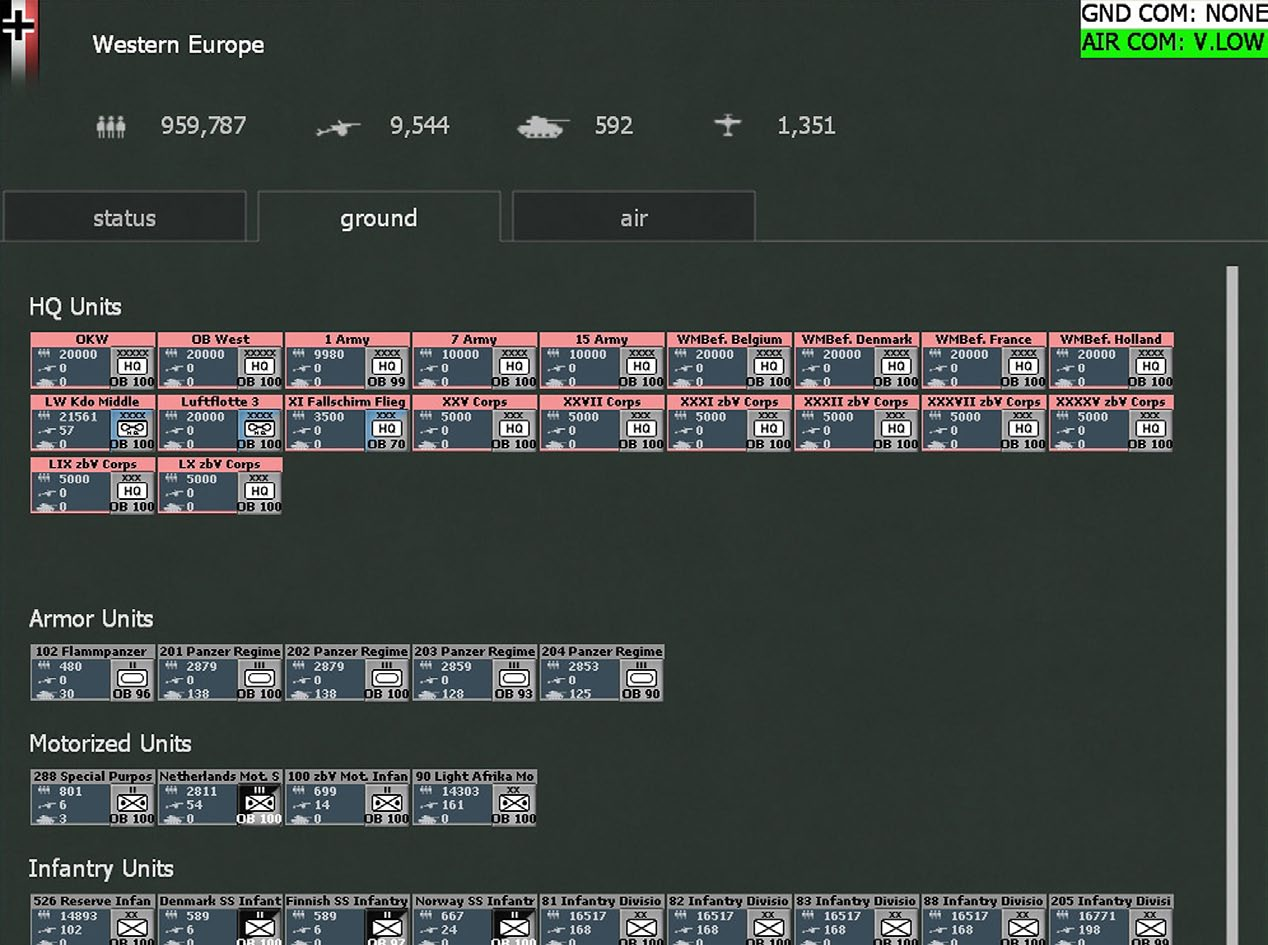
The example above is at the most detailed level Units in the Theatre boxes can be handled as units on the map. Clicking on a unit will bring up the detailed unit tab but with the HQ related information missing.
You can also access the units in a Theatre using the filters on the Commander’s Report. If you want to send them to another Theatre or the main map (13.3.4) it will often be easier to do it this way.
6.11 The Jump Box
This can be found at the bottom left of the screen (this option is enabled by default but can be turned off using the preferences screen – 2.6.3). The main part of this display shows the entire game map and indicates the location of the counters. Clicking on a portion will take the player to that sector.
At the top are letters which will vary according to side. The Soviet player will see N,T,E,R, and the Axis player W,N,Fi,R,G,Af,It,B.
Clicking on any of these letters will take you to the appropriate theatre box (13.1). Each letter also has a colour coded triangle. This indicates whether the required assets are in that Theatre to avoid penalties.
Since each Theatre has separate ground and air requirements (13.3.2), this indicator will show the status of the worst (so if the ground requirement is fully met but the air requirement is only 50% met it will show that).
The colour codes can be interpreted as:
- Light Green > 119.9
- Dark Green > 100 and <= 119.9
- Yellow > 80 and <= 100
- Orange > 60 and <=80
- Red <= 60
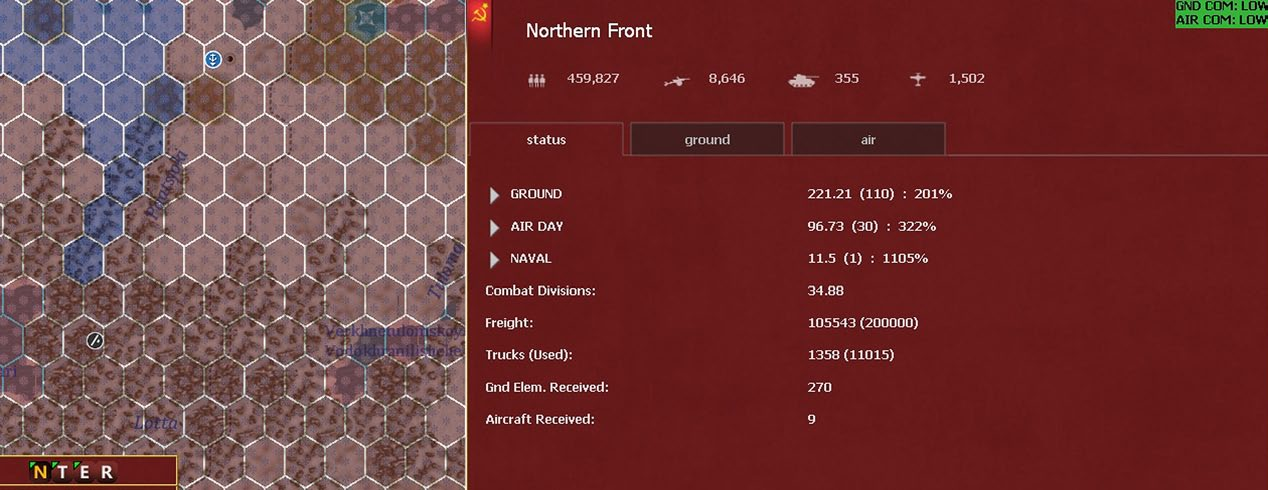
In this case the Soviet Northern Theatre more than meets the requirements for both air and ground assets. It is shown in green on the jump map and this situation can be cross-checked with the detailed Theatre box display.
6.12 The WITEpedia
The WITEpedia (36.14) can be accessed via the info screen pop up if you right click on the map or from the information tabs at the top of the screen.
A short report will be provided on the activities of most combat units in the game, leaders and other items. The report will also include a clickable link to other web resources discussing the particular topic.