4. Basic Gameplay
Focus: This section provides an overview of the key game play concepts in WiTE2. Our aim is that you can play the game by reading this chapter and will start to use the rest of the manual and appendices as you find you need more information. Having said that, reading the Player’s Notes may also be very helpful as they are designed to place the detail into a broader context.
Key Points:
- A short summary of all the main game concepts
- Where you can find Information when playing the game
- The basics of planning air operations and ground unit movement and combat
- The basics of supply production and delivery to combat units
- How weather works in WiTE2
- How to access and use the off-map Theatre Boxes
- A walk through of the first turns of the Velikie Luki scenario
4.1 Aim
The aim of the Getting Started section is to explain the basics of WitE2. The later sections of this manual re- examine all the topics and describe how everything works in considerable detail.
As part of picking up the core concepts of the game we also suggest reading the Player’s Notes in Appendix A (section 30). These provide short summaries of how WiTE2 differs from the original WiTE1 and WiTW, set out the key rules and provide some tips for play. In combination with this chapter, that should give you a good grounding in the overall game design and how the various sub-systems slot together.
This chapter also provides links to other sections in the manual where the particular topic is discussed in much more detail.
4.2 Structure of this Chapter
The Basic Gameplay Chapter has been split into three main parts.
- The first part covers the very basics of the game (4.3)
- The second part covers the main game concepts. This is sections 4.4 to 4.18
- The third part (sections 4.19 to 4.23) provide a relatively detailed discussion of how to play the first turn of the basic scenario of Velikie Luki and then some broad ideas about how to play the later turns.
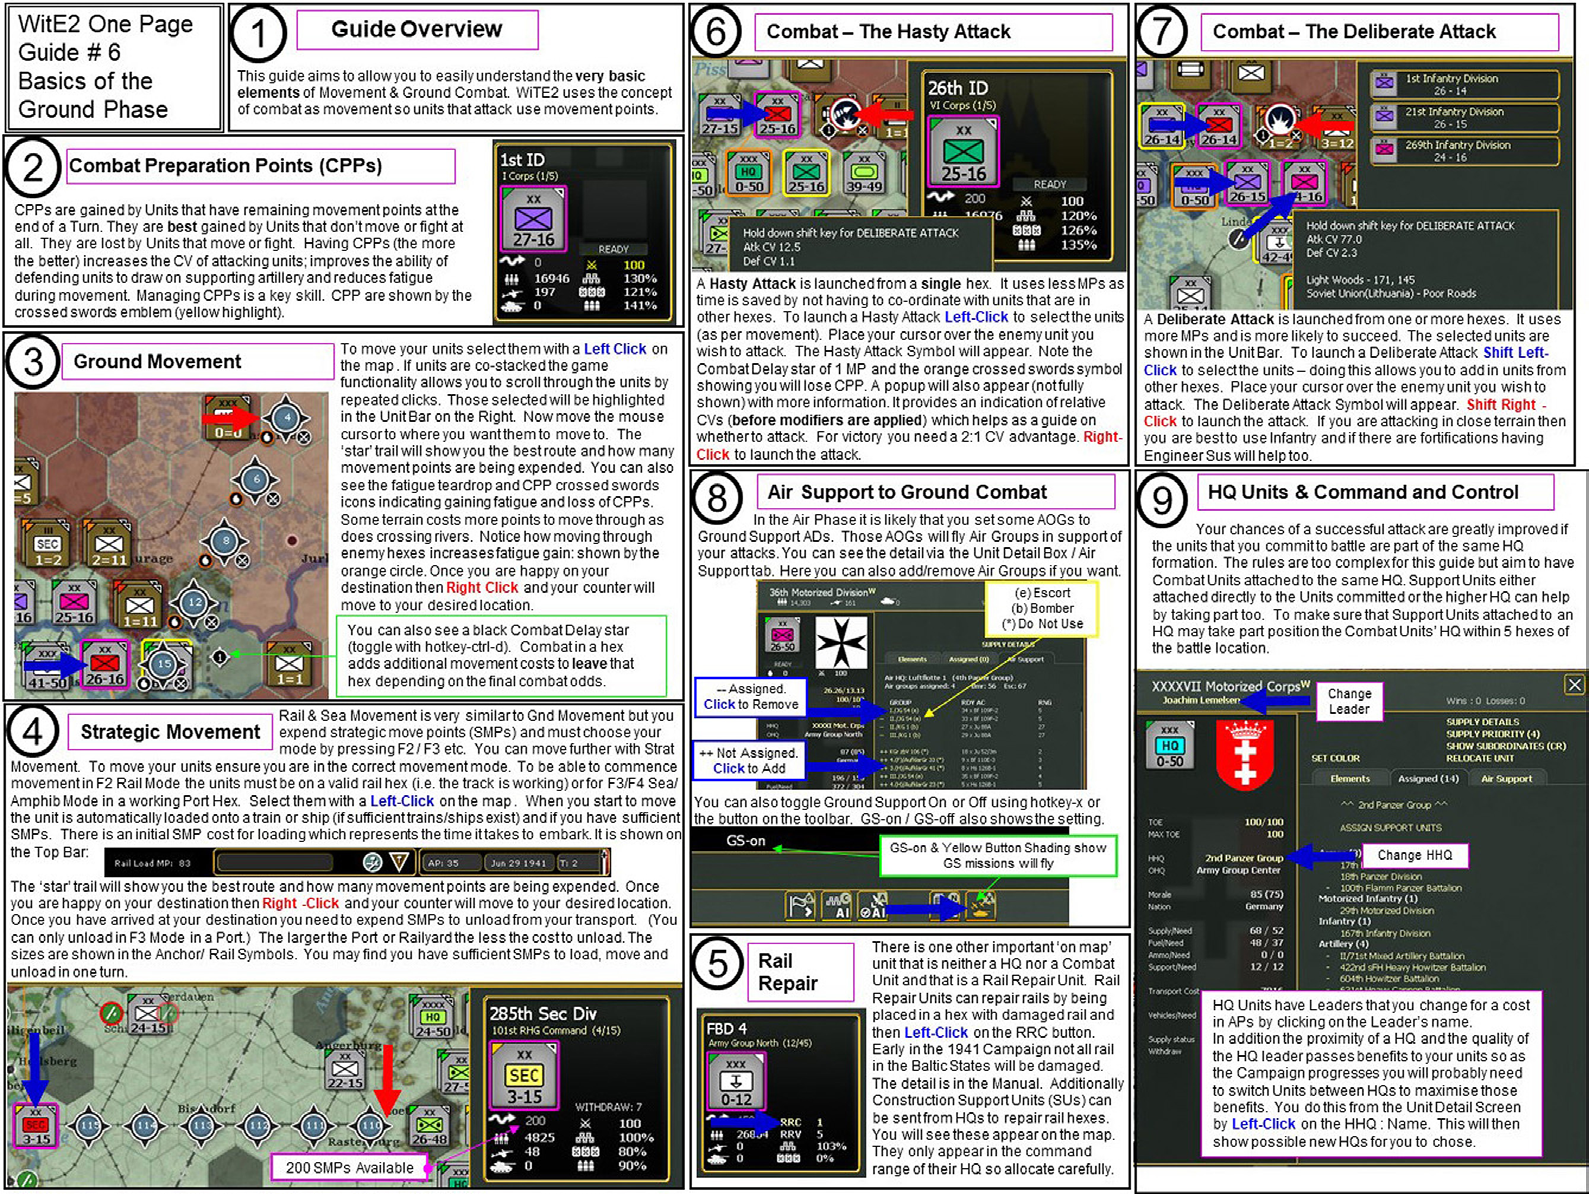
A number of Full Page Guides are interspersed throughout this chapter as graphic aide memoires in comic strip style.
4.3 Overview of the Game
This section covers all the basic concepts in WiTE2. At a minimal level, by the end of this section you should have some idea how the game is designed to be played and manage one or two turns of experimental gameplay.
4.3.1 Outline
WitE2 is a turn based simulation of the Eastern Front in WW2 from June 1941 to August 1945. A player represents either the High Command of the Soviet or the Axis Forces. Players can either play against the Computer AI or another Human opponent (equally the game can be set up to enable solitaire play with the player taking both sides).
The Game is played on a hex based map. Each hex is 10 miles across. The precise area covered by the map depends on the scenario chosen. Each Turn lasts one week.
WitE2 is an IGO-UGO game with the players taking turns to make their moves (like Chess or Backgammon). Each Turn is further subdivided into a number of phases where either the Player is able to make a move or effect a change or the Computer carries out relevant calculations impacting gameplay.
All these issues are summarised overleaf in the one page guide:
4.3.2 Game Concepts
WiTE2 uses a number of game concepts that have a particular meaning or role within the rules. The references in this section are to any further discussion in this chapter and to the main body of the rules.
The combat value (CV) (23.1) of a unit is a vital piece of information that shows the aggregate combat power of a unit. However, this can then be further modified by leadership, terrain, supply and the allocation of support units. It can also be inaccurate (for enemy units) due to the Fog of War (10.2).
So it is, at best, a rough guide to combat efficiency. If, at the end of a battle, the attacker has a 2-1 (or greater) CV advantage, they will win and the defender will retreat, rout or be destroyed.
Administrative Points (AP) (Chapter 9) represent the limited time and other constraints that affected both sides. AP are used to replace commanders, build depots and airfields, build certain unit types and to disband units.
Combat Preparation Points (CPP) (23.2) are one way the game reflects the importance of building up before launching an offensive. Units can have between 0-100% CPP depending on how well rested they are. The immediate effect is that CPP increases the CV of attacking units (in other words well rested units are more effective on the offensive) but it also improves the ability of defending units to draw on supporting artillery.
Units with a high CPP are also likely to have more movement points as a result.
Combat Units (CU) (21.3) are any on-map (or within a Theatre Box) ground unit counter apart from the various types of rail repair units that may also be in play.
Support Units (SU) (21.5) are any unit that is held off map. These can be attached directly to combat units, to a HQ (21.5.2) or a city or airfield and will be allocated to combat, or to support tasks such as digging entrenchments, as required.
Multi-Role Units (MRU) (21.4) are units that can either be on map (i.e. acting as a Combat Unit) or off-map (i.e. acting as a Support Unit) depending on the player’s wishes.
Air Operational Groups (AOG) (4.6 and 16.3) are the main way you manage your individual air units and assign them to combat operations.
4.3.3 Main Turn Phases
WiTE2 splits the game turn into four main sub-sections. In two of these the player is active and in the other two the computer either runs through the logistics and supply routines or executes the orders for the air phase.
Thus the first part of the turn is where the computer runs the supply, production and logistics phase. The player has no direct involvement at this point but has a variety of tools, available during the player controlled phases, to set supply priorities and to ensure that certain units are allocated new equipment and replacements.
The second part of the game turn is for generating the orders for the air phase. There are various levels of automation available to ease the demand on the player but you will need to make some overall decisions about allocation and focus of operations.
The player can take a varying degree of direct control including detailed allocation of air groups (16.4) to Air Operational Groups (16.3) or even manually selecting the precise weapon/fuel load of each air squadron. Alternatively the bulk of the air war can be conducted using the AI-assistance routines (4.6 and 17.1).
Once this is completed, the computer will then resolve the third phase – conducting all air missions apart from ground support, the air transport of supplies and any airborne operations (these all occur in the land phase).
Finally, the player will move the land units in the ground phase. WiTE2 uses the concept of combat as movement so in this phase units may move or attack as needed (as long as they have sufficient movement points to carry out the desired actions). Equally units may move longer distances by rail or by ships.
If the ground phase involves combat, it is possible that aircraft will also be committed (ground support) as ordered in the earlier air phase. Air drops and air transportation of units and supplies occur in the ground phase. Equally as units move they may encounter the results of the earlier air phase such as needing to move through enemy interdiction air attacks.
4.3.4 User Information
WiTE2 is a complex game and a variety of information displays are available. These can include:
- Changing the on-map display to show different information;
- Changing how the counters are displayed;
- Accessing information using the tabs at the top of the game screen;
- Accessing information about a given hex using the top of the game screen (if the hex has a named location such as a town, an airbase or a depot);
- Hovering your mouse over a hex will bring up an information display that can be used in place of changing the map display; and,
- Right clicking on a hex will bring up information about that hex and also enable the player to move onto a variety of display screens.
A very important source of information for players is the Commander’s Report. This is discussed in some detail later in this chapter but players are strongly advised to refer to appendix F for more information about how to access and interpret the information available. It is daunting at first sight but you will soon become aware of how to find information you consider to be important.
Further information on how to use the UI is provided later in this chapter (4.4) and in chapter 6.
4.3.5 Changing Unit Status
In addition to moving units (and attacking) on the map, WiTE2 allows you to set specific roles or criteria for each unit. Options include setting modes such as normal, refit (the unit is more likely to be reinforced or to upgrade to new equipment) or reserve (the unit may join in a battle – either defensively or in support of an attack). You can also set a unit so that it does not take on 100% of its notional equipment.
These options can be done variously using the Commanders Report (very useful if you want to set a number of units to the same status), the on-map counter or using the detailed unit view that you can access via the on-map counter.
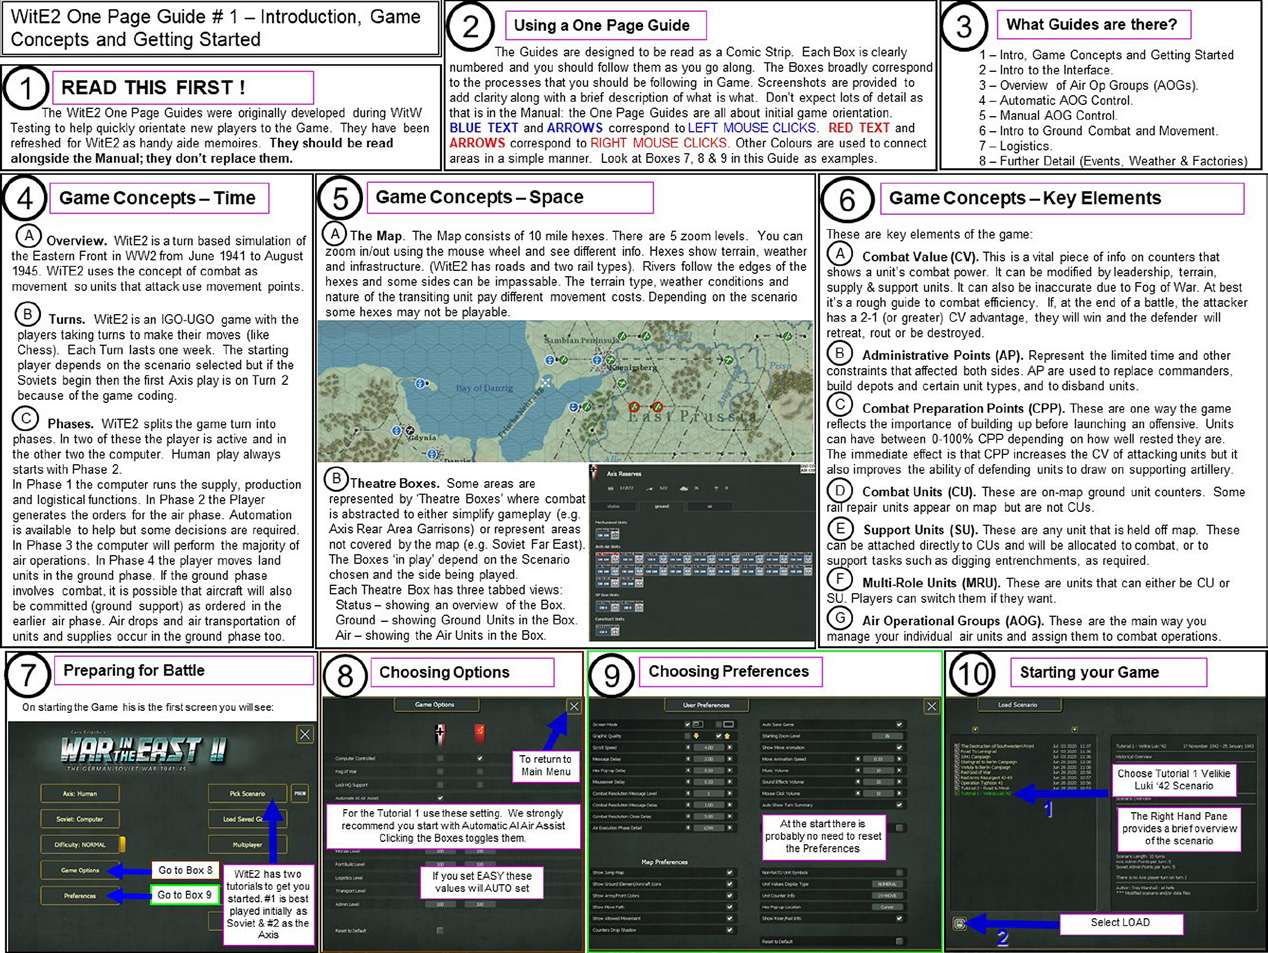
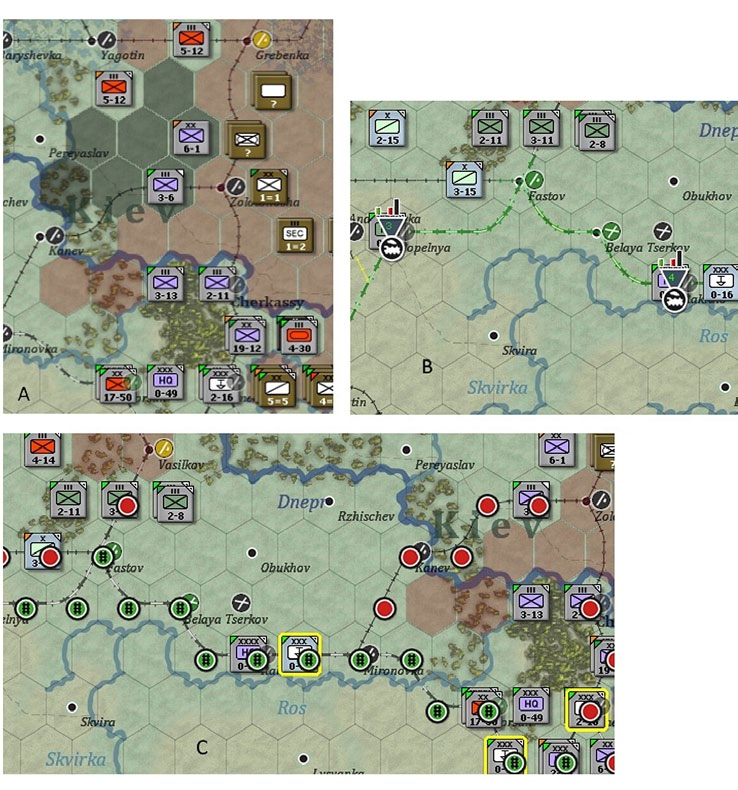
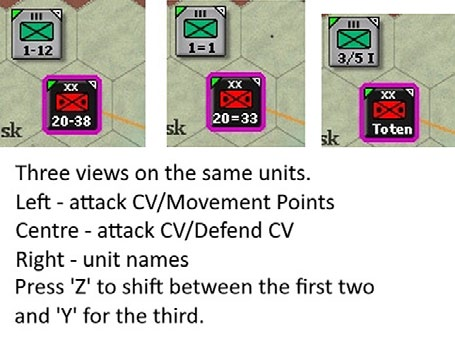
The image below shows three views on the same unit. Image A is how the counter appears on the right hand screen when you select it. Here you can change mode from ‘Refit’ by clicking to the right of the counter. Image B is an extract from the detailed unit tab (37.3), here you can change the mode from ‘refit’ by clicking on the box below the counter image. Finally, Image C is an extract from the Commander’s Report (for all the divisions in the 33 Army), you can change mode in the ‘Status’ column either unit by unit or by using the ability to carry out large numbers of changes at once (35.2.3).
4.3.6 The Map
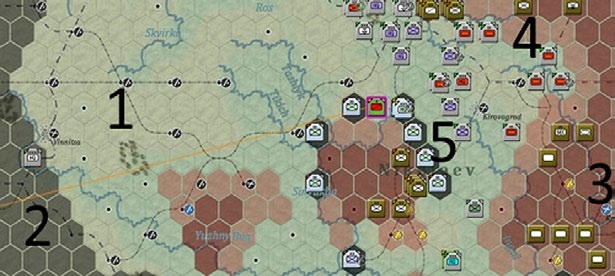
The main playing area is a detailed representation of the terrain and physical resources (cities, train lines, major roads) in the region from east of the Urals to the Rhine in the west and from the Arctic to the Black Sea. In many scenarios not all this potential region is in play.
Each hex is coded according to both the terrain and any human improvements. So, for example, a hex might contain clear or swamp terrain and either can have a rail line running through it.
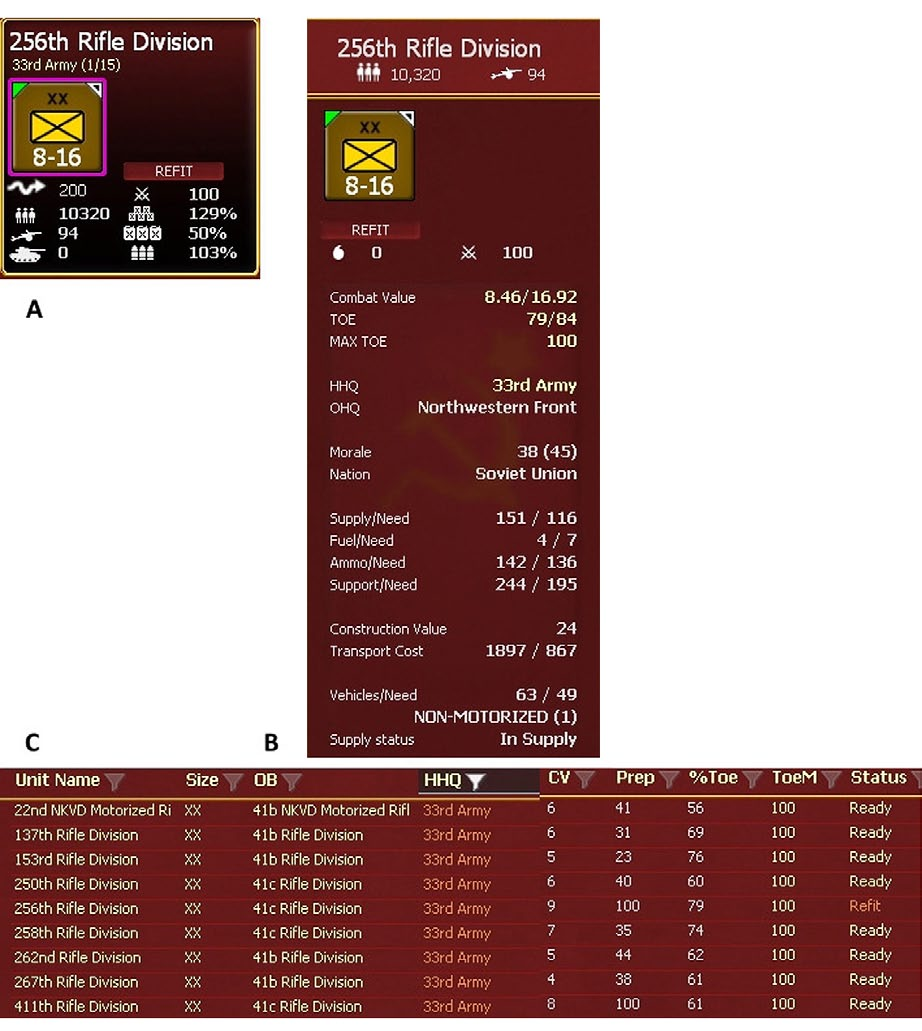
This shows a portion of the Western Ukraine. Hex ‘A’ is rough terrain, hex ‘B’ is a city hex with dual track rail line and level 2 airbase, hex ‘C’ is clear terrain with a good road (you can make the roads easier to see by altering the map view, see chapters 6 and 7), hex ‘D’ is clear terrain and a dual track rail line and hex ‘E’ is clear terrain and a single track rail line.
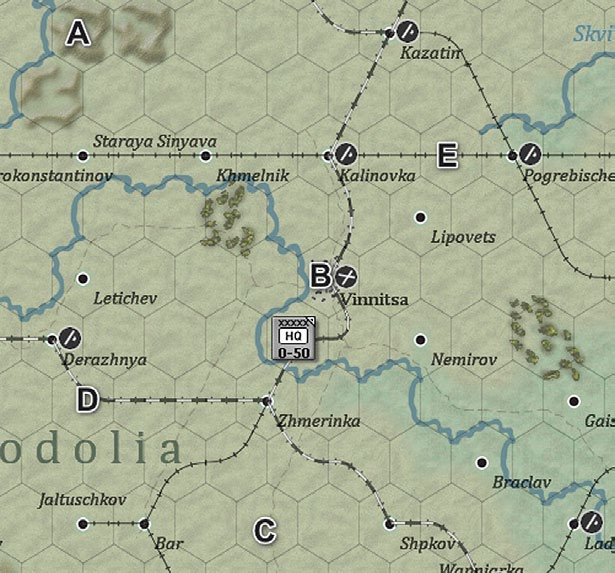
Some areas are represented by ‘Theatre Boxes’ where combat is abstracted. These represent regions where the Axis powers are directly at war with the Western Allies (so in June 1941 this happens in North Africa), regions where the Axis faces a substantial partisan war (both the Balkans and within the Soviet Union as the Axis forces advance), regions where the Axis powers and the Soviets are in conflict (the bulk of the Finnish front) or where the Soviets needed to retain a substantial garrison (such as the Far East).
Finally both sides have a ’national reserve’ Theatre Box where fresh units form up, can train and be subsequently deployed to the main map. Equally you can send badly damaged units to the reserve to refit. Here they will have a priority for manpower and equipment.
4.3.7 Map Modes and Displays
Different filters and displays can be applied to the map to display a variety of information. To control the clutter the player can switch these options on or off according to their needs.
It is thus possible to show enemy controlled hexes, hexes that have been captured this turn and hexes that were friendly controlled at the start of the turn. Other displays that can be turned on or off include the weather graphics, the depot network, newly repaired rail lines and the fortification levels of individual hexes.
The image above shows three different views of the roughly the same map area. A shows a recent German advance into previously Soviet held territory (the hexes in the darker grey-green). B shows the logistics network behind the German lines, showing 2 depots and the usage on the main rail line. Image C shows how much of the rail network behind the German lines has been repaired and can be used (the hexes with the green track symbol).
Other options include displaying battle sites or the mission zones of planned air directives.
You can also opt to remove the counters from the display – which can be very useful if you want to check on map information such as the usage of rail lines and the location of your depots.
Hovering your mouse over a hex will also bring up a display box that summarises the information available from the various map display options.
4.3.8 Game Options
WiTE2 can be played in a variety of ways and customized to suit the players. Options include whether the game is between a player and the AI or between two players (note that in this case the game can also be played using Slitherine’s servers). Other options include if either side will have advantages or challenges (game difficulty), whether or not the fog of war will affect the game and how the game will be saved.
4.3.9 Air Units
In WiTE2 air bases are permanent fixtures on the map. Over the game, more can be built or existing ones can be expanded, and, of course, they may switch ownership.
Air Commands are represented on the map with counters and are used to organise your air force (if you are using the AI-assistance routines). Depending on the map display option chosen, the rough location of the Air Operational Groups are shown (this is shown roughly in relation to the airbases in use). These are labels with no actual on-map presence but are used to ease a lot of the procedures associated with air war management.
When you first open a turn, you will see the rough allocation of the Commands and AOGs on the map, as:
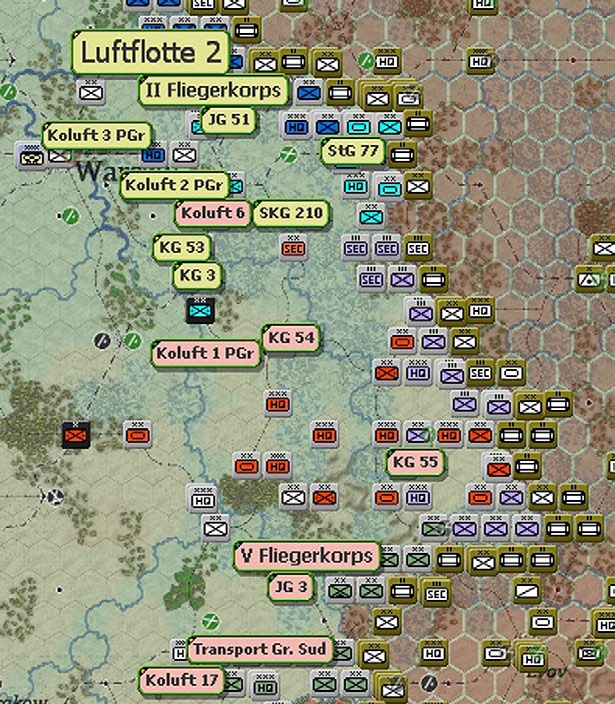
The nature of what is shown will vary according to how the map display is set up (from zoomed out where you will only see the Air Commands to zoomed in where you will see information about each AOG on the relevant information tab).
Air Commands and AOGs may each have planes based at more than one airfield and may share airfields with another Command or AOG.
Air units, as such are not shown on the map. Individual planes are organised into air groups (of different sizes) which have a primary role (fighter, recon etc.) and contain one type of plane. In turn, these air groups are assigned to both an Air Operational Group (AOG) and an Air Command. In some instances these are the same but mostly a given Air Command will have one or more AOGs assigned to it.
More information on controlling your air units is in section 4.6 below and then in chapters 16-19.
4.3.10 Land Units
WiTE2 is based on a very detailed representation of the forces available to the Axis powers and the Soviet Union. The basic building blocks are individual tanks, guns and planes and squads of infantry, engineers and support troops. For practical purposes these appear in the game as air groups (of different sizes) and ground units (some appear on the map as counters and others are ‘attached’ to either other combat units or to the various Headquarters).
Combat units are shown with an estimated ‘combat value’ (CV) which is an aggregate of the combat power (23.1) of all the constituent elements within that particular formation.
Ground Units. WiTE2 is basically a divisional level game but contains combat units that range in size from Corps to Companies. In addition to combat units, the game represents the various headquarters that controlled the two armies throughout the conflict.
Combat and Support Units. Ground combat units in WiTE2 reflect the main combat power of both armies. There are two basic types of combat unit. Some can only appear on the map and others never appear on the map. In addition some units can be in either mode (called ‘multi- role’ units).
On map units (also called Combat Units – abbreviated to CU) can be shown in a variety of ways depending on the player’s choices. Options are to show the counters with the two main numbers as the attack value and the movement points or the attack value and the defensive value (the enemy will always be shown with this option).
If the player is using the ‘fog of war’ option this information may not always be shown for the enemy and may not be accurate.
Off map units (also known as Support Units – often abbreviated to SU) include the various specialist artillery, anti- tank, anti-aircraft and engineering assets that both armies deployed. They also include units that were too small to operate independently such as early game Soviet tank brigades.
Some units are also designated as multi-role units (again this is often abbreviated to MRU). These include Soviet rifle brigades and various Axis brigades that appear throughout the game. These can be ‘on map’ or off map as support units depending on player choices.
Off map support units are always assigned to another unit. All can be assigned to a Headquarters unit. If this is the approach chosen, they are then allocated to combat or to other functions (such as building fortifications) by the computer (the chances of this happening are modified by the relative competence of the commander of the HQ) when units attached to that HQ engage in combat.
Others (such as infantry, armour, anti-tank, combat engineers and anti-aircraft) can also be directly attached to a particular on-map combat unit. In this role they will always take part in any combat that involves their parent unit but are not available for other purposes.
Headquarters. In addition to combat units, WiTE2 represents the command structure of both armies by on- map Headquarters units. These range in size from Corps to Army to Army Group (or Soviet Fronts) to the High Command (such as the German OKH or the Soviet Stavka). Headquarters can directly command combat units and have various off map support units attached.
HQs should be organized in a logical hierarchy. For the Axis powers, the usual organization will be to have combat units reporting to a Corps HQ, these in turn reporting to an Army, a group of Armies then report to an Army Group. After their initial defeats in 1941, the Soviet structure will alter so that most combat units report to an Army and those are then organized into Fronts.
Note that each HQ has a command limit. You can exceed this but then the commander will be less effective due to the excess demands on their time and HQ resources (such as staff officers, signalling units and field hospitals).
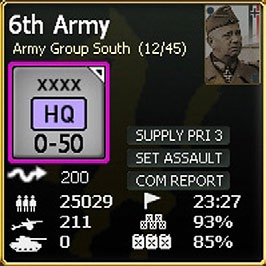
This shows the German 6 Army HQ. All the information on the counter is discussed later (4.7.4) so for the moment note that it currently reports to Army Group South, it is set to level 3 for supply priority (4.10.12), it has just over 25,000 men directly attached and it uses 23 out of its potential 27 command capacity (4.7.4).
Controlling your order of battle, and ensuring an appropriate command structure, is very important when playing WiTE2.
Leaders. Each Headquarter is assigned a leader. The game includes almost all the commanders available (who either commanded a corps or higher command, or could have) and each is rated according to their competence on seven factors. Some of these factors directly influence combat performance and others logistics and movement. For the moment, what matters is the higher a value, the better a commander is.
Corps (or Soviet Army) commanders can only influence the performance of units under their direct command but do so up to their full notional value. Army (or Soviet Front) commanders and above influence all the units under their indirect command but at a reduced value. Their rating is reduced according to both their distance in the command chain (so the leader of OKH will have some influence on almost every unit on the Axis side but this is relatively limited) and physical distance on the map (see Chapter 15 and especially section 15.5 for more information as to how this works).
So there is a trade-off between having your best commanders in the most senior roles and ensuring that key formations have competent direct leadership.
4.3.11 Supply and Depots
The supply system in WiTE2 is complex – but mostly happens ‘out of sight’ as the computer handles all the calculations.
Primarily, supply is moved along rail lines to depots and from there to the combat units. Trucks are often essential to moving supply from depots to HQs and can be drawn from your overall pool or the unit’s own organic truck allocation (this in turn will reduce the number of trucks available to the unit for its own movement).
Even at the basic level, there are a few key features to keep in mind.
First, the capacity of each rail line is limited (the most obvious aspect of this is whether or not a rail line consists of dual or single tracks). This capacity is not just used for the transport of supply and replacements but also to move combat units over long distances. Thus a given rail line can supply only a limited number of units (25.4).
Second, depots are crucial to both store and distribute supply. For the moment, remember that depots have three characteristics. Their type (most in the game are railway depots but some are designated as National Supply Sources or as ports), their size (which is related to the size of the railyard in the hex) and their priority (from 0-4) set by the player.
You as a player directly control the priority and location of the depots and the deployment of your HQs. As an aside, you can fully automate the creation and changing the priority of your depots to the computer.
Finally each HQ can be given a supply priority (from 0-4) by the player. All HQs (above 0) will be allocated a minimum level of supply and the priority setting will influence the maximum amount of supply that particular command will potentially claim (so a corps set to level 3 will take more supply than one set to level 2 - if it is available) but all commands will gain a basic minimum, if enough supply is available (25.8).
Note that in the example of the 6 Army headquarters above it is set to ‘supply priority 3’.
HQs will try to draw supply from nearby depots but sometimes will seek supply over a substantial distance.
Airbases also are allocated supply priority (from 0-4) by the player. In this case an important difference is an airbase set to level 0 will receive no supplies at all.
Note that setting a high priority for a given HQ does not guarantee receipt of that supply if insufficient supply stocks are available in the local depot network. Lack of supply, ammunition or fuel will seriously hamper the combat power of your units.
Railyards. These are a very important aspect to WiTE2. As above, the size of the railyard in a hex will have a direct impact on the size of the depot in that hex. They also contribute to the overall rail stock that each side has. Finally railyards make it easier to load or unload units onto trains for strategic movement.
Ports. Like Railyards, Ports are both part of the supply distribution model and enable strategic movement. For supply purposes, ports can be designated to either send out supply (to other ports in the same sea zone) or receive supply from other ports.
Before moving on, let’s put some of this information into context.
- You can access most of the in-game information in a variety of ways;
- You can amend the displayed game map to show different information;
- You can amend the on map counters to show different information;
- Supply really matters and involves transportation links (trains, trucks and horse drawn carts), depots and the relative priority you set for various combat commands;
- Organizing your order of battle, and leadership, is really important.
4.3.12 Administrative Points
These are used to represent limited command capacity for both sides during the game. Most of your allocation is from the per-turn limit for that particular scenario (3.3), some come from particular events (40.12) or by doing better in one of the off-map Theatre Boxes (4.14). You spend them to create depots, new units (this varies according to the unit type and game period) and swap commanders. Review the table in section 9.2 for a full list of the relevant actions and how much each will cost you.
4.3.13 Ending a Phase or Turn

Once you have completed all the actions for a given phase (i.e. issued all the air commands or land movement orders you wish), click on the end phase button on the right hand side of the top tab.
Depending on where you are in the overall game turn this will either commence the phase where your air commands are carried out or end the game turn. In this case, the game will move onto a logistics phase for your opponent (5.3.1).
4.4 Finding Information
This Topic provides a basic overview of the Player Interface and the Map. As discussed above, WiTE2 provides a lot of information to help players and this section will show you how to access it and some basic guidance as to how to interpret it. Further information can be found in chapter 6, where appropriate in the manuals and the various appendices discuss how to read the tables and displays in detail.
The one page guide overleaf summarises the information in this sub-section.
4.4.1 Basic Principles
The various information tabs work on one of five principles:
- If you click on the tab, then you can carry out certain actions, as an example, clicking on the rail mode movement button will enable that option (in this case you can move units that meet the criteria by rail)

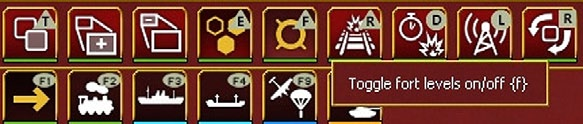
- If you click on the option, the information will be shown on the map. An example of this is the ability to show the level of fortifications in each hex:
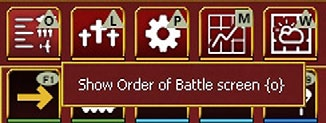
- If you click on the option, it will open a more detailed screen allowing you to make other changes or review something in more detail. An example of this is the Order of Battle (36.1) tab, click on this and that detailed screen will open;
- If you click on the option, you can amend the values. An example of this is the depot indicator (again top left hand side), hovering your mouse over this allows you to set the priority for that particular depot;
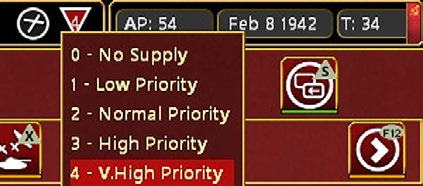
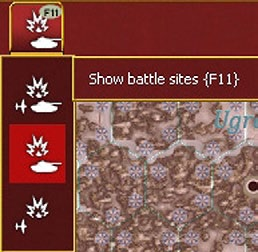
- If you click on the option, a drop down box will appear, you can select from this list and that will alter the map or unit display accordingly. An example of this is the battle site indicator tab (6.8.2) where you can select between showing all combats, just those involving land units or just those that occur solely between air units.
4.4.2 Using the Menu Tabs
Most of the interface is accessible using the toolbars at the top of the screen. There are four broad areas:
Menu Tabs. Across the top of the playing area are various toolbars that allow you to access key information.
- Mode Toolbars. These fill up the left and centre of the area. The top row options will change according to which of the three tabs (map information, info screens or administration) you select. The bottom row options will change depending on if you are in the air planning or ground phase (note the phase will be shown on the middle of the screen).
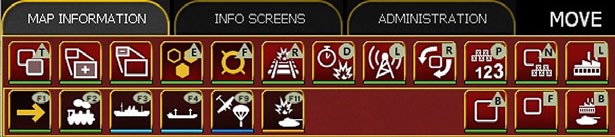
- Some tabs may appear in more than one of these displays if they are still relevant, so for example, setting air superiority missions (18.1) is only available when setting the air orders (17.4) but the option to display battle sites is available both when setting air orders and during the ground movement phase (Chapter 22).
- General Information Box. This is on the top right hand side and shows key information such as the Date, Turn Number, City Name (if applicable), and available administrative points (Chapter 9). The City Name Box is particularly important as clicking on the name accesses the City Information Screen (this can also be accessed via the map). Depending on what is in the hex, this may also show information about any depot or airfield that is present and can be used to create a new airfield or change the priority of a depot.

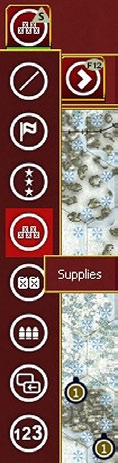
- At the left side of the Info Box is the Soft Factors Tab. This toggles various Soft Factors which indicate information about on map units by a colour coded tab on the top left corner of a unit counter. A good example is if the supply factor is chosen, then a red tab shows a unit with less than 41% of the supplies it needs.
- In addition, also almost all this information can also be accessed if you right click on any map hex.
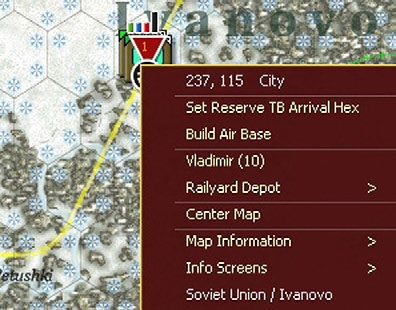
- More information about these options will be provided later in the manual but note that you can use this method to create a new air base (or increase the size of an existing one), alter the importance of the depot (or create a new one), access the city screen (Vladimir in this case) and access a range of other options.
- The rest of this chapter will talk you through how to use and interpret the information provided. More detailed information is available in Chapter 6 and the contents of all the secondary charts and tables are described in the relevant appendices.
- A full list of all the various menu buttons can be found in section 6,2.
4.4.3 Changing the Map Display
The WitE2 Map can be set to one of five zoom levels (you can shift views either by the mouse or by using the zoom- in/zoom-out tab) and is based upon a 10 mile hexagonal grid. Each hex has its own terrain, weather and perhaps human structures such as railways, roads or towns. Thus the map sets the basic playing environment for WiTE2 and presents information on:
The Geographical Terrain. Each hex has a specific Terrain Type. The terrain impacts directly on the movement and combat that occurs in or through the hex. Additionally hex sides can represent terrain features such as rivers which also impact on movement and combat or may even be impassable. More information can be found in chapter 7.
Weather. WitE2 models both air and ground weather conditions. These weather conditions can be seen on the map by toggling the Show Weather Button (Hotkey-W). Weather affects both combat and movement (see chapter 8 for details). The weather model is dynamic with fronts (of high or low pressure) moving into the game area and in turn generating weather effects, such as rain or clear skies. As the air weather shifts to rain or snow, ground conditions will change to mud or snow.
The ground weather only affects ground operations and the air weather only affects air operations.
Man Made Facilities. Some are always visible like Ports, Airbases and Rail lines. Others can be toggled on/off using the Show Industry, Roads, Fortifications or Logistics Info Buttons. Most of these man made amendments to the map are critical to the logistic model.
Roads are important during poor weather turns and in terrain such as forests, mountains or sand where off-road movement is often slow (especially for vehicles).
Unit Counters. Units are shown on the map as square counters. If you left click on a unit you may see all the movement options (if you have the hex control option displayed) and a more detailed unit box will appear on the right hand side of the screen.
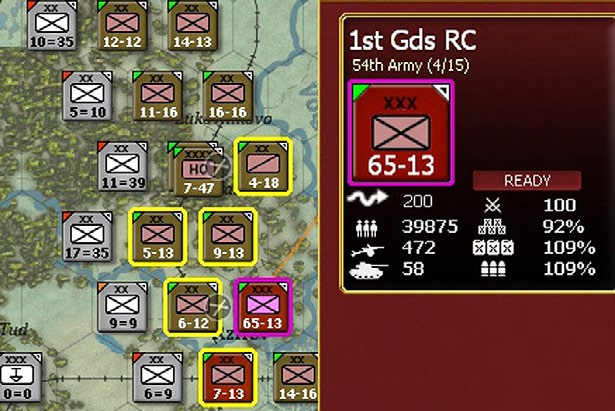
In this case the Soviet 1st Guards Rifle Corp has been selected on the map and unit display is now on the right hand edge of the map. Note that other Soviet units now are outlined in yellow, indicating they too belong to the 54 Army). This will be described in more detail in section 4.7.4 below
Selecting a unit. To select a unit to move or fight, left click on the unit(s) – you can move a complete stack at the same time if you wish, and then right click on the destination (whether this is to move or to attack).
Unit Movement. To move a unit(s), left click to select and then right click to select the planned move or attack. Note that you can select all the units in a stack to move together. Also it is important to bear in mind that in WiTE2, combat is a specific form of movement costing Movement Points (MP) to conduct.
You do not have to use up all the available MP at once, so you can order a partial move and return to that unit or stack later in the movement phase.
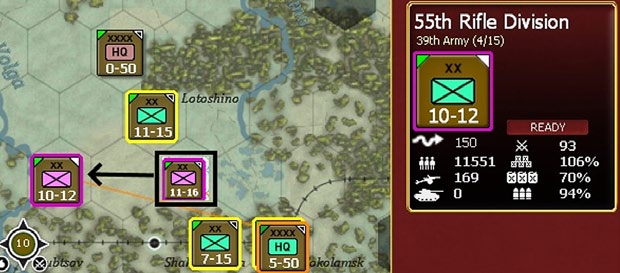
In the example below, the Soviet 55 Rifle Division has been ordered to move from its starting position (bordered in black) towards the Volga. Note that the hex south-west of the unit shows the Movement Points that would be left if the unit moved onto that hex. The unit is weaker after the move as it is now slightly fatigued (4.8.3 and 22.2)
Some aspects of the way that units and the map interact are obvious – you need to be on a ship to cross sea hexes. Other elements are less so – Armoured Units are better at attacking in Open terrain. Infantry Units defend better in close terrain like heavy woods.
Hex Control. Hexes are either friendly, enemy or pending friendly (these are hexes that have been taken during the current turn and will switch ownership at the end of the player’s turn).
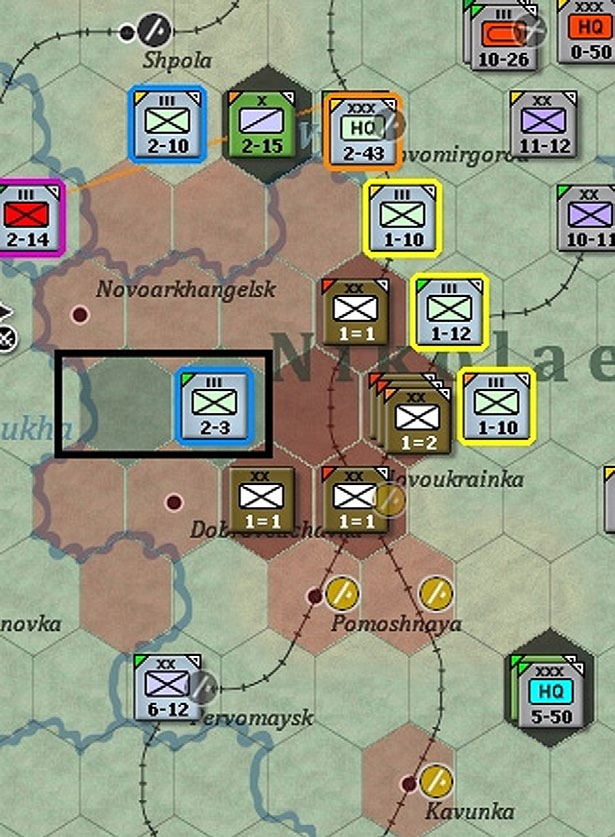
This shows how the map changes when a unit is selected to move. The light hexes were all Axis controlled at the start of the turn. The darker coloured hexes (to the east of the Romanian 2-3 infantry regiment), have been occupied by another Axis unit this movement phase. The light brown hexes are still Soviet controlled but you know they are empty of Soviet units. The dark brown hexes either are known to contain Soviet units (or you lack sufficient information to be sure).
The ownership of a hex has an impact on movement and logistics and the fatigue that units will build up as they move into that hex. If you can, only move in hexes that were friendly at the start of the turn as this is faster and costs less fatigue.
Hex Pop Up. If you hover the mouse over a hex the pop up will show you considerable additional information.
4.4.4 Combat Resolution Window
One important option is how you set the combat resolution level. This will affect both the amount of information you see as the game plays and the speed of play.
The combat resolution level is set when creating a game (36.17.1) and can be changed at any time. By default, when you start a new game or load an existing game it will be at the level you last chose.
You can change the combat resolution either via the user preference screen or by pressing the number keys (from 0 to 7). If you do this, a pop-up message will briefly appear:

If you chose level 0, there will be no delay as the combat will be processed automatically. Once it is resolved you can carry on moving and fighting. At level 1, the combat information screen (37.1) will appear for a short period giving you an overview of the combat and the outcome. By the time you select level 5 you will see considerable detail (down to the interaction of individual elements) as the combat is resolved. In this case, you can close the pop up at any time you wish and the final result will be shown.
When resolving air directives, the combat outcome screen will only be shown if you have a delay of greater than 1.
Detailed resolution can be informative if you wish to understand how the combat engine works but will significantly slow play. Note you can cancel the display process at any time by clicking on the cross in the top right hand corner.
Usually you can set the delay to 1 or 2 and review the outcomes afterwards by accessing the battle site indicator on the map. In this case the battle shown above ended in the surrender of the Soviet unit so the battle indicator is displayed as a white flag in a black border (the border indicates that this was an attack by the Axis side).
Information on how to interpret this particular screen can be found in 23.10 and 37.1 but it will show you the outcome, how many men, tanks and planes took part and the reasons for any losses.
4.5 Introduction to the Air Planning Phase
This Topic provides an overview of the Air Phase and explains the Auto Air Directive Creation function. The Air Phase is the first active part of the Player’s Turn. In your early games we strongly suggest you use the AI- assist routines (4.6) before moving onto manual control (if that is what you wish to do).
4.5.1 Purpose of the Air War
In WiTE2, both the Axis and Soviet air forces were primarily structured to support the operations of the main armies rather than conduct independent strategic bombing campaigns. Their approaches to both doctrine and plane design has implications for how you can use airpower in the game.
One practical example is that most Soviet fighters have very short ranges. This means it is important for them to be based close to the front lines or planned area of operations. It also makes the longer ranged lend-lease planes very valuable in certain situations.
This focus affects how you manage your air commands and the type of missions that are available to a given air command.
While you can conduct the full range of air operations, including bombing factories and cities, you are most likely to use the air force in one of the following roles:
- Ground Attack - Interdiction, this mission is flown in the air combat resolution phase and will inflict losses on any enemy unit that moves through those hexes (and possibly raise the cost of leaving such a hex). It can be used to target supply lines, reserves, or where the enemy is likely to advance or retreat as a result of combat.
- Interdiction missions can only be flown over enemy controlled hexes;
- Ground Attack - Unit, this mission is also flown in the air combat resolution phase and aims to disrupt or destroy enemy ground elements. As such it is often better used when aimed at a hex(es) you intend to attack later in the turn;
- Ground support, this mission is ordered in the air phase but not conducted until the ground phase. In this case bombers and fighters will support offensive or defensive ground operations adding their effect to the fighting between ground units (4.8);
- Air superiority, this mission is ordered in the air phase and will be conducted both in the air combat resolution phase and the ground movement phase. Fighters assigned to this mission will seek to engage enemy planes that come into a set area.
- A variant of this is that fighters with no other mission will always try to intercept enemy planes that come close to their airbase.
The impact of airpower on ground units is often indirect. Most times, air attacks will not destroy many ground elements but will disrupt and damage elements or increase movement costs. Damaged ground elements will not take part in any combat until they have the chance to recover (in a subsequent logistics phase) and are more likely to be destroyed in the course of any ground combat. Disrupted elements will recover at the end of that battle but at a cost of adding fatigue (and thus reducing the combat effectiveness) to the attacked unit.
Thus airpower will tend to reduce the enemy’s mobility and weaken their ability to win battles. It will not tend to inflict substantial direct casualties by itself (although this can sometimes happen).
4.5.2 Understanding Air Units
There are seven elements to each Player’s Air Forces:
Air Commands. Air Commands (16.2) are the HQ Units that command Air Operational Groups and Air units Both sides have a hierarchy of air commands and may have lower level commands (such as a Luftflotte) report in turn to a supreme air command (such as the German OKL).
Leaders. Who are assigned to each air command. Their relative competence will influence the speed at which damaged aircraft are repaired and the numbers of planes that actually take part in a given mission.
Below this level, air units are organised at two levels (16.3):
Air Operational Groups (AOG). These represent combinations of Air Groups and are the main way in which you will manage your air force.
Air Groups. Air Groups are the Squadrons and Groups of Aircraft that fly air missions. Air Groups are assigned to both AOGs and Air Commands (16.3).
In addition, your air assets include:
Airbases. These are fixed locations on the map where Air Groups can be based (16.6).
Pilots. Each pilot is rated for morale and skill and the morale and skill values shown for the air unit is the average of these individuals (16.7).
Planes. Your air force is built up of individual planes and these are allocated to air groups. Each air group can only have one type of plane and you can ensure that obsolete planes are no longer in use by your combat formations.
The types of planes that can be used is determined by the unit type and training (so a formation trained to use level bombers can only be equipped with some type of level bomber).
Over the length of the game, planes will become obsolete or particular models may be in short supply. You can set up air units to automatically upgrade in which case they will switch plane type to a more modern version (or an older one if there is a shortage) or handle this manually. If you do this manually you will need to check for the arrival of new models of planes.
Each type of plane has a mileage available. This will be used up carrying out missions. Once a plane has used up all its mileage it cannot fly again that turn. Usage so far in a turn is expressed as a % of the potential total miles.
4.5.3 Air Commands
As with the HQs that control your ground forces you will often find there is a hierarchy of Air Commands. The principle role for the Commands is to assign leaders to your air force and to organise your Air Operational Groups.
4.5.4 Air Operational Groups
These are the main method by which you manage your air force in WiTE2. The One Page Guide (overleaf) shows the main ways in which they are displayed in the game and how they can be accessed.
4.5.5 Types of Air Directives
There are seven different types of air directives but not all are available to every air command to reflect the various doctrinal differences between the Soviet and Axis forces.

Ground Support – Provides ground units with direct air support during ground attacks. This mission will actually take place during the ground movement phase.
Ground Attack – This focuses on a map area and slows & interdicts enemy ground units, limits their capacity to resupply, attacks their airbases, rail network or ports.
Ground attack missions can only target enemy held hexes, if the air directive box (17.4) includes friendly hexes these will be ignored for allocating the actual missions.
There are several variants to this mission. One (interdiction) will seek to hamper enemy movement but will do relatively little damage to static units (note this will attack supply convoys etc.). A unit attack will directly attack enemy units but will also create some interdiction.
Finally missions can target rail usage, enemy airbases, enemy rail yards or ports (18.1.4).
Strategic Bombing / Bomb City – Used to bomb production facilities & manpower in cities. Again, there are various options within this mission so you can be precise about the intended targets (18.1.5).
Air Recon – Used to increase the detection level of enemy ground units in the target area. Recon missions can be designated as Tactical or Strategic. Strategic recon will gather information on the types of targets that can be attacked using the strategic bombing mode (18.1.6).
Recon missions can only target enemy held hexes.
Air Superiority – Fighter units fly to an area and try to disrupt enemy missions in that area (18.1.7).
Note that in addition, fighters not assigned to any Air Directive will try to intercept enemy planes that come close to their base (18.1.7). Defensive Interception of Enemy ADs are automatic and do not require an AD to be set as the fighters will fly both in your Air Phase and your opponent’s Air Phase.
Naval Patrol – The units will attempt to create naval interdiction points in the target area. Naval interdiction can both disrupt (and possibly block) enemy naval movements (including naval supply) or protect and allow your own naval operations (18.1.8).
Air Resupply. This is a special type of mission that can only be flown during the ground movement phase. The AI- assist will use the air transport assets to send supply to combat units of the relevant command. You can over-ride this by setting it to prioritise air bases used by air groups under that command.
The manual process is set out in section 18.1.9 but basically you open the F9 tab and select a target hex. Usually a suitable sending air base and collection of air groups will be automatically selected for you.
Air resupply missions can only be carried out during the ground movement phase not when creating air directives.
If you are controlling the air war manually, then each of these mission is set up by selecting one of these tabs (shown during the air planning phase). If you use the AI- assistance, then suitable AD will be created for you.
Play tip. If you can, target a friendly controlled airbase – even one you have just captured – as more supply will be delivered this way.
4.5.6 Air Directive Creation
Auto AD Creation. To use the automatic AD creation process, refer to the one page guide ‘Using AOGs with AI Control’.
Manual AD Creation. This option is not recommended for new players and the strong advice is to use the AI routines until you understand the basics of the air war. If you want to move onto manual creation of Air Directives, allocation of planes or selecting the load-outs of your planes then read chapter 18 of this manual.
4.5.7 Executing Air Directives

Once you have completed the process of setting your air directives (whether this is automated or manual) you will need to press the F12 key.
This will commence the process of resolving your air directives. The speed and amount of detail shown will be determined by the level of detail you have selected for viewing combat resolution (4.4.4).
At the lowest level of resolution, you will simply see a small box in the lower right hand corner of the screen and a summary of missions and losses.
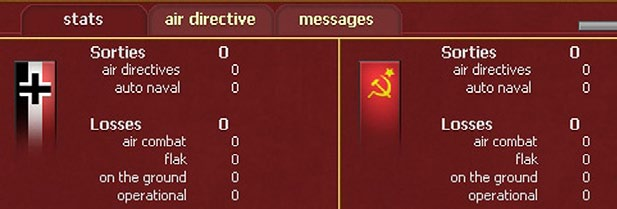
More information on how to interpret this screen can be found in section 37.16.7.
At higher levels of resolution you will see the routes taken by planes (including enemy interception where this is not obscured by the fog of war). You can opt not to see certain types of missions and by default reconnaissance missions will not be shown.
Selecting a combat resolution level above 1 will also mean you see the actual combats that occur. At higher levels this can make resolving the air phase time consuming and you can usually double check on key incidents by reviewing the combat results once the air phase is completed (37.1).
The air phase will end with the summary screen displayed (37.16.8). You can close this and move on or use it to examine aspects of the air resolution phase. In addition all the details that were shown briefly as the air phase was resolved can be found in the Logistics Log (36.9).
Once complete you are ready for the Ground Phase.
4.5.8 Airbases
Airbases. Airbases are fixed installations on the map of three different sizes – 1, 2 & 3 (which is the largest). As only one airbase is permitted in a hex some airbases may represent a number of historic airbases and the size is adjusted accordingly.
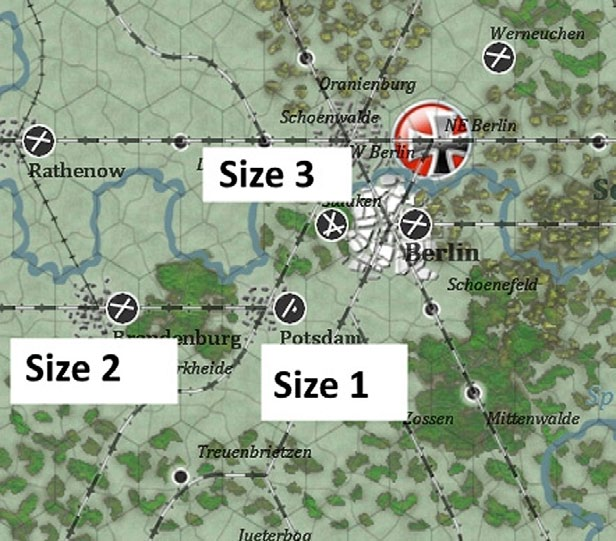
All the airbases in the above image are owned by the Axis side but currently unoccupied. You will notice other colour combinations and these are discussed below where relevant and summarised in section 6.4.7.
New airbases can be built in any non-mountain hex. They can be built in mountain hexes if that contains a town, city or an existing depot. A successful naval invasion will create a level 2 airbase in any targeted hex.
Airbases can be built using the top of the screen, unit detail for a location or by right clicking on the desired location.
In the example below, Pavlovo has been selected to show how you can build a new air base, the same process would work if you selected Gorky and decided to expand that airbase from size 2 to 3.

In this case, the first approach uses the tab at the right hand of the top row (6.2.2), the second is the list that pops up when you right click on the hex and the third is information that appears when you access the city display (37.13) by clicking on the name bar at the top of the screen.
It will take some time for a new airbase to become operational and this can be sped up if the computer can allocate a spare engineering Support Unit to the hex.
Keeping a stock of construction engineering units either in your High Command or Front/Army Group HQs can be useful to speed the building of new airbases as these can be allocated by the Computer to most hexes on the game map.
Level 1 and 2 airbases can be expanded in size. Expansion is slower in bad weather and terrain, especially from size 2 to 3 and this will also demand a substantial allocation of supplies so will be slow unless you have well stocked depots nearby.
Airbase TOE. Although Airbases are fixed they are still Units. They have a TOE representing the ground crew that provides support and defense. When an airbase is captured the TOE drops to 0% and will recover as support squads move to that location. Airbases will gain and reduce their TOE depending on how many planes are at the base. If you order an AOG to move to the base, if it lacks sufficient support units it will gain these in the logistics phase so that the base is operational (17.3.5).
If you remove all the planes from a given base, then its TOE will revert to 0.
Airbase Support, Supply & Capacity. The effectiveness of an airbase (in terms of supporting combat missions and repairing damaged aircraft) depends on both the level of support (i.e. sufficient ground crew) and sufficient supply.
The capacity of the base depends on the size and the type of planes present (16.6.6). There are penalties for having too many aircraft at an airbase. An over capacity airbase is shown by a red ring around the airbase. The % capacity is shown in the hex pop up.
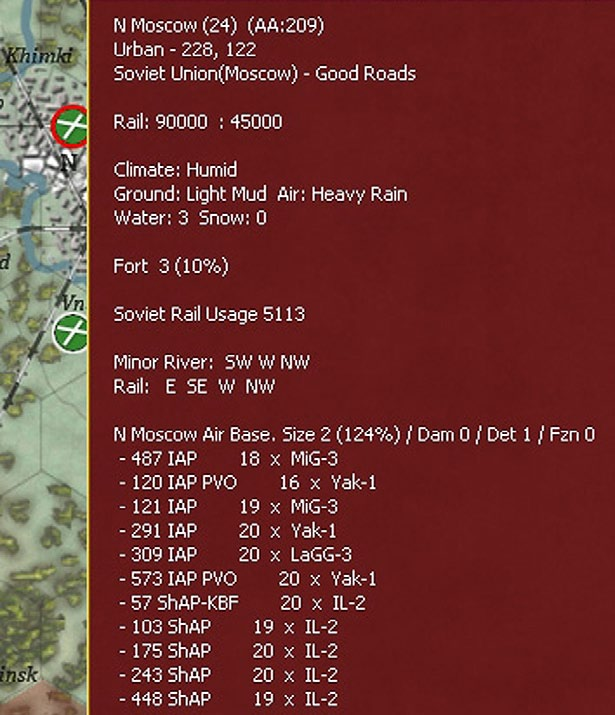
The logistic priority of airbases can be set individually or collectively using the tools in the Commanders Report. Airbases with a supply priority 0 receive no supply.
Bombing Damage to Airbases and Airbase Repair. Air Groups at damaged Airbases suffer more operational losses and fly less sorties. As airbases become more crowded then aircraft on the base are more likely to be hit if it is bombed.
When using the AI-Assistance routines (17.1), the AI will expand existing airfields when it feels this is necessary but players will have to manually establish new level 1 airfields if they feel these are needed.
4.6 Managing the Air War
You have two options for managing your AOGs. You can use the AI assistance and in this case your main input is to assign the AOG to a ground command and set the relative number of planes that the AOG will have. This will then generate air directives and redeploy your air force according to the priorities you set.
On the other hand you can either opt for full manual control or mix using the AI-assist routines with manual interventions.
4.6.1 AI Air Assistance
There are two levels to this. One means that you can only use the AI routines and that air orders and redeployments are executed when you press end phase for the air orders and after land moves (i.e. the F12 key). If you chose to do this, in a PBEM or server based games this option cannot be subsequently changed.
The alternative still allows you to rely on the AI assistance if you wish but you can also manage your AOGs manually. In your first games, it is suggested that you use the AI assist as you can use the AI to allocate planes to your AOG, create suitable air directives and redeploy your planes to new air bases.
The basics of using the AI assistance are set out overleaf on the one page guide.
4.6.2 Allocating Air Operational Groups to Ground HQs
Even if you decide to use the AI-assistance, you will still need to determine which ground unit HQs (17.1) the AOG is going to support, how many planes will be allocated to that AOG and the types of air missions you wish to support.
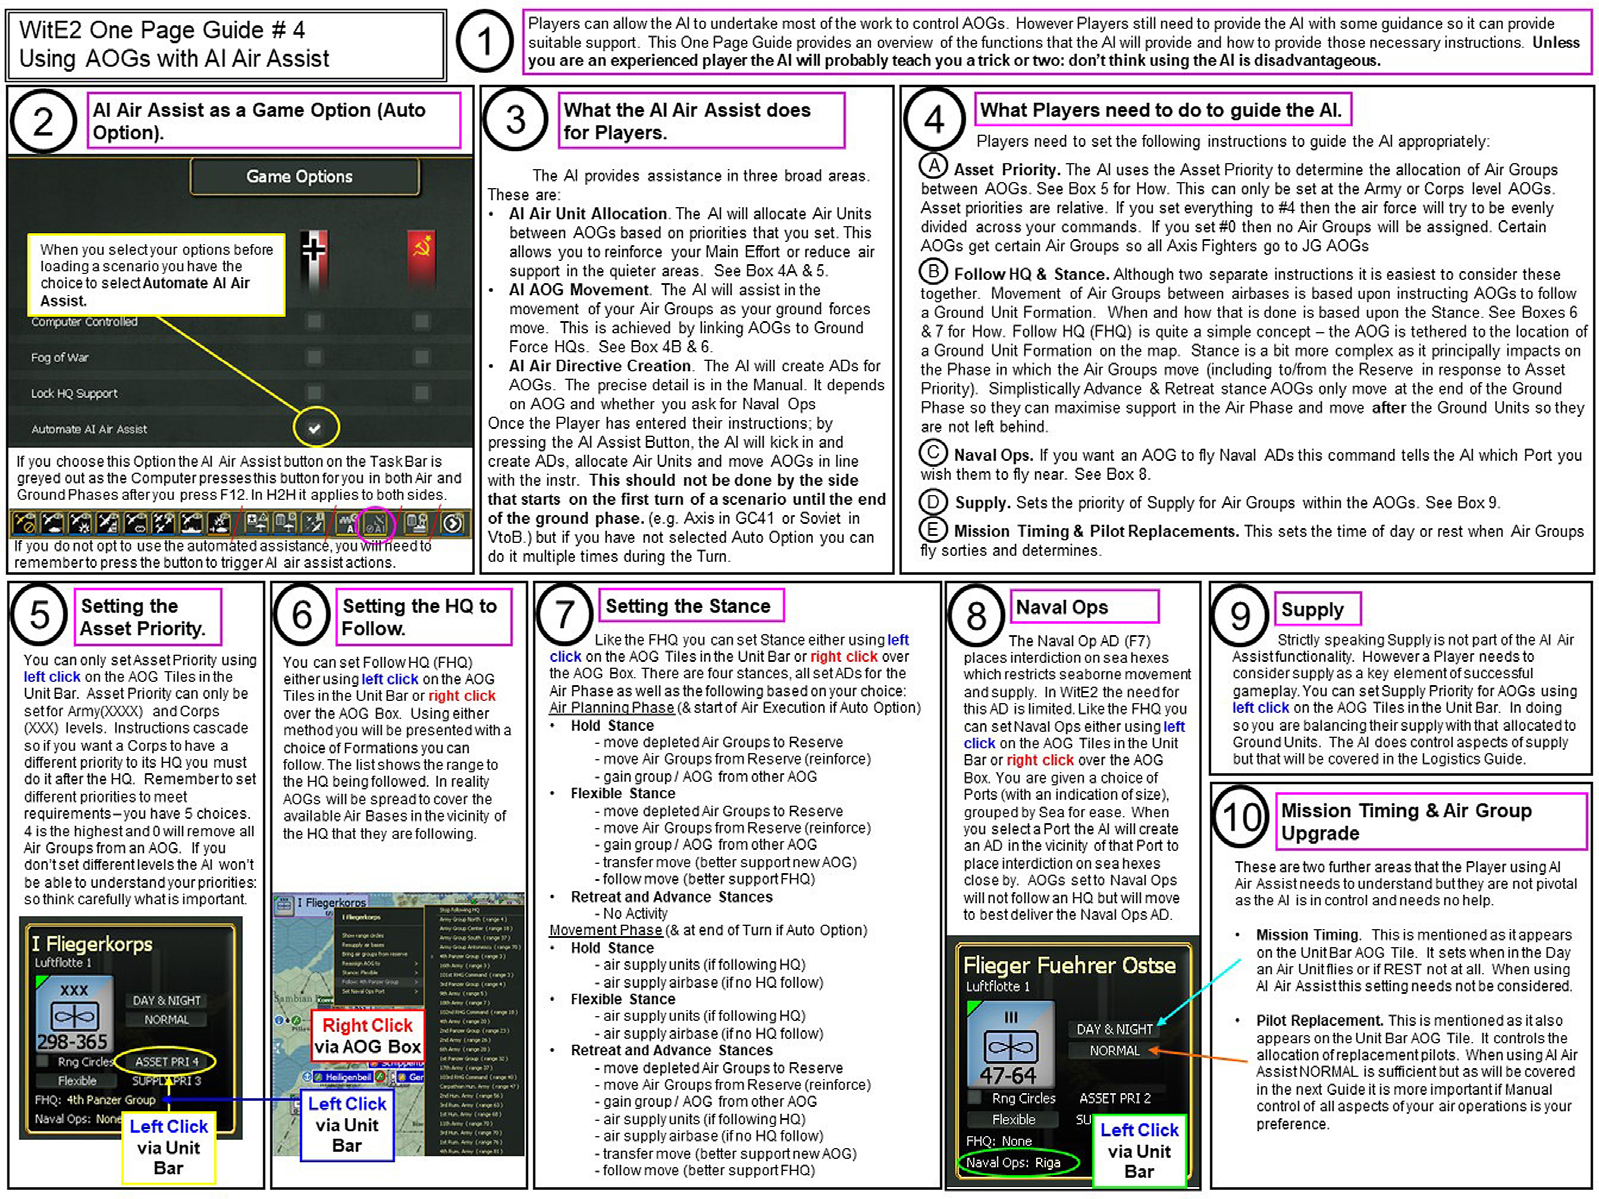
The one page guide ‘Using AOGs with AI Control’ sets out the key concepts.
Axis AOGs can be assigned to follow either an Army or Corps HQ, Soviet AOGs must be assigned to follow a Front or Military District. Soviet AOGs will be automatically assigned to the same front as their controlling Air Command (17.1).
4.6.3 Allocating Air Units to AOGs
This is set out in the one page guide ‘Using AOGs with AI Control’. In effect, you set the relative priority of each AOG and air command and the air units will be assigned to match the relative spread of responsibility (17.1).
If you opt to take manual control then you can directly determine which air groups are assigned to an AOG and redeploy your AOGs so that the planes move to new air bases.
4.6.4 Stances and AI Assistance
If you opt to use the AI assist, you still need to set the following variables:
- Stance (17.2);
- HQ allocation (the AOG/Air Command will usually ‘follow’ this HQ as it moves on the map;
- Naval operations (whether you wish the AOG to generate naval patrols);
- Asset priority (how much of your available air force will be assigned to this AOG or Air Command)
- Supply priority
In addition, the player will have to build or expand airbases, decide if you need to build depots to support your air force and whether or not you want your air units to upgrade automatically or control this manually (16.5).
Note that the AI will use your air doctrine settings (17.4.3) when creating missions and this will affect issues such as the height of the mission, the day(s) it is carried out and the relative intensity of the mission. If you find the results of your air campaign are unexpected (little effect or very high losses) you may want to check this screen and amend some of the variables.
A major part of using the AI assistance is setting the stances of your AOG. Your choices will determine how, and when during the turn, the AOG allocates its assets and whether or not it will move to follow the HQ it is assigned to.
There are four stances:
- Flexible
- Hold
- Retreat
- Advance
During the Air Planning Phase (or at the end of it if using Auto AI air assist) an AOG in a flexible stance may:
- Send air groups to the reserve (if they are deemed to be too weak to be capable of combat operations)
- Acquire air groups from the reserve
- Gain air groups from other AOGs (this is based on asset priority and the transfer can include a complete AOG if that is appropriate);
- Transfer air groups to other AOGs (depending on priorities);
- Follow move, the AOG will redeploy to the location of the HQ they are following.
- Carry out Naval Ops against a port, the AOG will redeploy to operate against the target port
During the Air Planning Phase an AOG in a hold stance may:
- Send air groups to the reserve (if they are deemed to be too weak to be capable of combat operations)
- Acquire air groups from the reserve
- Gain air groups from other AOGs (this is based on asset priority and the transfer can include a complete AOG if that is appropriate);
During the Air Planning Phase an AOG in a retreat or advance stance will undertake no particular actions but will still generate Air Directives as appropriate.
During the Movement Phase (and at the end of the turn if this is automated), an AOG in a flexible or hold stance will:
- Air supply units (if following a HQ)
- Air supply airbases (if not assigned to follow a HQ)
During the Movement Phase (and at the end of the turn if this is automated), an AOG in a retreat or advance stance will:
- Send air groups to the reserve (if they are deemed to be too weak to be capable of combat operations)
- Acquire air groups from the reserve
- Gain air groups from other AOGs (this is based on asset priority and the transfer can include a complete AOG if that is appropriate);
- Transfer air groups to other AOGs (depending on priorities);
- The AOG will redeploy to the location of the HQ they are following during the ground movement phase
- Air supply units (if following a HQ)
- Air supply airbases (if not assigned to follow a HQ)
- Carry out Naval Ops against a port, the AOG will redeploy to better operate against the port
Transport AOGs will usually try to resupply units of the command they are attached to. If they have no linked HQ, they will seek to resupply airbases connected to their air command.
An AOG can be set to follow a HQ (as normal) or conduct Naval Operations around a port, not both. If set to Navel Ops, the AOG will try to gain control of the sea hexes near the port. In this case, the AOG may have a different focus (naval patrol) to its controlling air HQ. For the Soviets, only named naval air commands (most likely either the Baltic or Black Sea commands) can carry out naval operations.
There are further notes on how to use the stances in section 17.2 but in general use ‘Flexible’ when the front line is basically stable as this allows air units to adjust their size and deployment but broadly within the current geographical area. Advance and Retreat should be chosen when you are looking for your air force to redeploy as the front line shifts. ‘Hold’ will keep your air force deployed at their current bases (which can be efficient in terms of the demand for support squads and supply).
4.6.5 Redeploying Air Units
If you use the AI assistance, then your air units will redeploy according to the rules above. In addition this will manage the transfer of air units to and from your national reserve (13.2).
4.6.6 Manual Control
The one page guide ‘Manual Control of AOGs’ (see figure 4-30 overleaf) sets out the basics of how you can manually control your AOGs. In addition you should read the key sections in chapters 16-18 as they explain how to create and amend your own air directives, how to bring air groups to the map and how to redeploy your air force.
You are strongly advised to keep to the AI-assistance for the air war for your first few games. You may well find that against the AI it has the effect of simplifying the game, while producing perfectly adequate results, thus speeding game play considerably.

4.7 Understanding Ground Units
This Topic provides a basic overview of the various game units and how to see information about them. The one page guide (figure 4-31 overleaf) sets out the main issues covered in this section:
4.7.1 Unit Structure
Units are made up of various Ground Elements (21.2) and the precise makeup of a Unit is based on its Table of Equipment (TOE) (21.2.5). A unit at 100% TOE has all its required Ground Elements.
Ground Elements vary according to the unit type but will typically include manpower (organised into squads), individual vehicles and guns and other weaponry. They also include the support squads that backed up the combat elements (signals, first aid, logistics etc.) and the trucks used to move the unit.
The number of Ground Elements, their Morale, Experience and Fatigue all impact on the ability of the overall unit to attack and defend.
Units can lose Ground Elements due to combat, attrition and movement. As this happens, a unit’s TOE will fall as elements are damaged or destroyed. New Ground Elements, produced by factories (4.10 and 26.1), can be received as replacements to maintain TOE level.
As the game progresses, you will notice that the TOE changes. This reflects the use of more modern equipment as well as the various changes that both sides made to the composition of their combat units. Thus a Panzer division in 1941 will be based around a mixture of Panzer I/II/III/ IV tanks (though some actually will use captured Czech or French tanks), by 1944 the same division will be using a mixture of Panzer IV/V tanks.
Note that if a unit cannot access its preferred element (such as a Panzer IV as its medium tank) it may substitute a similar element, including those captured from the enemy. Thus a Soviet 1944 armoured formation will seek to use the T34/85 as its basic medium tank but may use lend lease Sherman Tanks instead. A German Panzer division may make use of captured Soviet T34s.
4.7.2 Unit Types
There are five types of ground unit in the game:
- Combat Units (CU). CUs are units that appear on the Map as counters and can fight, such as an Infantry Division. Many CUs can breakdown into three smaller units to cover more ground (21.3).
- HQ Units (21.11). HQs appear on the Map as counters. They cannot fight. Most HQs provide command and control for either air or ground units. Some HQs provide Rail Repair or Amphibious capacities.
- Support Units (SU). SUs are smaller units including artillery, anti-tank, anti-aircraft, engineer, assault guns, and construction units. Most SUs do not appear on the map. They are attached to HQs & CUs and their ‘support’ is provided automatically. SUs can be moved between parent units as required (21.5).
- Engineering & Construction SUs will appear only when they are repairing a rail hex, otherwise they are attached to the city, depot or airbase they are repairing.
- Multi Role Units (MRU). MRUs are mostly brigade sized units (but note that not all brigades are MRUs) that can either be off map (attached to a combat unit or HQ) or on map as a Combat Unit in their own right (21.4).
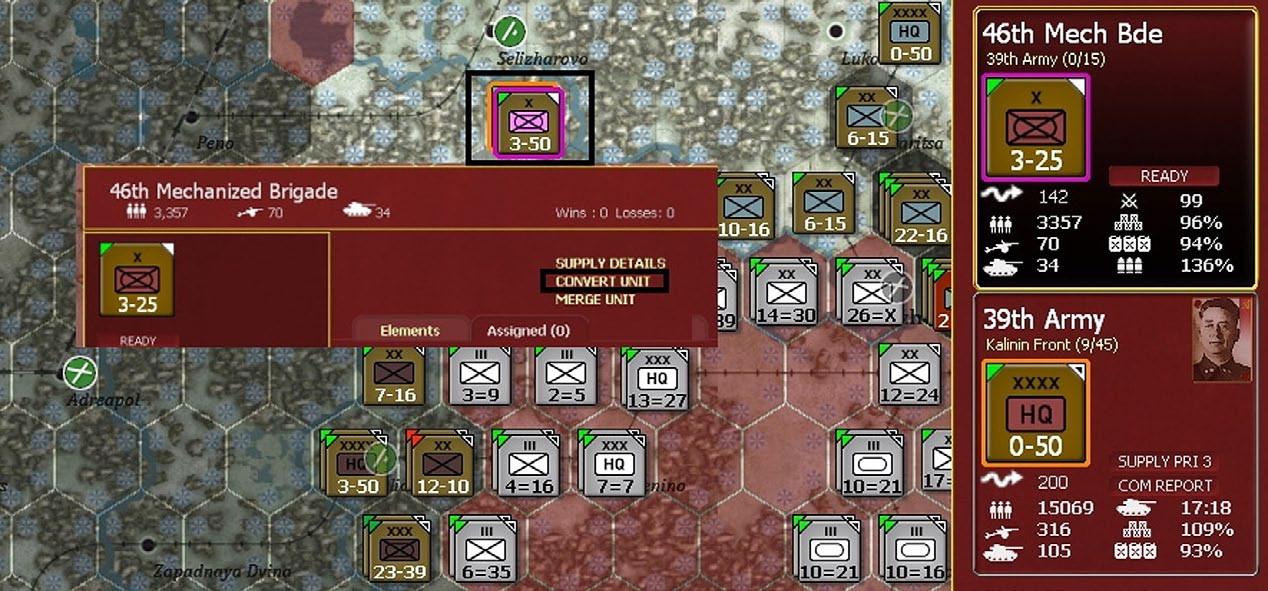
To convert a MRU to a SU it must be in the same hex as its controlling HQ and have at least 1 remaining MP. In the example below, the 46th Mech Bde is in the same hex as its controlling HQ (the 39 Army), open the detailed unit window and click on ‘Convert Unit’.
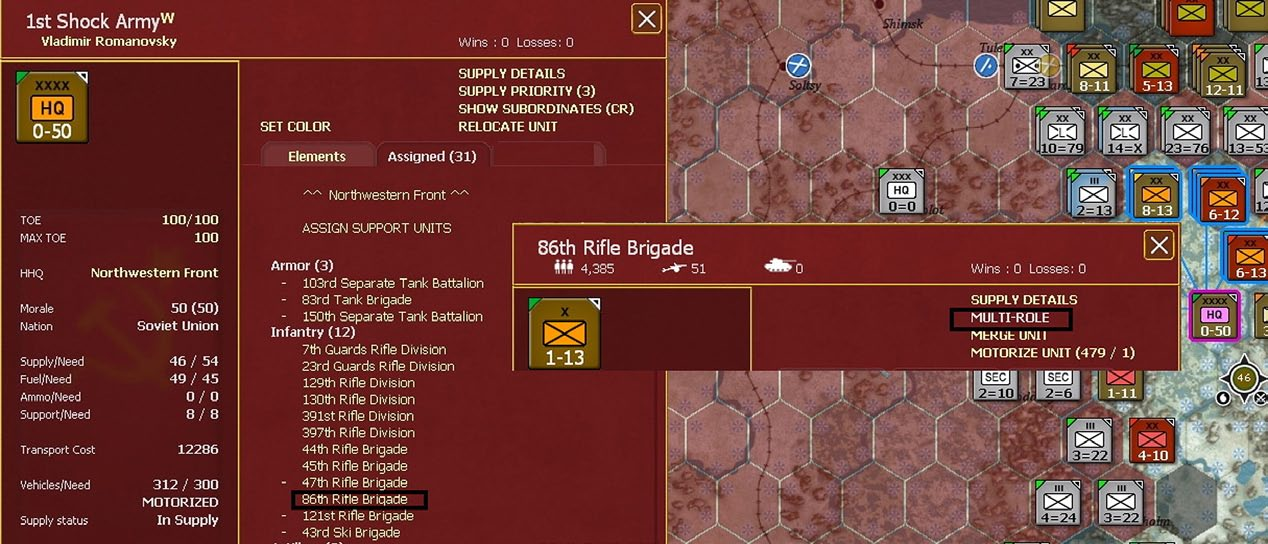
Once off map, they can then be re-assigned like any other SU. To convert a MRU to the map, there must be a space in the HQ’s hex for the MRU to reappear on the map. To reverse the process, open the detailed tab for the relevant HQ, select the unit (in this case the 86th Rifle Brigade) and click on ‘Multi-Role’. The unit will now appear on the map with 1 MP.
4.7.3 Building Up and Breaking Down Units
German divisions and Soviet Corps can be broken down into three smaller units. If you want to recombine these, then the original units need to be in the same hex (and each part with at least 1 MP). The original division or corps will be recreated with an average of the morale, experience and fatigue of its component parts.
4.7.4 HQs and Leadership
In WiTE2 HQs provide the chain of command for your ground units up to the Supreme HQ for that particular nationality such as the Soviet Stavka or the German OKH. Each ground HQ has an allocated leader with certain characteristics (15.3) and these leaders can be changed using your Administrative Points (9.2) but can also be killed in action or removed by the computer routines (this may happen if they have a relatively low political value). In the case of death or dismissal, a new commander will be appointed (and, in turn, you can change this).
The role of leaders (Chapter 15) and HQs (Section 21.11) are discussed in detail later in this manual and it is suggested you read those sections once you feel you understand the basics of gameplay.
For the moment, note that HQs and leaders affect the performance of combat units in different ways:
- In order to allocate Support Units to help out in combat the controlling HQ must be within 5 hexes of the combat unit (23.6);
- In order to provide Support Squads (think of these as representing staff such as radio operators, field hospitals, cooks, mechanics etc.) to a combat unit, different types of HQs have different ranges as:
| HQ UNIT | COMMAND RANGE (IN HEXES) |
|---|---|
| High Command | 90 |
| Army Group/Front | 45 |
| Army | 15 |
| Corps | 5 |
| Air | 90 |
The various leader ratings affect combat performance (23.8), movement capacity (22.1) and a variety of issues connected to the allocation of supply and replacements (25.1).
The effectiveness of leaders is affected both by their position in the command hierarchy and the distance between the HQ and the combat unit. The actual operation of these rules is complex depending on exactly how the command chain is structured, so once you have the basics clear we strongly suggest reading section 15.5.
4.7.5 Information About the Relationship Between Units
WiTE2 relies on the creation of an efficient chain of command between your units and HQs . To assist with this you can access information about unit Relationships. Although Command and Control will be covered in more detail in Chapter 15 and Section 21.11 it is worth at this stage highlighting the display functionality of Unit Counter Border Colour which shows Unit Relationships.
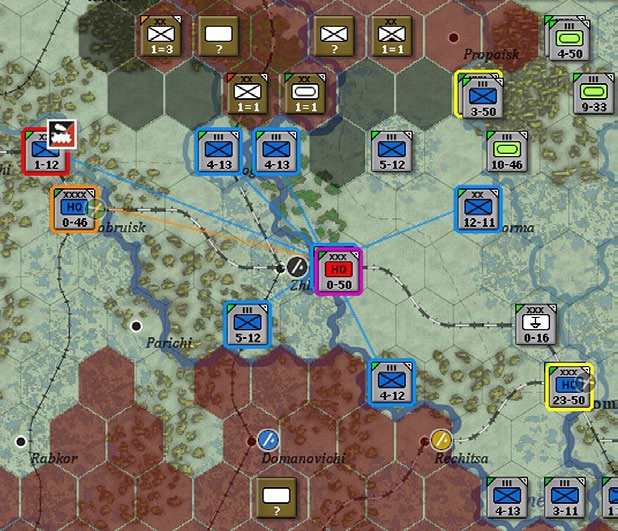
This functionality appears when a Unit is selected on the map. The different border colours are: PURPLE=Unit that you have selected; ORANGE=Selected Unit’s HQ; YELLOW=Other Unit directly commanded by the same HQ; BLUE=Subordinate Unit in Range; and, RED= Subordinate Unit out of Range.
In addition, a line will appear on the map of the appropriate colour showing how the unit/HQ is linked to other formations.
In some cases this line may be drawn to the edge of the visible display, indicating the relevant HQ is some distance. This will commonly happen if the HQ/unit reports to one of the Supreme HQs such as the German OKH.
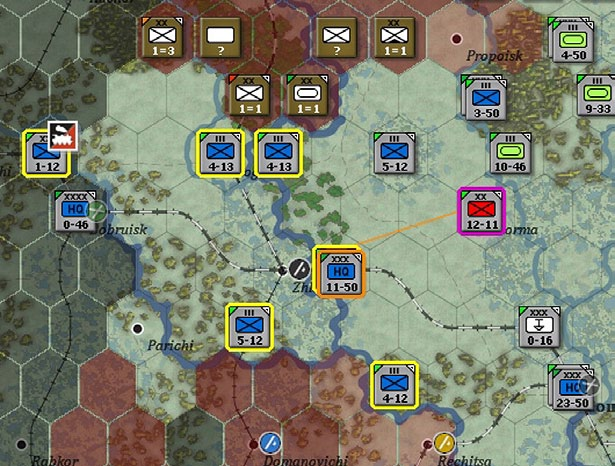
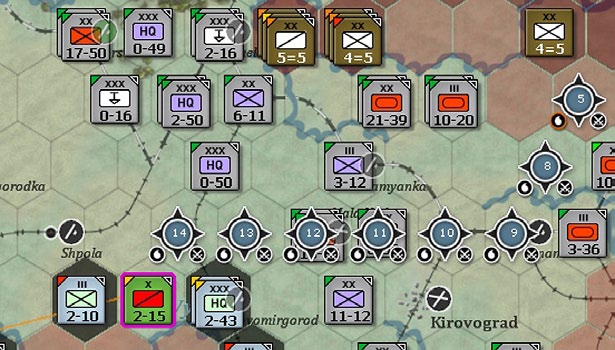
In the example above, the selected division (the 12- 11) is outlined in purple, all other units reporting to the same HQ are in yellow and the orange line indicates the connection between that unit and its direct HQ.
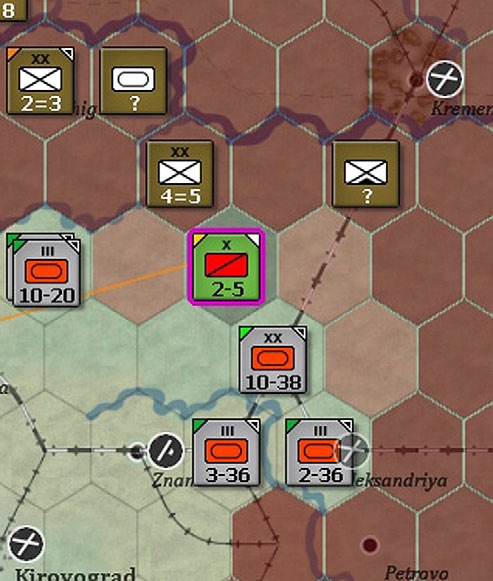
In this case the HQ is selected (surrounded in purple) and the units in blue are subordinate formations in command range, the one in red is out of command range (4.7.3 and 15.5.4). Note the blue lines between the HQ and the units it commands. In addition, the army HQ that controls the selected corps is highlighted in orange (and there is an orange line showing the connection). Finally, other corps HQs that share the same Army HQ are in yellow (as, in this case, they share the relationship of directly reporting to the same HQ.
4.7.6 Selecting and Moving Units
The basic step is to left click on a unit. You will see the detailed unit box appear on the right hand side of the screen and other on-map units will become highlighted. If you want to move more units in the same hex together, simply click on the additional unit boxes that appears on the right hand side (selected units will be bordered in white) or double click to select the entire stack.
If more than one unit is in a given hex then repeatedly left clicking will alter the order of those counters bringing a new one to the top (and thus ready to move) each time.
Once you have selected your units, right click on your desired destination (this can be a move or an attack). See One Page Guide 6 for more information about selecting units and different types of movement and attacks.
4.7.7 Unit Information
To help you manage your Units, WitE2 provides significant detail. For ease of understanding this can be considered in three levels – shown On Map, the Unit Bar and the Unit Detail Screen.
Shown On Map. The on-map Counter is the first level of detail. The colour of a Unit Counter shows Nationality or type (e.g. German SS and Luftwaffe and Soviet Guards units have a different background to other German or Soviet units). The symbol on the Counter shows the Type of Unit and its designated Size (34.1, 34.2 and 34.3).
The numbers at the bottom of the Counter can be varied to show the Combat Value, Movement Points or Defensive CV. Equally, if wished this can be used to display the unit title instead.
If Soft Factors (6.5) are selected then you may see information on Supply, Fuel, Morale etc. on the top left hand side of the counter. These are covered in chapter six but enable you to have a quick ‘at a glance’ view of those units in your army with supply problems or that have high morale.
Unit Bar. Selecting an On Map Counter with a left mouse click will activate the Unit Bar on the right hand side of the game screen. The Unit Bar reproduces the same information as the On Map Counter and provides more detail. For CUs this includes the Parent HQ, Supply Details, Strategic Movement Points, Preparation Points, Mode and Unit Strength in Manpower, AFVs and Guns.
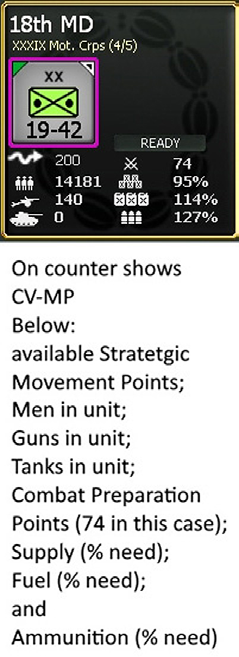
Using this view you can change the ‘mode’ (from ready to refit or reserve status) and click on the HQ (here XXXIX Mot Corps) and the display will shift to show the HQ.
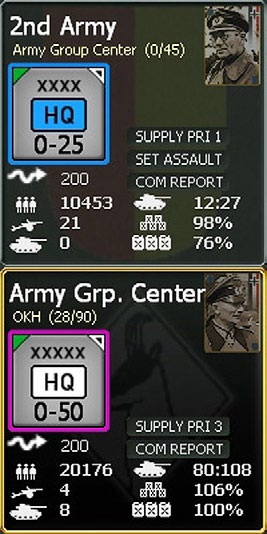
HQs show slightly different information, including their own higher HQ, Strategic Movement Points, the Command Capacity and current supply situation. You can also change the supply priority of the HQ (25.8) and access the relevant information in the Commanders Report.
This shows 2 German HQs, the 2nd Army and Army Group Centre.
HQs have no intrinsic combat value so the numbers are always 0-MP. As with the Combat Unit you can see the name of the HQ it, in turn, reports to but other parts of the display are very different.
If you click on the image of the leader, the box with all the relevant details will appear on the screen (37.7). Below the leader, you can alter the Supply Priority (these are currently 1 and 3 respectively) or access the Commander’s Report (4.17). Note that as the 2nd Army HQ is an Axis Army it can be set to assault status (this is discussed below in 4.13.3).
Below the counter on the left is the available Strategic Movement Points and strength in the unit (this will include any men, guns or tanks in Support Units directly controlled by this HQ). On the right is the usage of command points and how many are available (these are 12/27 and 80/108 respectively) and then the % of supply and fuel in the unit.
4.7.8 Unit Modes
Unit Modes are an important concept in WiTE2. These allow you to change either how a unit takes on replacements or might support other units in combats. There are five possible modes that can be chosen by the player.
The default is READY which can be seen as the general purpose status for a unit.
REFIT provides a greater chance at receiving replacements (4.11.1 and 25.8) and of upgrading to a new TOE when this becomes available.
RESERVE allows units to be committed in support of combat even if they weren’t selected to actually take part (this can happen both for the attacking and defending side) (23.7).
Placing a unit in STATIC Mode saves on vehicles but reduces mobility (21.8).
IN FORT is a special status that allows units to exceed the stacking levels and increase the defensive strength in major cities (20.6).
In addition, units may have several involuntary states. They may be routed, depleted, unready or isolated.
4.7.9 Re-assigning Support Units
This section discusses the two methods of moving SU between HQs and/or combat units. See section 21.5 for more detail on how to assign them to cities.
This can be done automatically or manually. You can choose to do it manually when you ’lock’ HQ Support in the set up screen (2.3 and 4.19.1) for a new scenario (in a game against the AI you can do change this at any stage – 36.18).
Automatic Re-assignment. To use this option, you need to set the ‘Support Level’ for your HQs and you can do this either using the individual unit counters or the Commander’s Report.
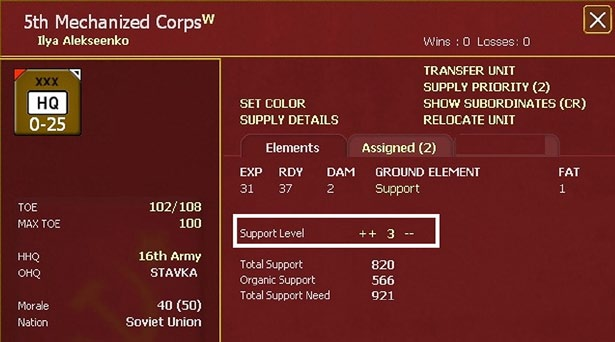
The value can be anything between 0-9 (21.5.6) and this will determine how many of each type (so for example all artillery SU are treated as a single type) that will be assigned to that HQ. Construction Engineer SU follow slightly different rules (again set out in 21.5.6).
So a German corps with a level of 4 will try to have 4 AT, artillery, armoured and anti-aircraft SU attached (assuming enough are available). One at level 0 will have none of these attached (and any that start attached will be returned to a higher level HQ).

Manual Re-assignment. In this case, you must lock the HQs in the set up screen or the game options screen. You can also do this in the Commander’s Report.
This allows you to choose which Support Units are assigned to which HQ or Combat Unit (21.5.7 and 21.5.8).
To assign a Support Unit to a new HQ, left click on the HQ on the map and then right click on the HQ display on the right hand side. Open the ‘Assigned’ tab and you will see something like this:
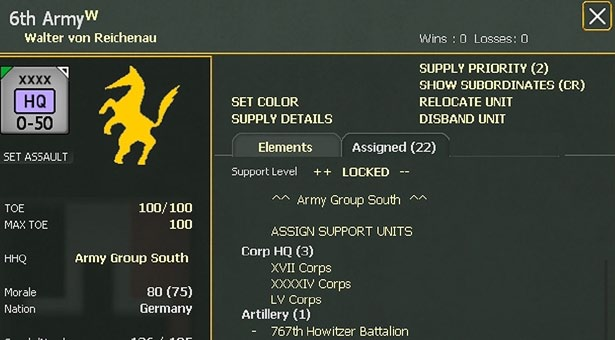
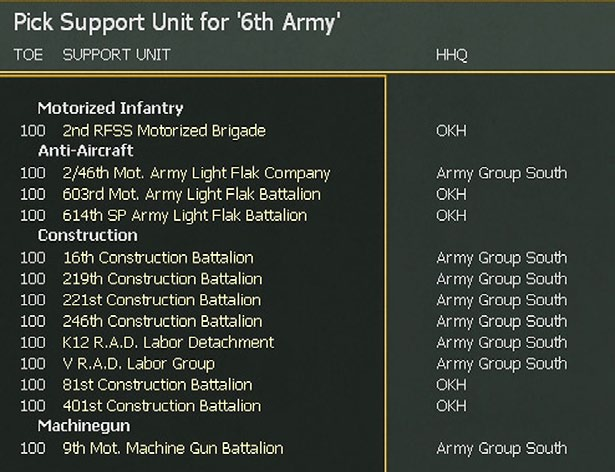
Select ‘ASSIGN SUPPORT UNITS’ and a screen like this will appear, showing all the eligible support units in the chain of command above the HQ you are using: Click on a desired unit and it will be removed from the list and assigned to the 6 Army HQ. You can also move Support Units from a HQ or Combat unit.
In this case, select the unit from the HQ tab (say the 767 Howitzer Battalion), this will open the unit tab (37.4), click on the HHQ text (this will be yellow if the unit can be re- assigned, grey otherwise) and you will see:

Click on any of those commands and the artillery unit will be redeployed. Note this allows you to send the SU to another army command, back to AGS or to any corps that is within range (so not just those that directly report to 6 Army).
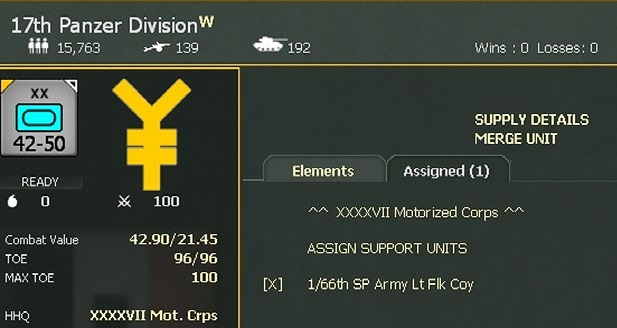
Assigning a SU to a Combat unit uses the same ‘ASSIGN SUPPORT UNITS’ function on the unit tab (37.3.3). To detach a SU from a combat unit, click on the [x] on the unit tab as:
4.8 Basic Movement and Combat
This Topic provides an overview of ground movement and combat. In combination these are the main activities you will carry out in any game of WiTE2.
4.8.1 Basics of Movement
To move any unit, first left click on the unit. At that stage the map display will change to show the hexes that unit could possibly move to in the turn:
In this case a Hungarian cavalry brigade has been selected and the map now has five different colours all indicating information about the movement options:
- These hexes are Axis controlled and within the movement range of the unit;
- These hexes are Axis controlled but outside the movement range of the unit;
- These hexes are Soviet controlled and are either occupied by a Soviet unit or you lack sufficient detection (10.2) to know. In effect the unit can move adjacent to these hexes but will probably have to fight a battle to actually enter the hex
- These hexes are Soviet controlled and known to be unoccupied. In this case the unit can enter these hexes (but at extra movement costs (22.2);
- These hexes are dark shaded for a very specific reason. Hungarian units are not allowed to stack with Rumanian units (and vice-versa) so these hexes are blocked even though they are within the movement range of the selected unit (14.2). You will find similar issues if you try to move Hungarian and Rumanian units into each other’s country or too far north on the game map.
You can then trace out a possible movement path by simply holding the mouse and moving it to a desired hex. For each hex in the selected path (and by default the lowest cost path will always be chosen), you can see the MP that will be left if the unit stops in that hex. Note the final hex in the path (next to the Soviet 4-5 division) has a red ring around the path indicator. That tells you will enter a hex that is currently Soviet controlled. Note also that as this is a brigade, it pays a movement penalty for entering a Soviet controlled hex (which is why the last hex costs 3 MP).
Right click on the desired destination hex. Depending on how you have set up the game (36.17.1), the unit will then either automatically move to the indicated destination hex or the move will be shown as it happens hex by hex.
This shows the situation now the unit is in the chosen hex. It can still move to a friendly controlled hex or other Soviet controlled hexes. The hex it has entered is now shown as a light grey to indicate it has changed ownership this turn.
This process applies whether the movement is of a single hex or a long redeployment using the rail system or to attack an enemy unit.
Equally, you can move more than one unit at a time by selecting the first unit then holding down the shift key. Left click on any extra units in the same hex and they can move as a block (and attack together). Double clicking on a stack will select all the units present.
The process for ordering an attack with units in more than one hex is covered in section 4.8.2 below.
The potential move distance will be shown for the slowest unit in the stack but you can usually move faster units again later in the ground movement phase.
There are two broad types of movement for ground units: tactical and strategic. You choose the mode by selecting from the tool bar at the top of the game screen.
Tactical movement (conducted when the F1- Ground Movement tab is selected) is from ground hex to ground hex and costs Movement Points (MP). Combat also costs MPs. Units that also use strategic movement have their Tactical MPs reduced proportionally to the expenditure of Strategic Movement Points (SMP) and equally moving using Tactical MP (say to a rail yard) will reduce the available SMP.
For movement purposes, there are four unit types: HQs; infantry; cavalry; and, motorized.
Cavalry receive a movement bonus over infantry units but are treated as non-motorised when considering the cost of entering certain hexes and for combat. Some cavalry units contain substantial motorised or armoured assets (such as the German 1 Cavalry Division in the early game or a Soviet Cavalry Corps in the late game) but these are still treated as cavalry for the purposes of movement and combat.
Note that it is possible to motorize (temporarily or permanently) any infantry unit at a cost in trucks and administrative points. Such units then are treated as motorized both for movement point allowance and costs.
At the start of each turn your units are allocated MP s. The number of MPs allocated is variable but the key factors involved are:
- Unit Type. Motorized and HQ Units receive more MPs than Infantry Units – but also pay a higher costs for some terrain types. Cavalry units are between infantry and motorized units in terms of overall mobility;
- If the unit was attacked in the last phase (either directly or because it responded as a ‘reserve’) then its MP may be reduced according to the intensity of combat and the outcome (22.1.3);
- Leader Checks. Failed morale and administrative checks reduce MPs.
Combat Preparation Points are very important in this regard as the more you have, the more likely you are to pass such leader checks. This is one of many reasons why it is important to try to preserve these as the game progresses (see section 22.2.2).
- Fatigue & Fuel. Units with fatigue and shortages of Fuel (motorized) or Supply (non-motorized) lose MPs.
- Trucks in the unit. Every unit has a notional level of trucks it needs to be fully mobile. A shortfall in the available number of trucks will lead to a reduction in movement points.
- Even if trucks are available to the unit they may need to be used to find supply if the local depots are too limited. In this case, the MP available will be reduced (22.1).
- Temporary Motorization. You can increase MPs if trucks are available by motorizing a unit.
Note that cavalry units cannot be motorized as the bulk of the manpower will still move at the speed of a horse not a truck.
As units move and fight they consume MPs. The MPs consumed depend on a number of factors:
- Terrain & Weather. It costs more to move through difficult terrain and cross rivers.
- Zones of Control. ZOCs represent the ability of all on- map CUs to exert control over the map area in their vicinity. Moving in/out of a ZOC costs additional MPs (22.2.4).
- Rear Area Movement (also called Administrative Movement). Moving in hexes you controlled at the start of your turn is quicker, and produces less fatigue, than moving into hexes that were originally controlled by the enemy. Note that administrative movement cannot be used in a hex with any level of enemy interdiction (22.2.1).
- Combat Movement Delay. When an attack occurs in a hex a cost maybe placed on the hex to slow further movement through that hex during the turn (22.2.7).
Note that the suggested movement path adopted by the computer will always be the path that has the lowest cost. If you want to move in a different sequence of hexes you may need to break down your planned move into smaller blocks.
Administrative Movement is a form of tactical movement that can only be used in hexes that were friendly controlled at the start of the turn and have no enemy interdiction (22.2.1). This allows units to move faster in each turn as the Movement cost per hex is reduced.
Strategic Movement. At the start of each turn units are allocated 200 SMPs. These can be spent on either Sea and/or Rail Movement and some common factors apply to each:
- Availability of Strategic Movement Assets. To move by Rail or Sea you require Trains or Ships. The assets needed to move a unit are related to its size and the type of equipment.
- Load/Unload Cost. It costs SMPs to ’transfer’ to/from strategic movement. This cost represents the time taken to load/unload. It is less in larger ports/railyards and more in a rail hex that is further from a railyard. Loading/unloading also consumes Port/Rail Capacity increasing costs for other units using the same rail line and reducing freight flow during the logistics phase.
So a late war Soviet Tank Corps with attached support units will demand much more rail or naval capacity to move than a single infantry brigade.
- Rail Movement Cost. As units transit rails they consume rail capacity resulting in congestion which can cause additional SMP cost for other transiting units.
Impact of Interdiction. Ground Attack and Naval Patrol Air Directives result in an Interdiction Value being placed on hexes. The higher the value the greater the movement cost through the hex and the more likely a moving unit will take damage. Note that any level of interdiction will prevent the use of administrative movement in that hex.
Interdiction can also be generated as a result of Soviet partisan actions (13.4).
Rail and naval movement through heavily interdicted hexes is particularly costly (both in terms of movement and losses). Very high levels of enemy naval interdiction can actually block movement into those hexes.
4.8.2 Combat
In WiTE2 combat is a function of movement and thus costs MPs. There are two types of combat: Hasty and Deliberate (23.4). Hasty Attacks cost less MPs but you can only attack from a single stack with reduced commitment and support fire. Deliberate Attacks cost more MPs but allow you to select multiple stacks to participate in the attack.
Note that if you attack a hex and win, all this does is to force the enemy unit(s) to retreat (or surrender or rout), it does not move your attacking units into the hex. That would require another round of movement and it maybe that your original attackers now lack the MP to advance. In effect, it might be better to leave some units out of the attack, or have a local reserve, to ensure you can exploit your victory.
Process to order an attack: In WiTE2 combat is treated as a special form of movement. In effect it costs movement points to attack and during the movement (action) phase you can mix attacks with moves exactly as you wish.
To order a single unit to attack:
- Simply select the unit by left clicking on it and then right click on the target hex.
- You can check the likely combat odds (23.8) before attacking by hovering the mouse over the target. An estimate of the likely chances of winning the attack will pop up;
- If you right click on the target unit you will conduct a hasty attack, if you use shift+right click you will conduct a deliberate attack.
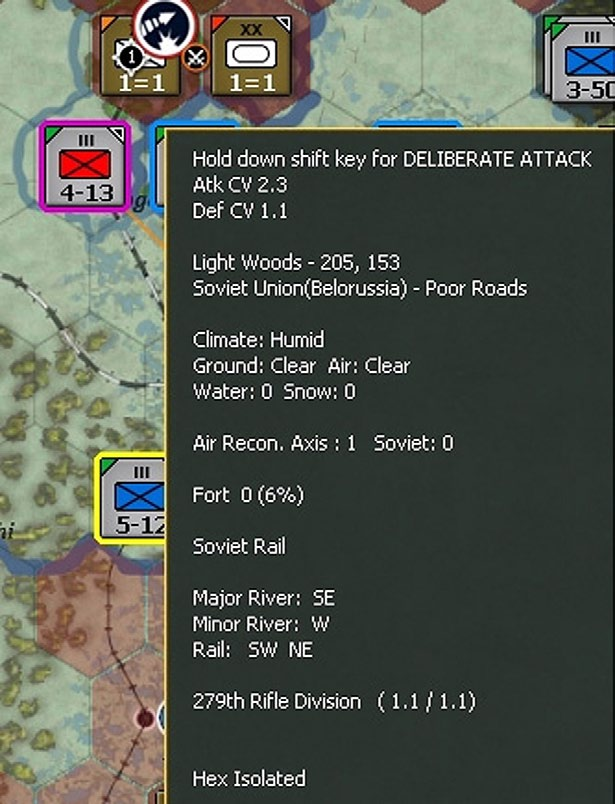
In the example above, the German regiment is considering an attack on the Soviet rifle division to its NE. The image on the left shows the display if a hasty attack is planned and on the right if a deliberate attack will be used. Note the improvement in the attacker’s combat value at the expense of more movement points. Interpreting these odds takes some care as they can be misleading if you have poor levels of detection and will not take account of how the battle unfolds (artillery and airpower can substantially reduce the combat value of units).
To order more than one unit in the same hex to attack:
- The basic steps are as above, including whether to make a hasty or deliberate attack;
- To select more than one unit to attack, hold the shift key and left click on all the units in the hex that you wish to attack with (remember that double clicking on a hex selects all the units present).
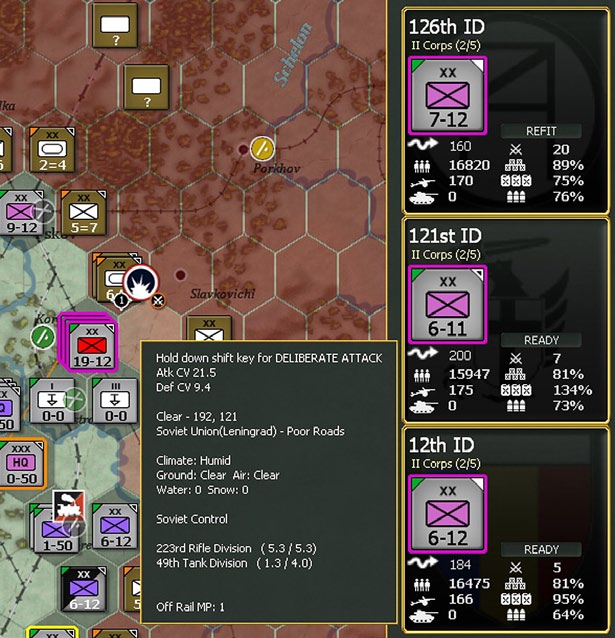
In this instance, 3 German infantry divisions are ordered to attack a Soviet stack of a rifle and tank division. A deliberate attack has been selected (it could have been a hasty one). If you do not want to use all the units in the stack, left click on the unit display on the right hand side.
- To order an attack using units from more than one hex :
- This is more complex and can only be done if you intend to launch a deliberate attack;
- Hold down the shift key and move the mouse over the hexes that contain the units you wish to attack with;
- On the right hand side of the game screen will appear a full list of all the units you have selected;
- On that screen, click on the unit type icon for any unit you do not want to include;
- Hold the shift key down and right click on the target hex
Here the Soviet player is launching a major attack and wants to use units in two hexes to attack the Germans. This must be a deliberate attack. If, for example, they wanted not to use the 18 Guards Rifle Division (perhaps so it can advance into the hex if the combat is successful) then left clicking on the display will remove it from the battle.
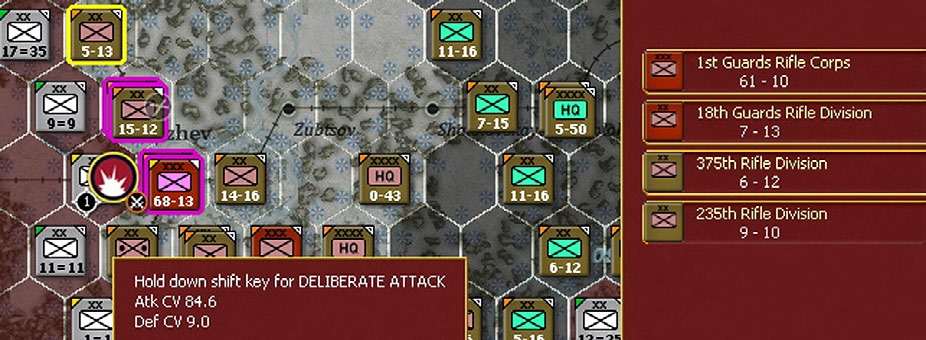
If this second attack succeeds, and the Soviets have armoured units in reserve, they may manage to break out deep into the German rear.
This process may sound complex but quickly becomes intuitive. Note that if you have selected units that lack the MP (or are in the wrong location) to make a deliberate attack, you must deselect them before you can launch the attack.
CV (Combat Value). Choosing where, when and with whom to attack is a key skill. To help you understand the relative strength of units their counters display the Unit CV. Comparing the Attacking CV with the Defensive CV provides an indication of the likely outcome (4.8.4) but does not reflect likely changes to both values as the actual battle is resolved (4.8.3).
When you mouse over the unit you plan to attack, the hex pop up shows you a better indication of the adjusted CV values for both sides. Be warned: when combat occurs other factors such as terrain, reserves and leader checks occur that cannot be predicted so the CV is only one indicator of possible success. Equally if your knowledge of the enemy hex is limited (known as the detection value 10.2) then the information on their CV may be misleading.
If the final outcome is a 2-1 CV ratio (or better) then the defender will retreat from the hex. Depending on circumstances the defender may rout, shatter or surrender rather than just retreat.
Support Units. Whilst it is obvious which Combat Units will participate in combat it is less clear for Support Units. Support Units that are directly attached to Combat Units will automatically be added to the battle. Support units attached to the HQs of Combat Units participating in the battle must pass a series of checks in order to take part.
Resolving Combat. When an attack occurs the combat engine resolves the combat as individual ground elements are engaged. The detail that you can see depends on the message level which you have set.
The results can be reviewed using the F11 key which will display all the battles over the recent turn (for both sides) and you can select the ones you wish to review (37.1).
If you win then the enemy will retreat from the hex allowing you to move into the hex if you have units with sufficient MPs remaining.
4.8.3 Other Factors That Affect Combat
This Topic explains some of the other factors involved in Combat and how to use them to advantage.
Detection Level. The Detection Level is a measure of how much you know about your enemy. This is most readily apparent when you are playing with Fog of War On – in that Units with a DL 1 will be shown as a counter on the map but with no further information. Low detection levels will also adversely affect the attacker as the scope for being surprised or ambushed by the defender is increased.
Combat Preparation Points. Preparation Points are an important feature in WiTE2. They represent allowing units to rest and build up for an attack and influence both the displayed CV, the allocation of Support Units and overall combat performance. Preparation Points are gained when a unit does not use all of its Strategic Movement allowance (with this improved if they stop in friendly controlled territory, not adjacent to an enemy unit or if they are part of an Assault HQ – 4.13.3). They are lost as units move, if they attack (this will cost you half the remaining total), if the unit is attacked and the enemy comes close to success or, for Support Units, when these are assigned to a new HQ or attached to a different Combat Unit.
If possible try to retain your CPP as they also help you in maintaining the mobility and efficiency of your army.
Fortifications. A key element of any defensive operation is the use of fortifications to protect your position. Fort Levels provide a significant bonus in defensive combat.
Almost all units in WitE2 have the ability to establish fortification levels although it is much more difficult to reach the highest levels. The building of fort levels is automatic but there must be a combat unit in the hex. Both sides can build specialist Fort Unit in particular hexes to help in this process and construction engineers either in the unit’s HQ or attached (only possible for Fort Units) will speed the process.
Morale and Experience. All units have ratings for Morale and Experience which represent a Unit’s Capability and Training. In simple terms the higher a Unit’s Morale and Experience the better. They influence both movement and combat.
Fatigue. As Units conduct operations they gain Fatigue. The rate of gain for Fatigue is influenced by morale and supply as well as the terrain traversed and any combat. Fatigue impacts the Combat Value of a ground element with the CV reduced by 1/3 of the fatigue level. Fatigue also impacts movement point allowance. Try and rest your Units before fatigue gets too high.
Reserve Mode. Any READY combat unit may be placed into RESERVE mode by selecting the Ready/Refit/Reserve toggle on the unit bar (4.7.7). Combat units in RESERVE mode may be automatically committed to a nearby battle, both offensively (must be within 3 hexes) and defensively (must be within 6 hexes). Reserve units that are committed to combat do not move, but they must have the MPs required to be expended in order to commit to the battle. Units that move, retreat or rout are taken out of reserve mode.
Attrition. Attrition represents the effect of wear and tear on units.
In WiTE2, there are different ways in which a unit may suffer attrition:
- Units that begin the turn adjacent to enemy units during their logistics phase will suffer additional attrition losses representing low intensity combat;
- As units move they will start to build up fatigue. A percentage of a unit’s vehicles will be destroyed and damaged based on the number of movement points the unit expended during the previous turn;
- If units are forced to retreat after a battle they will suffer additional attrition losses. The losses will depend on the level of experience and morale of the retreating unit and whether or not one side is motorized;
Trucks will also suffer attrition during the logistics phase. This can affect both the trucks assigned to support the logistics system (in depots) and those attached to units (as these will be used to draw supply from the nearest available depot).
Interdiction. Imposing interdiction levels on a hex though air power or partisan actions can raise movement costs for both units and supply in addition to possibly inflicting direct casualties. Any level of interdiction will deny the ability to use administrative movement (4.8.1).
4.8.4 Interpreting the Combat Result
The battle report (37.1) will indicate the losses suffered by both sides and it is possible to open up other tabs to explore the battle in more detail.
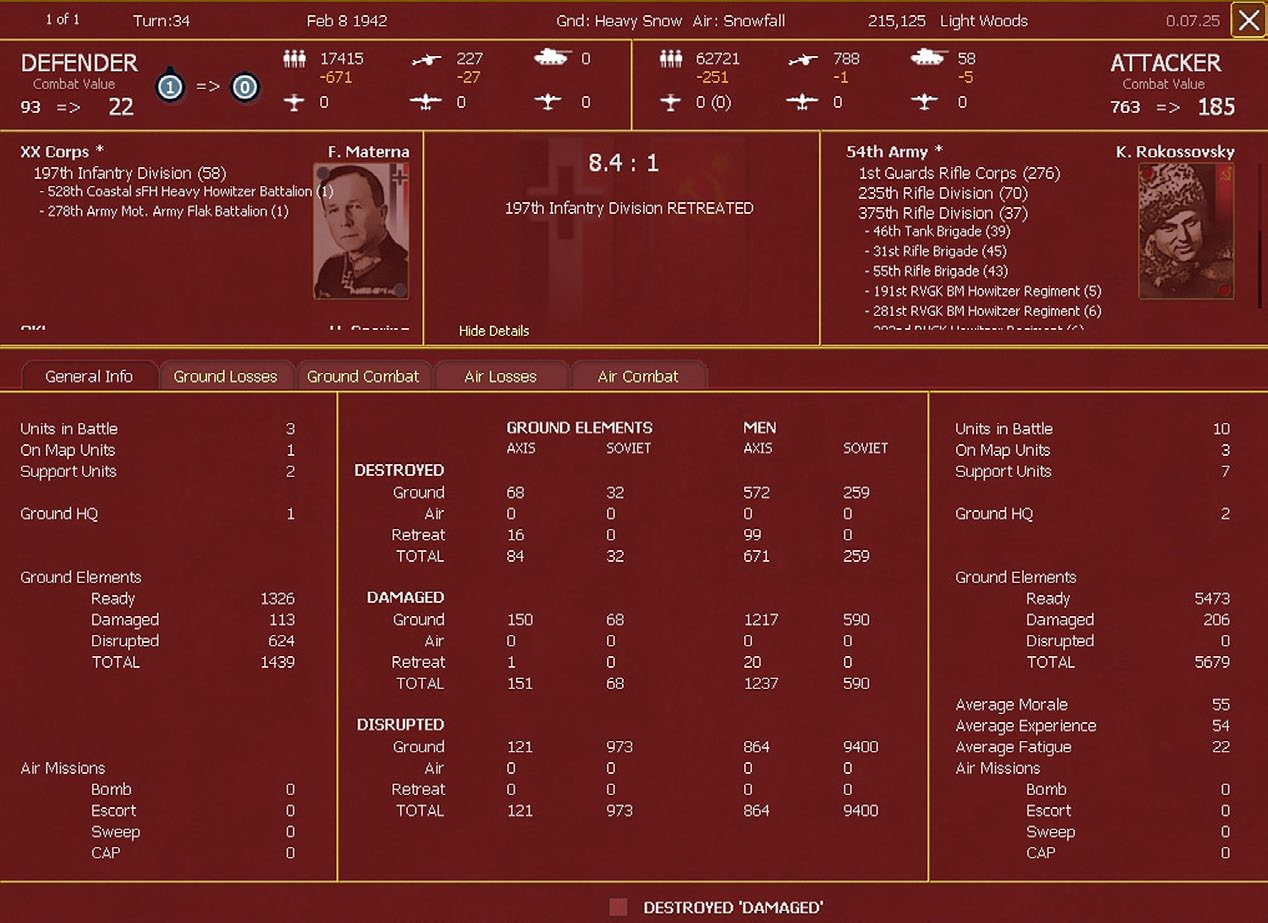
The example above is the report for the Soviet attack discussed in 4.8.2. At first only the top screens will be shown giving you a quick overview of what happened. If you press the option to ‘show details’ then the display shown will appear (here clicking on hide details will remove the extra information).
How to interpret this information (and the other tabs) is discussed in sections 23.10 and 37.1. For the moment, note that across the top you have the numbers of men involved, the changes from the at-start to end of battle CVs (so the German division dropped from 93 to 22), how many units were involved (both on map and as support units) and how many elements were disrupted, damaged or destroyed. The other tabs allow you to explore this in more detail if you wish to see which elements were hardest hit and equally which elements did the most damage to the enemy.
4.8.5 Possible Combat Results
Once a battle has been resolved one side or the other will have won. Usually, if the final odds are less than 2-1 the defender will hold the hex, if the final odds are more than 2-1 the defender will be forced to retreat. If the final odds indicate an overwhelming victory, this retreat may be for more than one hex indicating a significant disruption of the enemy’s defensive line.
In addition to winning or losing the battle may generate other outcomes:
- If the attackers are well led, it is possible that a defeat will be converted to a ‘scouting’ attack with much lower losses;
- If the final odds are more than 5-1 it is possible that the defender may be forced to retreat 2 or more hexes;
- If the defender is in a hex that was isolated at the start of the turn (23.12) and is forced to retreat they may retreat normally if a path exists or surrender. They will always surrender if they have no valid retreat path;
- If the defender had no valid retreat path (but was not isolated at the start of the turn), then the retreat will become a rout with much higher losses;
- If the defender is badly beaten, has low morale or experience, poorly led or is an infantry unit facing motorized attackers, it is possible that a retreat result will see the unit shatter and be destroyed instead of retreating. In these circumstances, even if the unit retreats normally it may also take much heavier losses.
4.8.6 Special Turn 1 Rules
Some of the rules above may be suspended or modified on the first turn of any scenario. Quite often you will find units that will be frozen for a number of turns. In addition, scenarios that start on 22 June 1941 will be affected by the rules in chapter 11.
These provide a movement bonus for Axis units attacking into the Baltic States and Bielorussia (so not the Ukraine) if they only have 15 MP left (if they are motorized). These movement bonuses are suspended for units moving into or beyond hex row x:194 (so basically a line running north-south through Minsk). Other important changes are suspending the cost of enemy ZoCs and reducing the impact of combat on units leaving the hex (11.2).
When moving your units, these costs will be calculated for you, but you may find that similar units entering the same hex have to pay different costs due to these rules.
More widely, the Germans cannot move units in (or into) Hungary and Romania and the Soviet South Front will be fixed unless the Germans move South or East of Lvov (the exact trigger hex is 187,187). The map below shows the Soviet at-start deployment in this region and the critical hex.
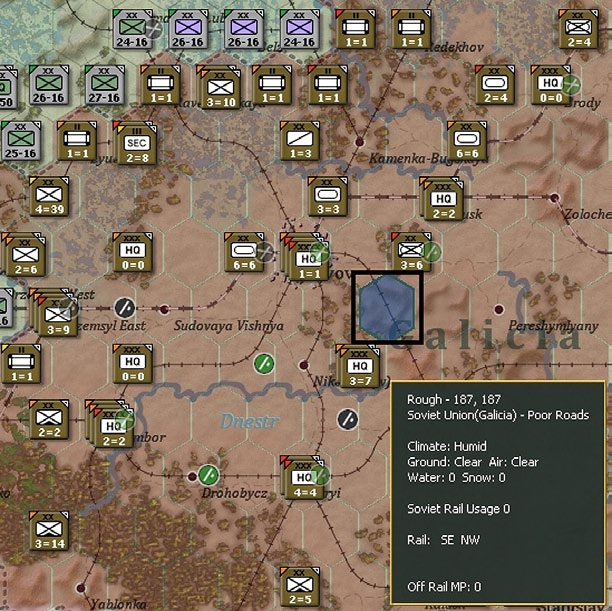
In addition, if the Axis side is played by a human player, then Soviet motorized units will be placed into reserve mode and may intervene in any battle (11.3.2). This is more likely to happen for formations reporting to the South West Front (again in the Ukraine).
4.9 Introduction to Invasions and Airborne Operations
Overall air transport of units (including airborne operations) and naval invasions are a relatively minor part of WiTE2. In WiTE2 neither side has the capacity for the type of amphibious or airborne actions that the Western Allies had developed by 1943. However, if they wish both sides can conduct paratroop operations but only with brigades or the regiments of a broken down German division.
Only the Soviet player has the capacity to launch naval invasions and only in the Black Sea.
Full details on how to prepare for and execute airborne and naval operations can be found in later in this manual (sections 23.9 and 24.7). An outline of how to use air transport planes to move freight is covered in section 4.10.16 of this chapter as well as later in the manual (22.5).
4.10 Introduction to Logistics
This Topic provides a basic overview of the logistics system in WitE2. The logistics system in WitE2 can seem deceptively simple but the more you explore, the more detail can be seen. More information about the logistics system can be found in section 6.9 and chapter 25. The information in the player’s notes sections, especially 30.8, may also help you to understand this vital part of the game.
It consists of 4 key elements: Production, Unit Demand, Freight and Distribution.
The one page guide on the previous page sets out the basics of this section.
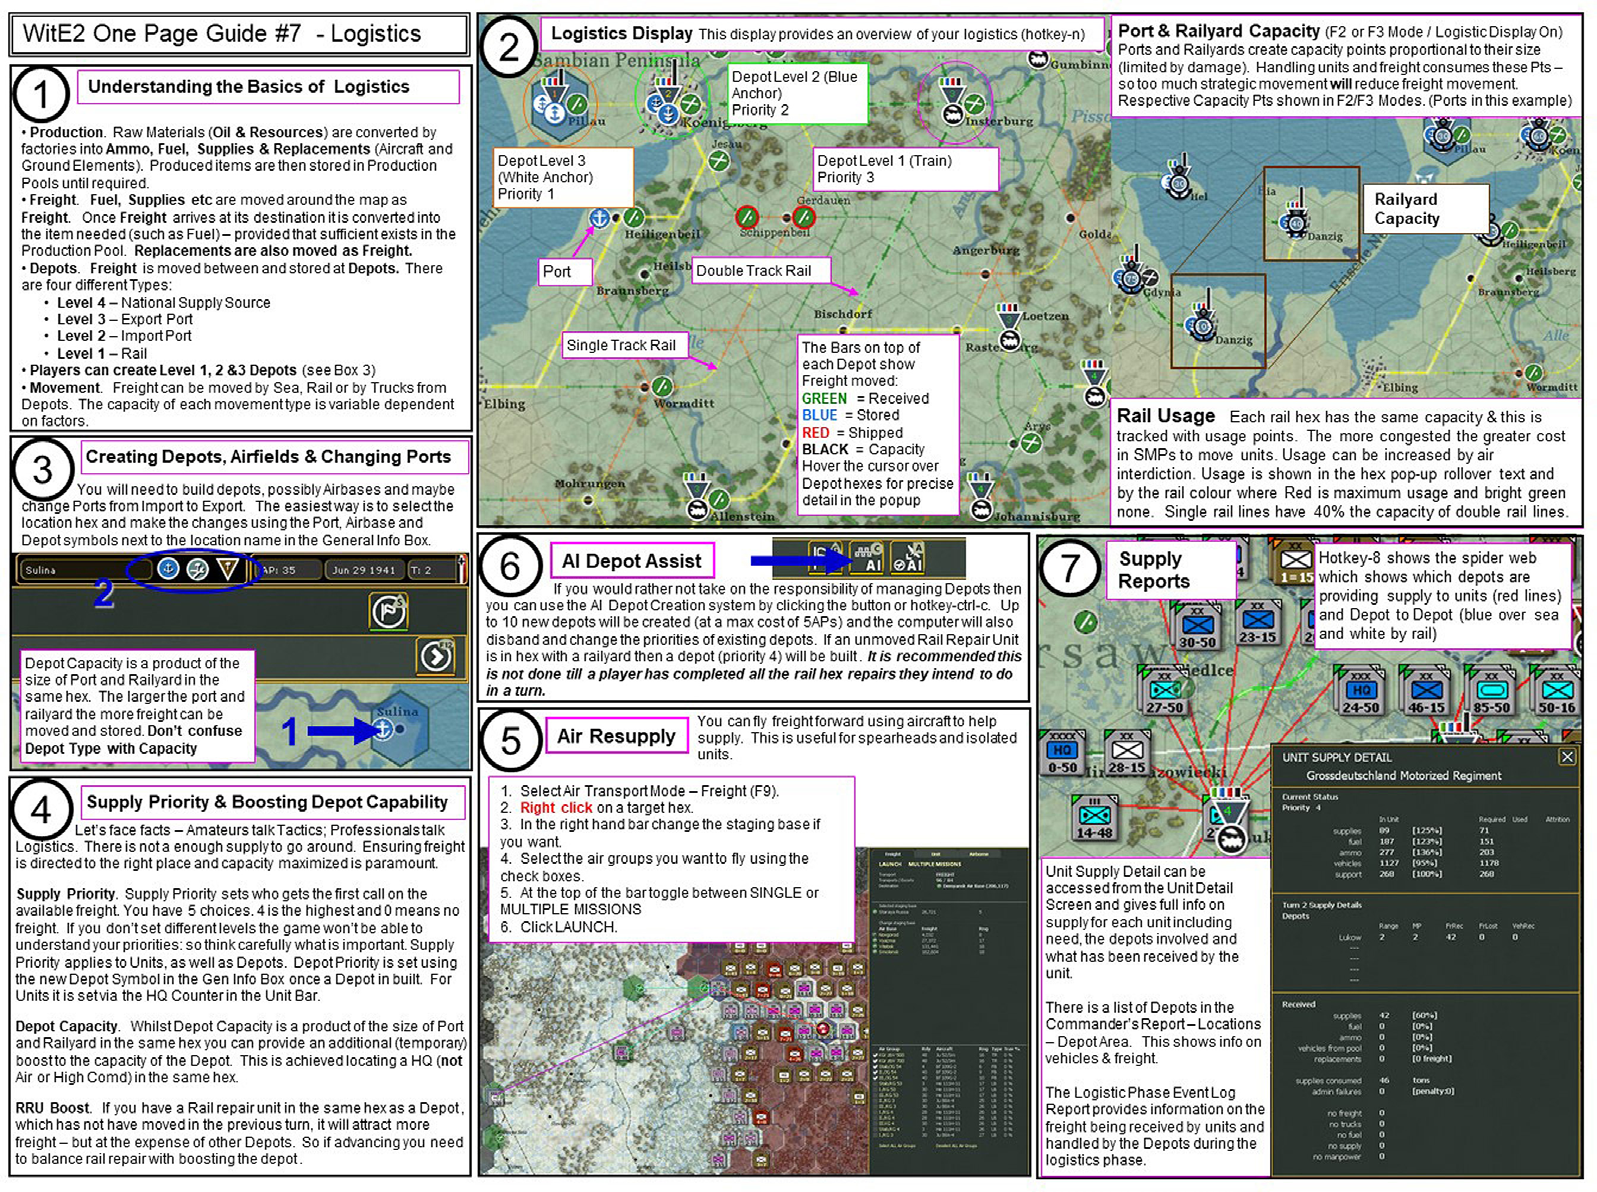
4.10.1 Production
Raw Materials are converted by factories into four supply items:
- Supplies
- Fuel
- Ammo
- Replacements (consisting of either Aircraft or Ground Elements)
These items are then stored in Production Pools until required. When they are moved across the supply system, these are treated as ‘freight’ (25.3) and use up rail, shipping and truck capacity as they are delivered to your armed forces.
Once freight arrives at the unit it is broken back down to one of the four items.
Units need the four different supply items as they move and fight. The demand for each item varies depending on the type of unit and how it has been used in the preceding turn(s).
In addition, the production system (Chapter 28) is used to create new Ground Elements (21.2). In turn these can be used by freshly raised units to bring them up to strength or to replace losses in your existing formations.
As a player you have no direct control over the production system in WitE2. You may lose or gain resources and factories as the game progresses but you are unable to change either what or how much a factory produces or the TOE of units (you can, however, set a maximum to control how much of this TOE the unit will absorb).
The production screen (36.3) provides a summary of production showing how much is being built and how much is being held in production pools. Elements annotated with #- are no longer produced and those annotated ** have yet to begin production.
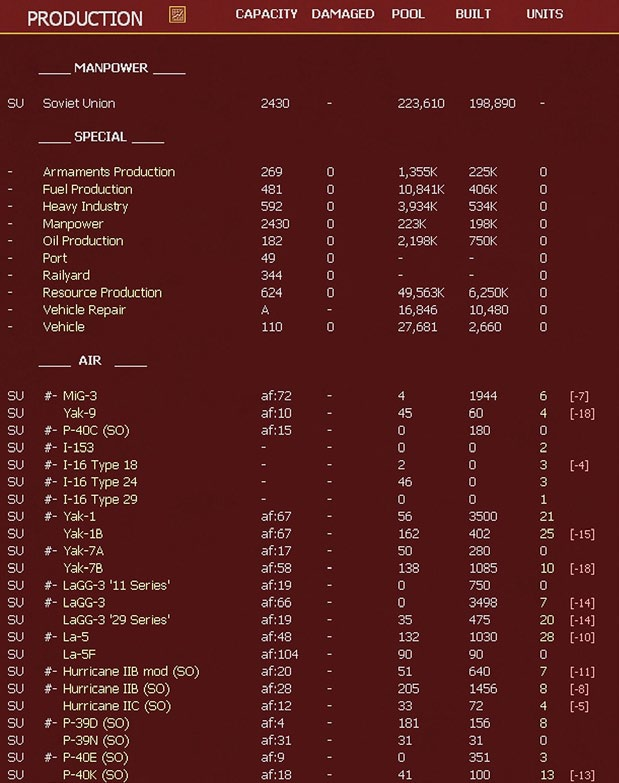
For the moment, you can ignore this screen but may want to refer to it to check why, for example, some of you air units are short of planes (you may be using a type in low production or that is now obsolete). You can use the screen to go to more detail about a given element, check which factories produce it and which units are making use of it.
4.10.2 Types of Depots
Freight moves by train, ship and truck to the network of depots. Depots have two attributes. They have the ability to store supplies that can be used by nearby units in the coming turn(s). Equally they have the ability to receive and send freight during the logistics phase. In addition, they often hold the trucks used to support the logistics system.
There are four Depot types.
The figure opposite shows three different types of depots and their symbols. Berlin is a National Supply Source (marked with a star), Stettin is shown as an exporting port (black box) and receiving port (note how the symbol has changed) and Rathengow is a rail depot (marked by a train symbol).
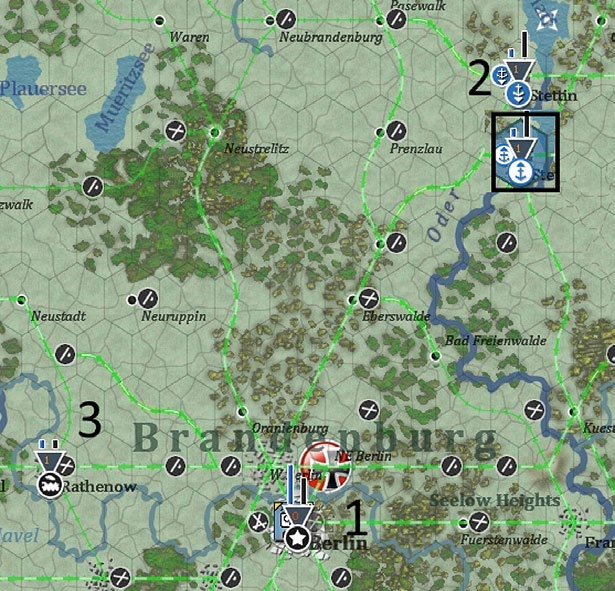
Managing this part of the game takes some experience but one critical issue cannot be over-stated. Depots only send freight to those at a higher priority level (4.10.4) so a priority 4 depot cannot send freight to another depot. Equally an exporting port can only send naval freight to a destination that has a higher priority.
Level 4 (National Supply Source). These produce Freight. They cannot be built in game.
Level 3 (Export Port). These ship freight to Level 2 Depots. The ports cannot be built in the course of the game but may become damaged and need to be repaired. A given port can be allocated to receive or send supply according to the player’s needs.
Note that if a port is also connected to the rail network it will interact with other rail depots for the receipt and dispatch of freight using the rail system.
Level 2 (Import Port). These receive freight from Level 3 Depots by Ship. The depot is created on capture of a port, can be disbanded and rebuilt later if desired. The higher the priority of the port depot, the more likely it is to receive freight by sea (and the capacity to ship freight is limited by the number of transport ships in a region as well as by port capacity).
Port Depots are automatically created by Amphibious HQs when invading.
Level 1 (Rail Depot). These receive freight from Level 1-4 Depots by Rail. They are created if a player builds a Depot in any hex with a railway (even if this is not currently connected to the wider rail network). If the chosen location has no railyard then a Level 1 Railyard is created with 100% Damage.
Thus level 1 depots can also be built in hexes that are on a rail line but where there is no current link. The number of such depots (i.e. those not built in an existing town or city) that can be created each turn is limited.
This allows the player to pre-build a rail yard so the depot will be fully operational when the rail line is connected.
As with airfields, the computer will allocate construction engineer Support Units to a hex that is building (or repairing) a rail yard. Keeping a stock of these in your high command or Front/Army Group HQs is useful for this purpose.
Level 1 Depots can be built or disbanded through the City Information Window accessed by clicking the City Name in the Unit in the General Information Box.
4.10.3 Building Depots
There are two ways in which you can build new depots.
- Fully Automated. If you press Cntrl+C then the computer will build new depots, change their priority and disband any unneeded depots. If you use this option it is strongly recommended you complete all your rail repair (21.6.1) actions for that turn before doing this so that the routine has access to all the useful information (see 25.7.3 for more details of the rules used for this option). You will be reminded that you have this option when you decide to end your current turn;
- Manually. A depot can be built in any hex on a rail line. If the hex does not contain a rail yard, then one will be created (with 100% damage) to support the depot. Each depot built this way will cost 1 Administrative Point.
4.10.4 Setting Priorities for Depots
To help distribute freight in support of your Operations you are able to set Supply Priorities. Priorities can be set for individual Depots and HQs (all units attached to the HQ have the same Priority) ranging from 0 (lowest) to 4 (highest).
You can change depot priority from the on-map display, from one of the tabs at the top of the screen, from the depot screen or using the Commander’s Report.
Even at level 4 a depot or HQ may not receive all the freight it can potentially hold if there is insufficient capacity in the related rail system or the depot itself. The supply system seeks to allocate a basic amount to each depot, those with higher priority only gain more if sufficient transport capacity exists.
Each airbase has its own supply priority regardless of the Supply Priority of its controlling HQ.
4.10.5 Depot Storage Capacity
Depot capacity is related to Port and Railyard size and not the Depot Type. The larger the Port or Railyard the more Freight can be handled by the Depot.
Relative Depot capacity is shown by the height of the black bar. While bigger depots may appear to be more efficient, in many sectors of the Soviet Union you may need to rely on a greater number of relatively small depots. This will be displayed when you select the logistics tab.
In the example above, the black bars show that Stettin is a larger depot than Rathengow (but Rathengow is actually typical of the bulk of depots on the map).
The size of the depot (linked to the size of the rail yard in the hex) is key to its capacity and this can be reduced if the rail yard (or port) is damaged (which can happen when it changes hands or due to enemy bombing) and increased if a HQ is stacked in the hex (25.7.8).
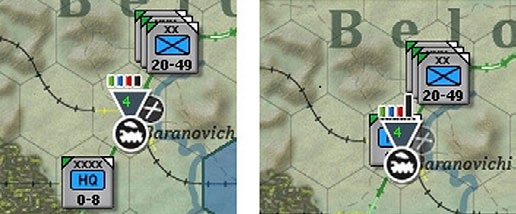
This shows (visually) the impact of placing a HQ on a depot. On the left side Baranovichi has no HQ and the black bar indicates its capacity to process freight. Placing an Army HQ on the hex trebles its capacity (this can also be checked using the mouse-over options, see 6.9.1 for more information).
The importance of doing this so as to optimise your logistics network cannot be over-stated. Especially for the Axis player in 1941, use of this ability will make all the difference as your armies sweep into the Soviet Union. In turn, come 1944, the large Soviet forces need all the help available to remain in supply when on the offensive.
Thus a depot in a hex with a damaged rail yard (or port) will function less effectively than one where the rail yard (or port) is fully repaired.
If a rail yard is damaged, either due to being captured or just built then it will try to automatically assign any available construction units to speed repairs.
4.10.6 Distribution of Freight
The movement of Freight between Depots by Sea or Rail is finite.
There are two constraints on moving freight: firstly the capacity of the Port or Railyard to handle the freight and secondly the capacity of the network in between.
These costs are the same as those for units moving by Strategic Movement. As Strategic Movement happens, freight movement costs later in a turn can become excessive. In effect, unit Strategic Movement may constrain Freight (at worst, the cost of movement will be so high that you lack sufficient rail assets to send any freight to a location).
The phasing of the game turn matters in this regard. While the logistics phase (5.3.1) comes before the ground movement phase in a turn, the rail usage is reset to zero at the end of the logistics calculations. Thus any ground movement in one game turn reduces the rail capacity available to move freight in the following turn.
The final link is between Depots and Units. Units will seek to draw freight from the nearest Depot. This is mostly done by Truck or, in some cases, horse drawn transport.
If a unit is a long way from the nearest functioning depot it will have to allocate more of its own trucks to moving supply. In turn this will reduce the MP allocation as the unit will have less trucks available to support its combat operations.
Port depots can be set to export or import (25.2.2) freight. Exporting ports will have a priority in the supply phase and will only send out freight if sufficient cargo ships are available in that sea area (25.6) and there are importing ports of a higher supply priority.
4.10.7 Rail Usage
Rails are colour coded to show Rail Usage (if you select the Supply Map Mode). Bright green means that no freight has passed that hex and red means that the equivalent of 30,000 tonnes has (38.7.7). Rail Usage is incurred not just by movement but also by air interdiction and partisan actions.
As Rail is used it becomes congested and movement costs more SMPs (Green = no penalty, Red = Max Penalty). Congestion is maximized at 30k but movement is still possible at the highest cost in SMPs for Units and Railyard Points (which especially affects freight).
Note that double rail lines can carry up to 30,000 tonnes per turn before they reach maximum capacity. Single rail lines can only carry up to 12,000 tonnes before they reach maximum capacity.
4.10.8 Rail Repair Options
A fully functioning rail network is key to your logistics. Damaged hexes can be repaired in one of two ways (22.6). Both sides have a number of Support Units that can carry out rail repairs. These are allocated to a HQ and then sent to any suitable hex within that HQs command range (4.7.4)
This range limit is important, if you assign your rail repair to units to the OKH or Stavka then they will be used almost anywhere on the map. If you want to concentrate their effort on a given sector it might be better to allocate them to a corps or army HQ as the shorter range will limit their deployment.
When in use, the rail repair units will appear on the map and are affected by the normal stacking rules (i.e. they are one of the 3 units that can normally be in a hex).
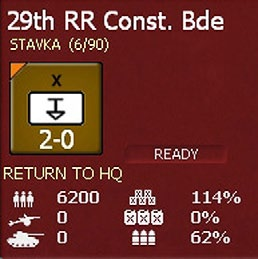
If you want this unit to stop repairing a given hex, then click on ‘Return to HQ’ and it will be removed from the map.
In addition both sides have full manual control over a few specialist rail repair HQ counters (21.11.1). These are moved on the map and if they occupy a hex that can be repaired (i.e. is adjacent to an already repaired hex) then their display will show as:
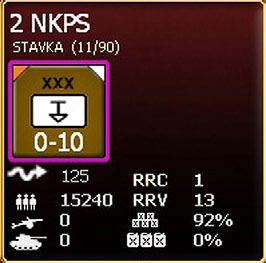
Note that this has two indicators not present on other HQs. The line RRC is the cost to repair the current hex (in this case 1). If you click on this text, the current hex will be repaired and that cost in MP will be deducted from the unit’s allowance. The value RRV indicates how much rail repair capacity the unit currently has.
4.10.9 Depot Priority and Eligibility for Resupply
Setting all Units and Depots to Priority Level 4 will not make your logistical challenge simpler as there is never going to be enough for everyone to get everything.
The system will allocate freight (which in turn is broken down into supply, fuel, ammunition and/or replacements as needed) according to priority. A level 4 depot will, if railway capacity exists, receive more freight than a level 1 depot. However, a depot will also try to use trucks to obtain freight and in doing so may reduce the number of vehicles available both for transferring supply to combat formations and moving those formations.
4.10.10 Depot Priority and Freight Movement
A depot will only send freight to a depot at a higher priority (so a priority 4 depot will not send freight to another depot).
In general you should layer your depot priorities to bring freight from the NSS to the front line by using the priorities. A depot at priority 1 or more, between the NSS and the front line will claim some freight if it is a source of supply for either combat units or nearby airfields.
4.10.11 Tools for Influencing the Allocation of Supply Between Depots
You have 3 main means to influence the allocation of freight.
First, relative supply priority of each depot is important as this will direct freight to the more important areas, but remember that just because you have a depot at priority #4 does not mean it will gain all the supply it wants. Railway, shipping and truck capacity may be lacking.
This shows the layout of depots behind Army Group South in August 1941. Some depots in Poland have been set to 0 and the main line from Lvov to Vinnitsa has a sequence of depots at priority 2, increasing to 3 where the main airbases are and 4 for the depots nearest the front line.
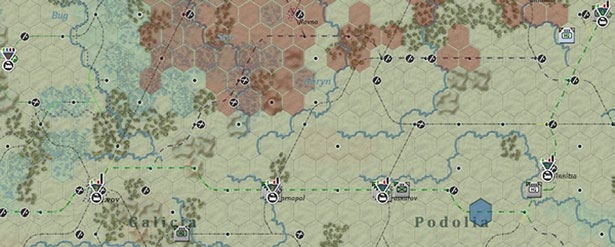
Second, placing a HQ on a depot will increase the available capacity of that depot, again increasing the ability to unload and load freight. Army level HQs are particularly effective in this respect (4.10.5 and 25.7.8).
This is very important. If possible keep your HQs on functioning depots as this will improve the ability to forward supplies to your combat units. Also, if you want a unit to refit (after suffering combat losses or to upgrade to more modern equipment) it will do so much quicker if it is in REFIT mode, on a depot and stacked with a HQ.
Third, placing one of your rail repair HQs (these are called FBD for the Germans and NKPS for the Soviets) on a depot, and not moving it in the turn, will increase the amount of supply drawn to that depot compared to others on the same network.
Note that in this case, you do not increase the amount of freight moving along a given supply path but you do alter where that freight is delivered to. This can allow you to build up for an offensive relatively quickly on a small sector.
4.10.12. HQ Priority and Eligibility for Resupply
HQs also have supply priorities from 1 to 4 (25.8). In this case, the system is designed to ensure that each HQ is first allocated the basic minimum and then the higher rated HQs will obtain additional freight (if it is available).
Note that a HQ will try to obtain the supply needed for its units and will start to use the trucks allocated to move its combat formations to achieve this.
Since using trucks to gain supply adversely affects the Movement Points of a unit (22.1) you might want to avoid placing HQs that are distant from the main supply net on too high a supply priority. The cost of obtaining that supply may undermine your operational mobility.
Equally, a HQ at a high priority will divert trucks from unit movement to obtain the needed freight.
If you are not careful, you may end up with well supplied but relatively immobile units. Be prepared to set HQs in relatively isolated areas to a lower supply level to avoid this.
4.10.13 Unit Resupply
When a unit is eligible to get resupplied from its HQ it must first pass a leader administrative check. If successful it may get up to 20% of the need of the item (Motorized units seeking fuel or Artillery Units seeking Ammo get up to 40%) subject to availability and loss during the delivery.
Note that this process is repeated for up to 5 times per turn for each unit. Thus a unit that has good commanders all the way up the command chain (15.5) is likely to receive more supply on average than one that has poor commanders.
The Unit Supply Window (37.12) shows the detail of the Supply received. At the bottom you can see when a Unit failed to meet an eligibility check which meant it failed to receive some of the potential supply.
Units look to draw freight from the nearest depot, which can be some distance away. The further the unit is from the depot, the greater usage of vehicles and fuel to move the supplies and the more that is lost in transit.
Note: The trucks attached to the unit will be used for this as well as those retained in the general truck pool. If too many trucks need to be used for re-supply, the Movement Points available to the unit will decrease.
The overall number of trucks detached from units to obtain supply can be checked using the end of turn logistics and production report (36.9).
The range for this supply is limited to either 30 hexes or 75 motorized MP if the logistics level is set to 100.
All units can get freight from a depot up to 3 hexes away without vehicles by using horses.
Once the closest depot is depleted of freight, a unit will try to get its remaining needs from the next closest depot up to a maximum of five but normally only will access two different depots.
4.10.14 Improving the Chances of Gaining Replacements and Supply
For the unit to get replacements, it must pass both administrative and support checks and it helps if it is in refit mode or is located in the National Reserve (13.2).
Units have up to five chances each turn to receive supply and replacements. Thus if they pass every leadership test, and are close enough to a depot with sufficient capacity, they can gain up to 100% of their need.
If the unit is in refit mode it is more likely to receive up to 40% of the need each time it passes one of these tests (if the supply is available). Units in refit on any depot will attempt to get to 100% TOE irrespective of the supply priority, drawing from other depots as well.
Adding a HQ counter to a depot will substantially assist any combat units stacked in the hex and looking to take on reinforcements. Similarly you can leave your rail repair HQs on a depot to raise its priority for supply deliveries (25.7.9).
Units in refit located in the same hex as a national supply source depot (type 4) will have access to virtually unlimited freight.
Units set to refit and in the relevant national reserve (13.2) will be the priority for new or replacement equipment. As far as possible, their needs will be met before any on map refit takes place.
4.10.15 Strategic Movement and Rail Capacity for Resupply
The Depot’s ability to receive freight is set by the Railyard & Port Capacity Points remaining at the end of a turn. Strategic Movement also consumes Railyard & Port Capacity Points so you must balance carefully how much strategic movement you use. In effect, if you use up the capacity sending fresh units to a sector very little freight can be allocated in the logistics phase.
4.10.16 Air Supply
You can use air transport to supply to forward units. Air Transport to an air base hex is more efficient than landing supply in a non-airfield hex.
4.10.17 Displaying Information About the Logistics System
The Logistics Display allows you to see some key logistic information. As with all on-map information you can access this using the information tabs at the top of the screen (6.2), right clicking on the map (6.3) or by using one of the hot keys (Appendix J).
Rail Lines are coloured to show usage indicating areas of increased movement cost due to congestion.
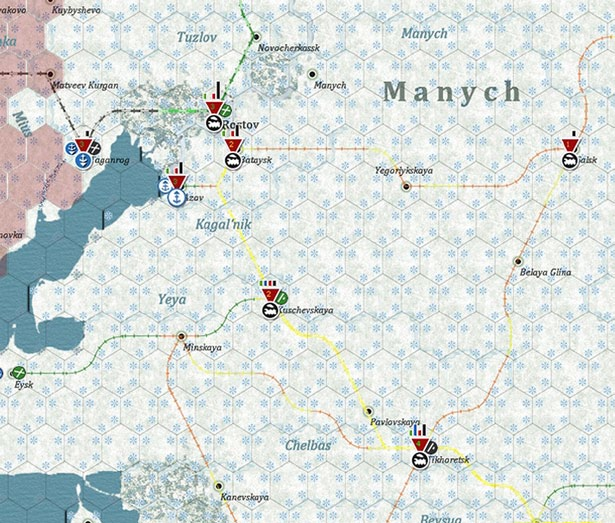
This shows the rail net behind the Soviet units attacking at Rostov in early 1942. The main line to the Caucasus is yellow indicating enough usage to cause problems. Some branch lines are orange so any units or freight using them will be subject to additional delays. The black lines around Taganrog have not yet been repaired.
Pressing the ‘8’ key also displays a network of lines which show the main Depot to have supplied a unit (red line) and last Depot – Depot (white or blue line) link.
This shows (at a zoomed out level) the supply network for AGC and AGN in August 1941. The red lines show that depots such as Vilnius and Minsk are supplying the bulk of the combat units. Those in turn (the white lines) are drawing supply from the rail network back to Germany). Naval supply (the blue lines) is being used to send freight to some ports in Lithuania and Estonia.
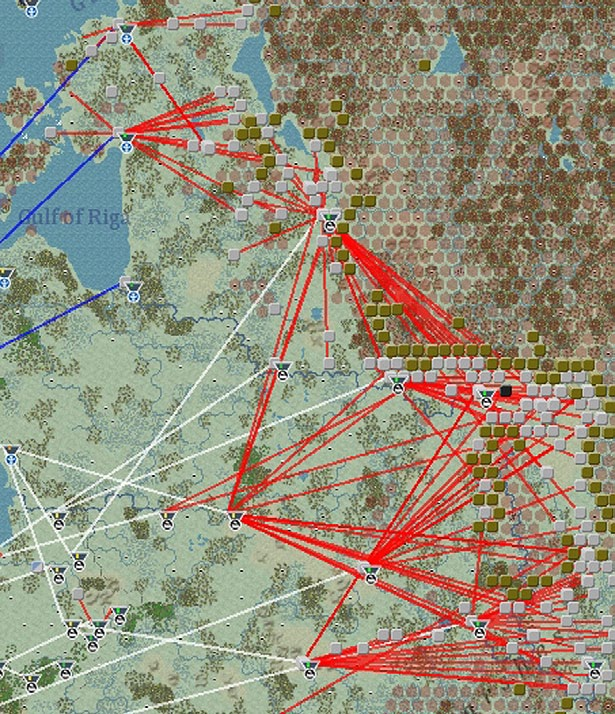
This can be helpful if you are trying to understand where units and HQs are drawing their supply from. If they are using too many trucks for this their relative combat capacity and movement may be affected.
4.11 Changes to Your Army
As the game progresses the two armies will change. This reflects the allocation of new equipment, new forms of organisation and shifting levels of morale and experience. It also reflects the process of absorbing combat losses and replacing those losses in existing units.
4.11.1 Reinforcements
Reinforcements are fresh units (both combat and support units) that arrive in game (either as a historically occurring event or the result of the Soviet player building fresh units).
Note that most of the Soviet units destroyed in the early game (up the 1 November 1941 turn) will be placed onto the reinforcement cycle and will return at a later stage. However, these units will then need to be rebuilt with appropriate Ground Elements and given time to train before they will be of much use in combat.
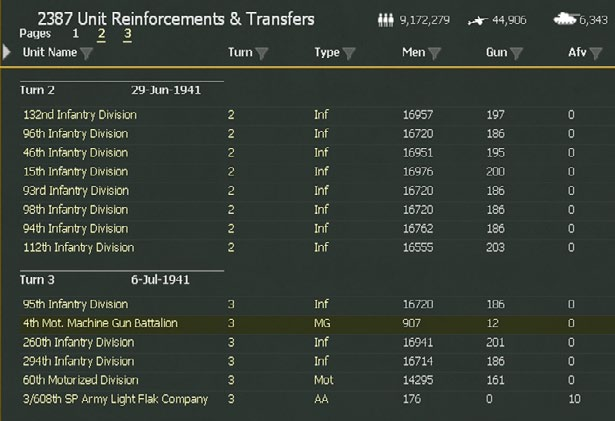
The reinforcement chart (36.7) shows all the scheduled reinforcements.
This shows the first turns of the game and the German reinforcement schedule. It includes reinforcements, units being transferred from another theatre to the map and transfers between theatres. Not shown on that image, but the chart also shows when units will be disbanded, withdrawn or transferred from the map to another Theatre.
4.11.2 Replacements
Replacements are allocated to existing formations to bring them up to strength as set by their current TOE (26.1).
Units in refit mode will have advantages over other similar units when receiving replacements. Equally units in refit mode and in the National Reserve will be the first to be allocated any available equipment.
Note that routed units will not receive replacements until they recover from being routed.
In addition to fresh men and equipment, elements that have been damaged in combat may also return as replacements.
There are delays that affect the speed at which damaged elements will return representing the time lost as lightly wounded soldiers and damaged equipment are treated or repaired and then return to their units.
Replacements are sent as freight along with supplies, ammo and fuel (25.3).
Replacements coming into units will bring down the average experience for that type of ground element by a small amount.
4.11.3 Changes to the At-Start Army
As noted in the earlier discussion about the Table of Equipment (TOE), the mix and type of elements in a unit will change over time. Equally a unit may substitute an equivalent element if its preferred element is not available (this will happen in particular with tanks and artillery guns). Units that are in the National Reserve or on a National Supply Source will change to a new TOE more quickly, others will do so over the next few turns (assuming they are connected to the main supply network).
In addition, the structure of the two armies will change. Broadly the Axis forces will stay the same over the game. Their basic combat unit will remain the division and their command structure will be one of corps, armies and army groups.
The Soviet army will change substantially over the game. By August 1941, the at-start Corps will start to either disband or convert to Army HQs. From then to the end of the war the basic Soviet command structure will be of Armies reporting to Fronts.
Equally as the game progresses, completely new unit types will become available to the Soviet player.
By December 1941, the Soviets will also slowly start to replace the division as their basic combat unit with a Corps.
4.11.4 Building Soviet Combat Corps
From late 1941, the Red Army started to re-organise so that units operated as corps size combat units. These are treated as normal combat units (CU) in WiTE2 and not as corps level HQs (21.11).
These are built in one of two ways. The build unit screen (27.2.3) will show when they are available and the component parts and the maximum number at any one time.
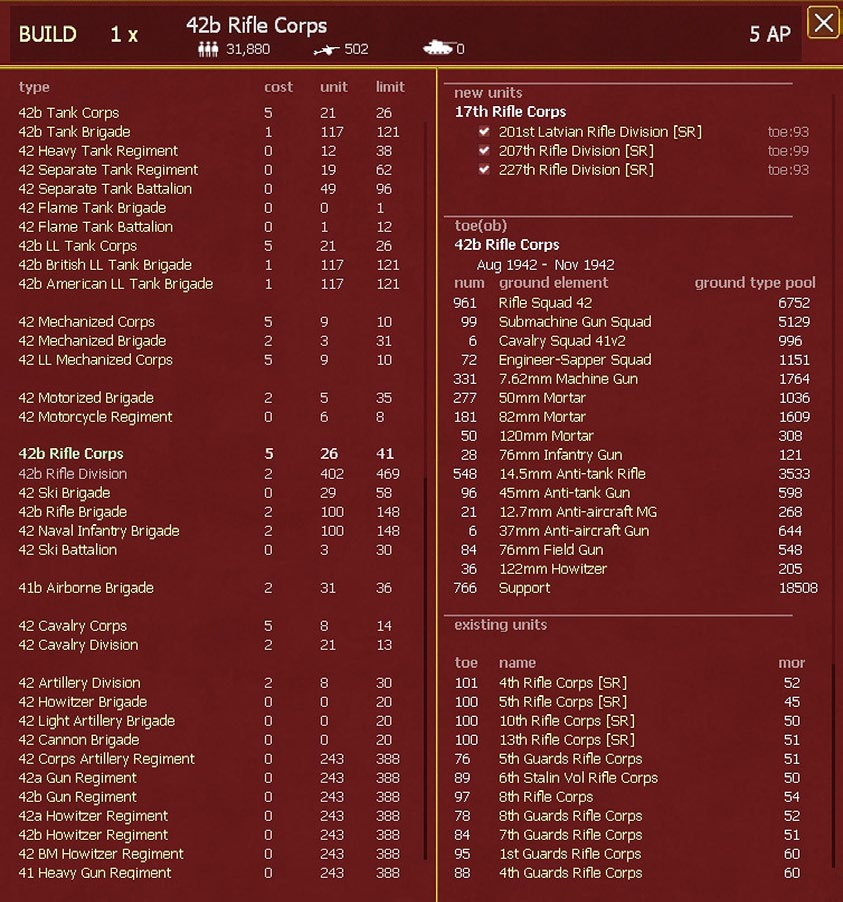
This screen is used to build new units. At the top will be shown how many you wish to build and the cost in Administrative Points (5 in this case). Since some of the components already exist, it will be suggested you use them (in this case all in the Soviet reserve). Below that are the elements that will be needed to fill out the new formation and a list of all the existing corps formations. Note that at this stage of the game the Soviets have 26 Rifle Corps in play and can build up to 41.
On Map. The Soviet player can build Cavalry, Rifle and Mechanized Corps on the game map. To do this they need to bring 3 of the requisite unit types (cavalry divisions for a Cavalry Corps, rifle divisions for a Rifle Corps. If these component parts are present in a hex, press the build up/breakdown button (21.3.2). You will be informed of the cost in administrative points and asked if you want to complete the action.
If the division or brigade has a scripted transfer to another Theatre at some stage (13.1) then it cannot be used to build a Corps.
Off map. Units in the Soviet reserve can also be converted to corps in the same way. In addition, if building a corps in the reserve you can build it without having all 3 component parts. In this case, the requisite missing brigade(s) or division(s) will be constructed and then combined into the new unit. The cost in administrative points will be higher as you have to create the new units as well as build the corps.
Finally, Soviet Tank and Mechanized Corps can only be built off map. The component elements must either already be in the national reserve or acting as an off map Support Unit and attached directly to the Stavka HQ.
This is because the tank brigades are only support units and cannot be deployed directly on the map. A Tank Corps is built using 2 Tank Brigades and 1 Motorized Brigade. These units will be placed in the Soviet reserve and can then be ordered to the map.
A Soviet Corps will be created as a Guards formation if two or more of its component parts already had Guards status.
4.11.5 Building Fresh Units (Combat and Support)
Usually only the Soviet player can build fresh units. The exception to this is that both sides can build fixed fortification units (20.5).
To do this, select the build screen (shift b). This will show all the units that can be built, their administrative point cost (if any) and the total number that can be built. It will also indicate the components needed to build the unit and how many of these are currently available.
Most unit types have a build limit (this will change across the game) and this cap cannot be exceeded when building new units (you may have more of a type than can be currently built due to changing limits).
You can order between 1 and 10 of a particular unit type at any time. New units will be assigned to the National Reserve where they will acquire the equipment they need and start the process of training and gaining experience.
Note that the numbers shown are for all the possible elements that could fill out that unit. The game system allows a degree of substitution so if a certain tank or gun model is not available it will use something similar (21.2.7).
The German player can build specialist fortification units.
4.11.6 Elite Units
Both sides have elite units that have advantages in terms of unit morale and, via their ToE, more and better equipment.
The German SS units are created at their historical dates. This often involves withdrawing one version of the unit before it returns. Thus the initial group of SS Motorized divisions will withdraw in late 1942 and return as SS Panzer- Grenadier divisions. In turn these will withdraw and return as SS Panzer divisions. In addition, the Gross-Deutschland formation (which starts as a brigade) is treated as an elite unit as are some other German units.
In 1943, the German player will receive first SS Corps HQs and then SS Army HQs. These can only be commanded by SS leaders (15.2).
Soviet elite combat units are mostly created as they win sufficient battles. There are constraints on how many of particular types of unit (infantry, armour, mountain, artillery, etc.) may become guards units. There is no limit on the number of cavalry or airborne combat units that may become guards units. Heavy tank and rocket units are automatically created with guards status. The limit for motorized type units is approximately 35 percent.
For non-motorized type units, the approximate percentage limit varies by year as follows: 1941 - 5 percent January - June 1942 -10 percent July - December 1942 - 25 percent 1943 - 25 percent 1944 - 30 percent.
From 1942 the Soviet player will receive a number of Guards Army HQs as part of the normal reinforcement cycle. Some of these will replace existing Army HQs at the date when they historically changed their title.
At their historical dates, Soviet Air Operational Groups will rename as Guards formations. This has no direct impact on gameplay but will also trigger the designation of a number of air units as Guards. These formations will receive a +5 bonus on their potential maximum morale.
4.11.7 Upgrading Air Units
Air units can be set to upgrade to new planes either automatically or manually. If this is done using the automatic system it will happen during the logistics phase and the unit will be useable in your next turn. If you do so manually, the unit will not be able to fly in the turn it upgrades.
When an air unit swaps to a new plane type there may be some loss of experience.
When air units upgrade they cannot change their type so a tactical bomber formation will still be equipped with tactical bombers not with longer range bombers. A list of the restrictions in this respect can be found in section 16.5.1.
Air units in the non-reserve Theatre Boxes will be automatically set to automatic upgrade.
4.12 Weather
4.12.1 Basic System
The WitE2 weather system models both ground and air weather conditions, in addition water in rivers and lakes can freeze allowing easier movement. The ground condition determines MP costs for movement and the impact on attacking CV values in ground combat. The air condition impacts air missions.
The Weather changes before the Soviet phase (in other words the German turn uses the same weather as the preceding Soviet turn). This reflects the Soviet Union’s (and its Allies) better weather forecasting capability.
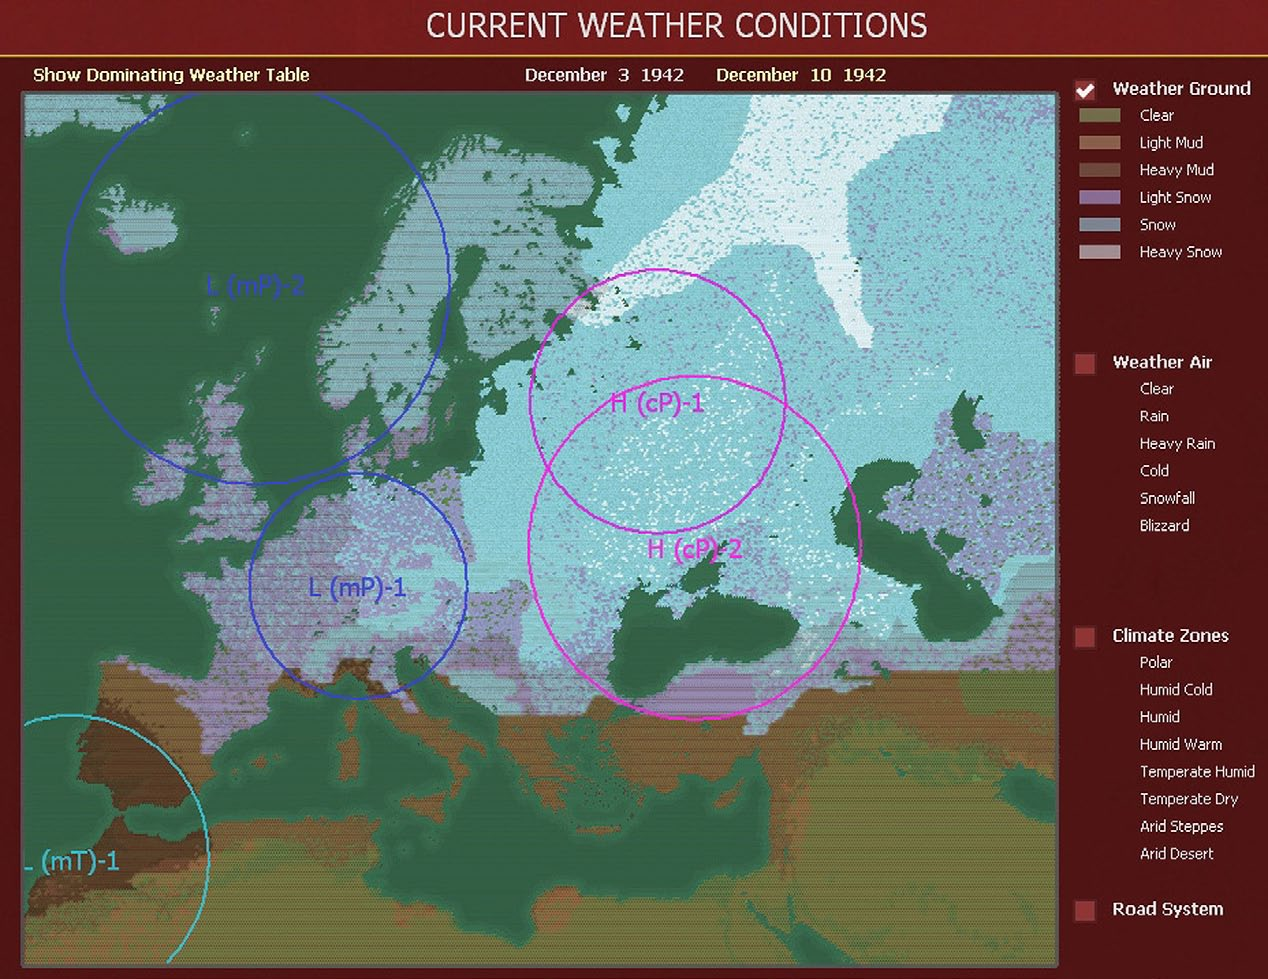
Dominating Weather Conditions. Each hex is assigned to a weather zone and each weather zone is assigned a dominating weather condition for each particular month of the year. This is the weather that will apply in that hex unless it is modified by a weather front (8.1).
Weather Fronts. Weather fronts are critical as they will amend the dominating weather for that particular zone meaning the weather can change from turn to turn. There are 5 different types of weather fronts that can enter the map and alter the base air condition in a hex depending on the time of year, the base weather and the climate zone. Falling rain or snow in hexes in turn creates mud and snow levels.
Air Conditions. There are 6 Air Weather Conditions: Clear, Rain (these represent light rains - summer rains, no more than 2-3 days a week), Heavy Rain, Cold (light snow, clear sky most of the time), Snowfall (more regular snowfall with more cloud cover) & Blizzards (snow storms and very low temperatures). These affect the conduct of air operations and both Heavy Rain and Blizzards will stop almost all air missions from taking place (even if the mission takes place, you may end up with heavy operational losses as a result).
Ground Conditions. There are 6 ground conditions: Clear, Light Mud, Heavy Mud, Light Snow, Snow and Heavy Snow. These affect ground movement and combat.
Each condition affects the cost of movement through a hex. This cost is in turn modified by the quality of the road system: Good, Average or Poor. In WiTE2 each hex has been graded for its road quality. The better the road system, the less impact weather has on movement and ground combat.
Checking the Weather. There are three methods by which you can see the weather in a hex:
- Hex Rollover. The weather condition in each hex can be found in the hex rollover text – this also shows the amount of snow or water on the ground.
- Weather Screen. Information can also be found on the Weather Screen (see previous page). The Weather Screen allows the player to toggle on information for the Ground Weather conditions, the Air weather conditions, display the Climate Zones or the Road Systems.
In this case, the bulk of the Soviet Union has snow on the ground and is dominated by the two high pressure systems.
- The weather screen also allows you to access a forecast for the next turn (8.2);
- Weather Graphics. The weather can be seen on the map by toggling the Weather button on the Map Info Bar. You can toggle between showing both Air and Ground conditions, Ground only, Air only, or no weather art at all.
Impact of Weather on Air Operations. Air mission weather is classified as very poor, poor, fair, good, or excellent, and this is determined by the aggregate cloud cover over a particular air mission’s entire flight path. The determination of the percentage of cloud cover in a particular hex reflects the current air weather condition.
As the weather worsens, it is likely that either the number of planes who complete a mission will be reduced or the mission may be completely canceled.
Once the mission flies, the weather in the target area will also impact the effectiveness of the airstrike or reconnaissance mission. Ground Support missions are significantly reduced in effectiveness during bad weather such as heavy rain, snowfall, and blizzard. In addition to decreasing the effectiveness of air missions, bad weather can result in less aircraft taking part in missions and even entire air missions being canceled. Flying in bad weather results in increased aircraft losses.
4.12.2 Special Winter Rules
Whether the first winter of the war was unusually harsh is a matter of debate but what is clear is that the German army was badly prepared for the impact. This is simulated by increasing losses due to attrition and breakdowns. The full rules are set out in section (8.6.1) but note that the Germans will probably have a lot of disabled men who will return to their formations in the spring.
By contrast the winter of 1943-44 was unusually mild and again the usual weather rules are amended (8.6.2) to reflect this.
4.13 Managing Commanders and HQs
This section covers how to manage your Command and Control in WitE2. As noted above managing the deployment of your HQs, your Order of Battle and how you assign your leaders are key skills to playing the game well.
4.13.1 Leaders
Almost every HQ Unit has an assigned leader who commands all units attached to that HQ, and indirectly affect those attached to lower level HQ’s. Leaders have ranks and designations that determine what level and type HQ units they can command. More importantly they have leadership ratings that affect a wide range of functions.
Leader Ratings. There are seven leadership ratings, Political, Morale, Initiative, Admin, Mech, Infantry, and Air, with the last three collectively referred to as combat ratings. In all cases, a higher number is ‘better’ but it does mean that a commander with a high political score but low military competence can be expensive to replace.
- Political. This affects the cost to replace the leader and the probability of promotion/dismissal/execution.
- Morale. This affects unit combat value in battle, determining win/loss credit, adding or recovering fatigue for the unit’s ground elements, and rallying routed units.
- Initiative. Affects the MPs a unit will have during the turn, the ability of ground elements to fire and hit during combat, the ability of units in reserve status to commit to a battle, the ability to reduce casualties by turning a low odds hasty attack into a reconnaissance in force or to break off a losing attack before suffering excessive losses.
- Administrative. Affects the MPs a unit will have during its turn, checking for repair of damaged aircraft and ground elements and determining wastage and resupply. Admin checks are also affected by the actual number of support squad (21.2.2) ground elements in the leader’s HQ (this reflects the wider capacity of the officer’s staff and is one way the game models the Soviet disorganization at the start of the German invasion).
- Mech and Infantry. These ratings are part of the ground combat system and are used to determine the overall combat value as well as the ability of the ground elements in the units under their command to be able to fire and to hit opposing ground elements. Successful rating checks will increase combat value and improve the chance of ground elements to both fire and to hit.
- Motorized units use the Mech rating and non-motorized units use the infantry rating;
- Air. For air leaders, a successful air combat skill check will result in more ready aircraft from an Air Group participating in a particular air missions.

General Khalyulzin is a less than stellar Soviet commander with low values for almost all the categories. His units are likely to fail many command rolls as a result and thus fight far less efficiently.
Changing Leaders. You can change a Leader by clicking on the Leader’s name in the Unit Detail Screen. There is a dismissal cost in APs that you must pay (in the case of General Khalyulzin this was 8). You are offered a choice of new Leaders shown with their ratings so you can select the most suitable.
If you click on the dismiss button, you will be offered a list of possible replacements such as:
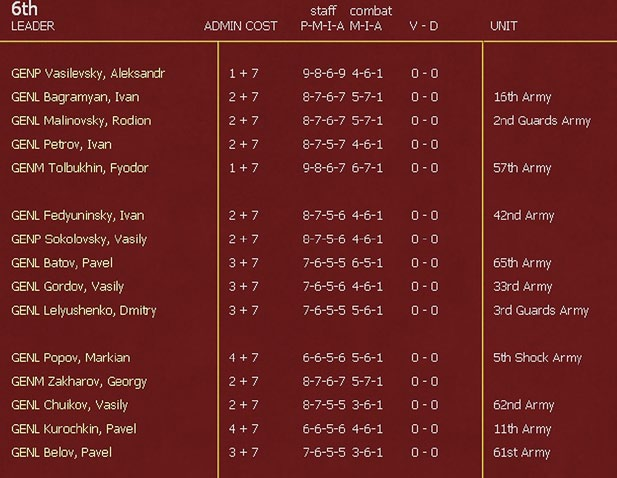
The replacement cost will vary according to how suitable the new leader is for the post (it increases if the role will be a promotion and their current rank is too low). The screen also tells you if your chosen leader is already leading a HQ. If so, they will be automatically replaced in that role.
Equally the game routines may dismiss a leader with relatively low political value and who has lost a number of battles. Leaders may also be killed in combat.
Leader Rating Checks. Leader ratings can have an impact on almost all actions taken by units. It is therefore important to select the best leaders that you can afford with your APs and ensure that they are commanding units in the optimal structure – both in terms of size and deployment.
Commanders at different levels in the Order of Battle will have different effects on the units under their command (15.5.3).
Most combat units will report to a Corps or Army HQ (the latter becomes common as the Soviets abandon their pre-war OOB in August 1941). The commander of this Corps or Army will use their full ratings to affect the units directly under their command.
Commanders at the next level (i.e. an Axis Army command or a Soviet Front command) will have a lesser impact on all the units under their command. Their scores are reduced both by distance in the command hierarchy and on the map. Their leadership scores are used if the lower level commanders fail one of the many leadership checks (affecting supply, combat performance and the recovery of disrupted elements – among other things).
In turn, commanders at the Stavka (the Soviet supreme command), an Axis Allied High Command, a German Army Group or the German OKH HQ can help units pass if their immediate commanders have failed their tests (15.5).
Players Note: Creating a logical Order of Battle and placing your best commanders at the appropriate level is a key skill in playing WiTE2. A commander with very high scores will have less direct impact if they are in a more senior position but will affect the performance of more units. Bringing together your best commanders at each level can create a real advantage on one sector of the battlefield.
Also note that the Germans have an advantage of generally better commanders than the Soviets and potentially having four command levels (corps-army- army group-OKH) compared to the three of the Soviets (army-front-Stavka).
4.13.2 Headquarters
Leaders are assigned to headquarters (HQ) units and in turn then command the various combat and support units that make up your army. This section sets out some of the ways in which HQs and units interact and the consequences when this is flawed.
Commanding HQ. In Combat each side has a commanding HQ (normally the HQ with most CVs directly reporting to it in the battle). Units not reporting directly to this HQ suffer modifiers that reduce their CV for the battle. Try to attack with units in a single Corps or Soviet army if you can. Ideally do not mix multiple Axis Army commands or Soviet Fronts in the same battle as the command penalty can be severe.
Command Points (CP). Each combat unit costs command points depending on its size and any difference in nationality between the unit and its HQ. Usually a Soviet corps will cost 3 command points, an Axis or Soviet division 2, and an Axis or Soviet brigade or regimental unit 1 CP.
Off map Support Units have no cost in Command Points nor do on-map rail repair units.
These values are increased by 1 if the unit is reporting to a HQ of a different nationality. Note this applies all up the command chain, so a Hungarian brigade attached to a German army will cost that army 2 CP, and in turn will cost the relevant Army Group 2 CP.
Command Capacity (CC). There is no limit to the number of units that can be attached to an eligible HQ unit. However HQ Units have a Command Capacity (CC) which determines how many units (CP value) it can efficiently command.
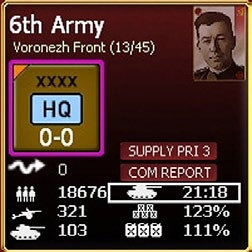
In this case, the 6th Army commands units costing a total of 21 Command Points and thus exceeds its command capacity of 18. Normally a leadership check is the leader’s relevant score divided by 10. Since the 6 Army is overloaded by 3 the divisor will increase to 13. In general, if you can, try not to overload HQs.
The CC values of many types of HQ will shift over time (21.11.3).
Command Ranges. When leader rating checks are conducted the range to the HQ is important. Keep your Units within Command Ranges of their HQ Units. The most important relationship is the unit should be less than 6 hexes away from its direct commanding HQ. You can see if units are out of range on the map by selecting the HQ. Units in-range will show with a blue border, units out of range will have a red border. It is important to ensure that combat units are within 5 hexes of their immediate controlling HQ. Changing HQs. You are able to change the HQ of a Unit once per turn by clicking the HHQ in the Unit Detail Screen. When it has changed it will be shown with a *. Changing HQs has no Admin Point Costs.
Here, the Soviet Mechanized Corps has changed its HQ to 1st Guards Army this turn. It now cannot move to another HQ until the next turn.
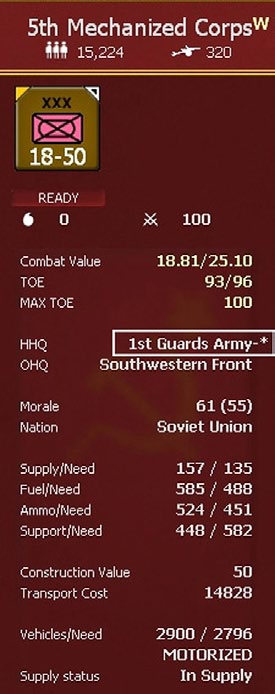
If a combat or support unit is allocated to a new HQ in that turn then there will be a penalty of against any leader checks that use the administrative value (mostly logistics).
4.13.3 Assault Tips
The rules above are modified if the HQ is designated an ‘Assault HQ’ (21.11.2).
This can only be done for a limited, but changing, number of Axis Armies or Soviet Fronts.
In this case, 1st Panzer Group has been set to assault status increasing the Command Points of the Army HQ and all attached Corps HQs. By contrast 6th Army is not on assault status and it, and the attached Corps, retain their standard Command Capacity.
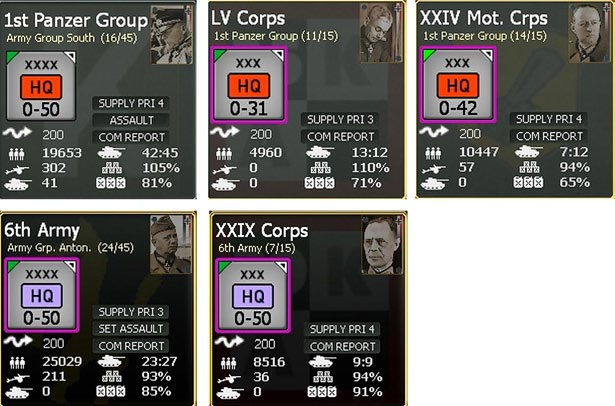
The consequences are to increase the Command Capacity by 5/3 for the HQ itself and 4/3 HQs that report to it, units reporting (directly or indirectly) to the command will gain Combat Preparation Points more quickly (23.2), will have a better chance to pass the various leadership checks (15.5) but will not build fortifications (20.2) beyond level 1.
This is a powerful option but is primarily designed to improve the offensive capacity of the attached formations. However, the capacity for more rapid regain of CPP can be useful in any situation.
You can see which commands are set to Assault status from the OOB screen (6.2 and 36.1), as:
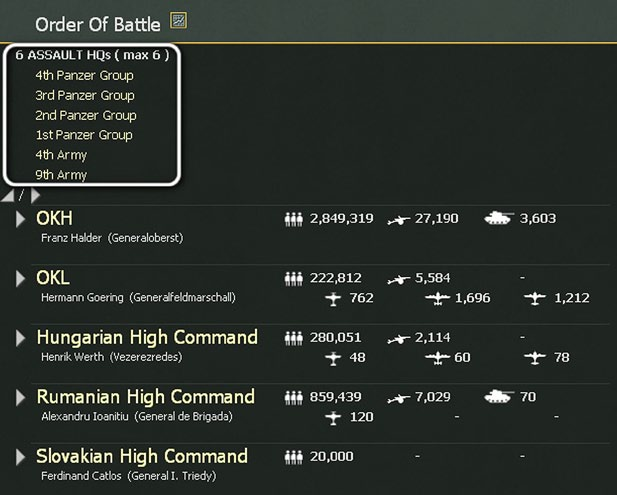
These advantages do not accrue if:
- The unit itself or its HQ has just been attached to the relevant Axis Army or Soviet Front this turn;
- If either the Assault HQ or any other HQ in the command chain is overloaded in terms of Command Points (21.11.6);
- If any HQ in the command chain is outside the command range for the Assault HQ (21.11.4)
4.14 Theatre Boxes
The Theatre Boxes provide the game with the ability to simulate the influence on the Eastern Front of other areas of conflict. You can bring up the Theatre box display using the tabs on the To show the theatre boxes on the map press the relevant tab on the Info Screens, right click on any hex or using the Ctrl+T hotkey. Ctrl+T by default will take you to the national reserve.
There are two basic types of Theatre Boxes in WiTE2.
4.14.1 National Reserves
Both sides have a reserve box which can be used to refit either damaged or new units.
Ground units are moved from the reserve to the map first by accessing the reserve (either via the Commander’s Report 35.2.3 or the on-map display 13.2) and then selecting the units to redeploy. The arrival hex for German and Soviet units needs to be designated on the map and can be changed during the turn so that different units arrive in different hexes (13.2.1). Units from other Axis nations will arrive in their respective national capitals.
Ground Units can be sent to the reserve if they are on a working rail line and more than 4 hexes from any enemy unit. They also need enough Strategic Movement Points (SMP) remaining to allow them to both entrain and move a single hex by rail.
Again this can be done counter by counter on map or using the Commander’s Report.
Units sent to the reserve will lose all their existing Combat Preparation Points (23.2.2).
Air units are moved from the reserve by selecting the desired destination airbase and opening the air redeployment option (13.2.2 and 17.3.2). If you are using the AI-Assist routines then this will be done automatically as the AI will send weakened air units to the reserve and bring fresh ones to the map.
4.14.2 Other Theatre Boxes
In addition to the Reserve, here are a number of Theatre boxes that model regions where one side had to keep a large garrison (such as the Soviet Far East) or where secondary fighting took place (such as the Balkans or the Arctic) while other theatre boxes reflect regions (Western Europe, North Africa and Italy) where the Axis forces are engaged with the Western Allies.
Finally, the partisan war within the Soviet Union and in Yugoslavia is modelled using appropriate Theatre Boxes.
Depending on the game play options, some Theatre Boxes are out of play and units will only enter or leave them according to historical deployments. The player(s) have to make a decision whether to actively manage the Theatres or not at the start of the game as this cannot be subsequently changed.
If a unit has no set withdrawal dates it can be transferred from the map (or the national reserve) to a non-reserve TB to boost strength at that location but can’t be subsequently removed unless the options in 13.3.4 have been enabled. Enhanced Player Theatre Box Control allows free movement (up to certain limits) between theatres and between theatres and the map.
It is suggested that in early games the Theatre Boxes are left locked (they are automatically locked in any non-campaign scenario). The full rules for managing the Theatre Boxes are in Chapter 13.
4.15 Events
WiTE2 has an event system which enables scenario developers to either reflect actions happening in off map Theatre Boxes (such as the start of a new offensive or a lull in combat) or that directly affect the on-map portion of the game. These can be conditional on the certain outcomes such as the loss or capture of some locations by a certain date (13.5).
The one page guide (figure 4-70 opposite), Further Details, summarises key information about the Theatre Boxes, Events, Weather and Logistics systems.
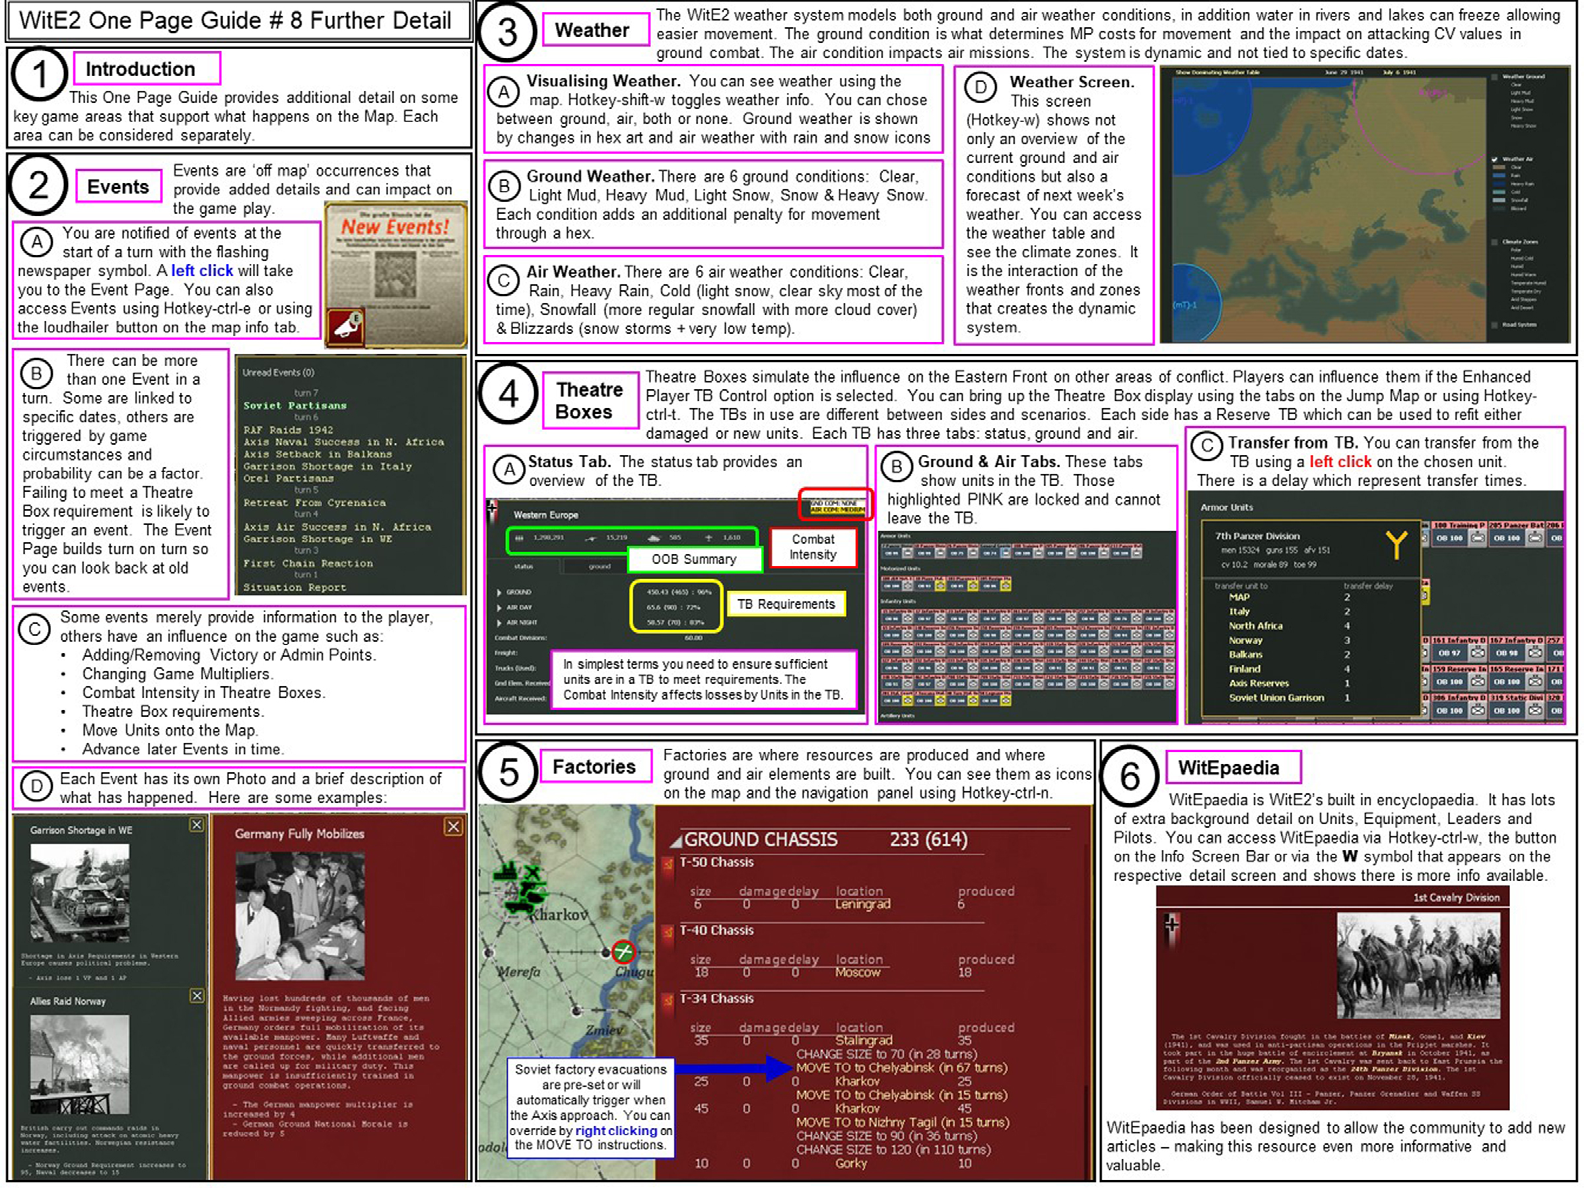
4.16 Victory Points
Earning VPs and Victory Conditions allow you to win a game even if you have lost the war – by achieving a better result than History. Victory Points can be seen in the VP Screen (Hotkey-V). The calculation of Victory Points and Victory Conditions is different for Short scenarios and Campaign Games.
4.16.1 Victory Points in the Short Scenarios
Victory conditions for non-campaign scenarios are based on control of victory locations set by the designer and cumulative losses in men, guns, AFVs and aircraft. Victory points for control of victory locations are awarded each player-turn as well as separate victory points awarded for controlling victory locations at the end of the scenario. Victory locations can be applicable to both sides or be specific to one side only.
Victory point locations can be displayed by selecting the Toggle Victory Locations button in the map information menu tab (Hotkey-shift-V).
Losses are based on the number of men, guns, AFV or aircraft that must be destroyed for the opposing side to gain one victory point. This base number for losses can be further modified for each side by a certain percentage.
At the end of the game the total points for each side are compared as a ratio and the result is determined by the following rules:
- Decisive Victory - ratio greater than or equal to 5.0
- Major Victory - ratio less than 5.0 but greater than or equal to 2.0
- Minor Victory - ratio less than 2.0 but greater than or equal to 1.1
- Draw - ratio less than 1.1
4.16.2 Victory Poionts in Campaign Scenarios
Campaign Scenarios start at different points during the war but the game will always end at the latest on the first turn in August 1945.
For campaigns that start in June 1941 the system basically encourages the Axis player to try and capture more cities (either take them earlier or take cities that historically were not occupied). In turn, when the Soviet player regains the initiative, they too gain bonus points for capturing cities in advance of the historical schedule. For campaigns that start later than June 1941, the VP scores are initially set on the basis of the progress of the historical war.
Key Concepts
The campaign victory system relies on two key concepts.
Initiative. At any stage of the game, only one side has the initiative. This side will gain VPs as below as they capture cities and lose VPs if their opponent manages to retake a city.
Initiative Switchover – Currently initiative can switch to the Soviets between Oct 1 1942 and July 1 1943 whenever the German score is 10% or more below the German HWM. If this has not already happened then the initiative will switch on July 1 1943. Once initiative switches, it never switches back.
Once the initiative changes, the VP score is recalculated using the value of the cities held by the Soviet player at any stage, plus any bonuses for cities that were historically lost but not in the current game.
German High Water Mark (HWM) This is the highest score ever obtained by the Germans throughout the game. At the time that the initiative changes, the Axis HWM score is frozen, and the Soviets begin to score points (in the same way the Germans have been scoring).
Note that this rule uses the highest score the Germans have achieved at any stage of the game, NOT the score on the turn when the initiative changes.
Detailed Rules Certain cities are marked as victory locations and each of these cities is given a base victory point value.
Bonuses will be given for capturing cities based on comparing to the historical capture date. A maximum of 6 points can be earned per city. If the city is captured on the historical turn, a bonus of 3 is scored. One additional point is earned for each week earlier the town is taken, and 1 is lost for each week late. So taking a city 3 turns early would score 6 points, and 2 turns late would score 1 point.
Once scored, bonus points will never be lost, but the base points are lost when the city is lost. If a city is retaken, these base points are regained but the bonus points can only be awarded once in the game. If historically a city changed hands more than once (such as Kharkov) then the first capture date is the one used to determine the bonus.
Cities that were never taken by the Germans will generate the maximum early capture bonus if captured by the Germans at any stage in the game. However, if such a city is retaken by the Soviets there is no bonus for early recapture simply the value of the city itself.
Soviet capture bonuses can be earned while the Germans have initiative when the Soviets recapture a city. When the initiative switchover occurs, Soviet cities never taken by the Germans are considered recaptured by the Soviets at the time of the Initiative switchover for determining Soviet bonus points.
The effect of this rule is to encourage a Soviet player to trigger an early switchover of initiative while the German player gains from delaying this as long as possible.
All points up to the change of initiative are scored by the Germans. Any positive (either from events or the bonus for retaking cities) scoring by the Soviets at this stage become negative German points, and any negative Soviet points become positive German points. Later in the war when initiative changes, only the Soviets score points and any Axis points are used to reduce the Soviet’s score.
4.16.3 Victory Conditions for Campaign Scenarios
WiTE2 can be won due to the sudden victory conditions (29.1), the capture of Berlin, the in-game situation at the end of 1944 or by reaching the scenario end date.
Sudden death victories can come from:
- Axis Sudden Victory (Axis quarterly check value achieved), this gives a Decisive Axis Victory
- Soviet Sudden Victory (Soviet quarterly check value achieved) gives a Decisive Soviet Victory (if it happens before or on 31 December 1944) and a Major Soviet Victory (if it happens after 31 December 1944 and on or before 1 April 1945)
- Axis Sudden loss will occur if they did not a High Water Mark score (29.1.1) of at least 525 by 1 January 1942 and 575 by October 1942 (note they do not need those scores on those dates but to have achieved them at some stage). Note this will not apply if the Axis side is being played by the AI. The fall of Berlin gives the following outcomes if the Soviets take the city (the relevant dates for the Western Allies are slightly different see the full rules in Chapter 29:
- A Decisive Soviet Victory if on or before 31 December 1944
- A Major Soviet Victory if after 31 December 1944 but on or before 28 February 1945
- A Marginal Soviet Victory if after 28 February 1945 and on or before 31 May 1945
- or a Draw (if it falls after 31 May 1945 but before the scenario end date)
If on 31 December 1944 the Soviets fail to have matched the Axis high water mark score and the Western allies control no German territory, this is an Axis Major Victory.
Finally if the game reaches the scenario end date without triggering any other victory condition then the result is an Axis Marginal Victory. The end dates vary with the scenario:
- 1941 Campaign – 1 August 1945
- Stalingrad to Berlin Campaign – 1 July 1945
- Vistula to Berlin Campaign – 1 June 1945
The rules for the Sudden Victory conditions can be found by accessing the Victory Point screen, as:
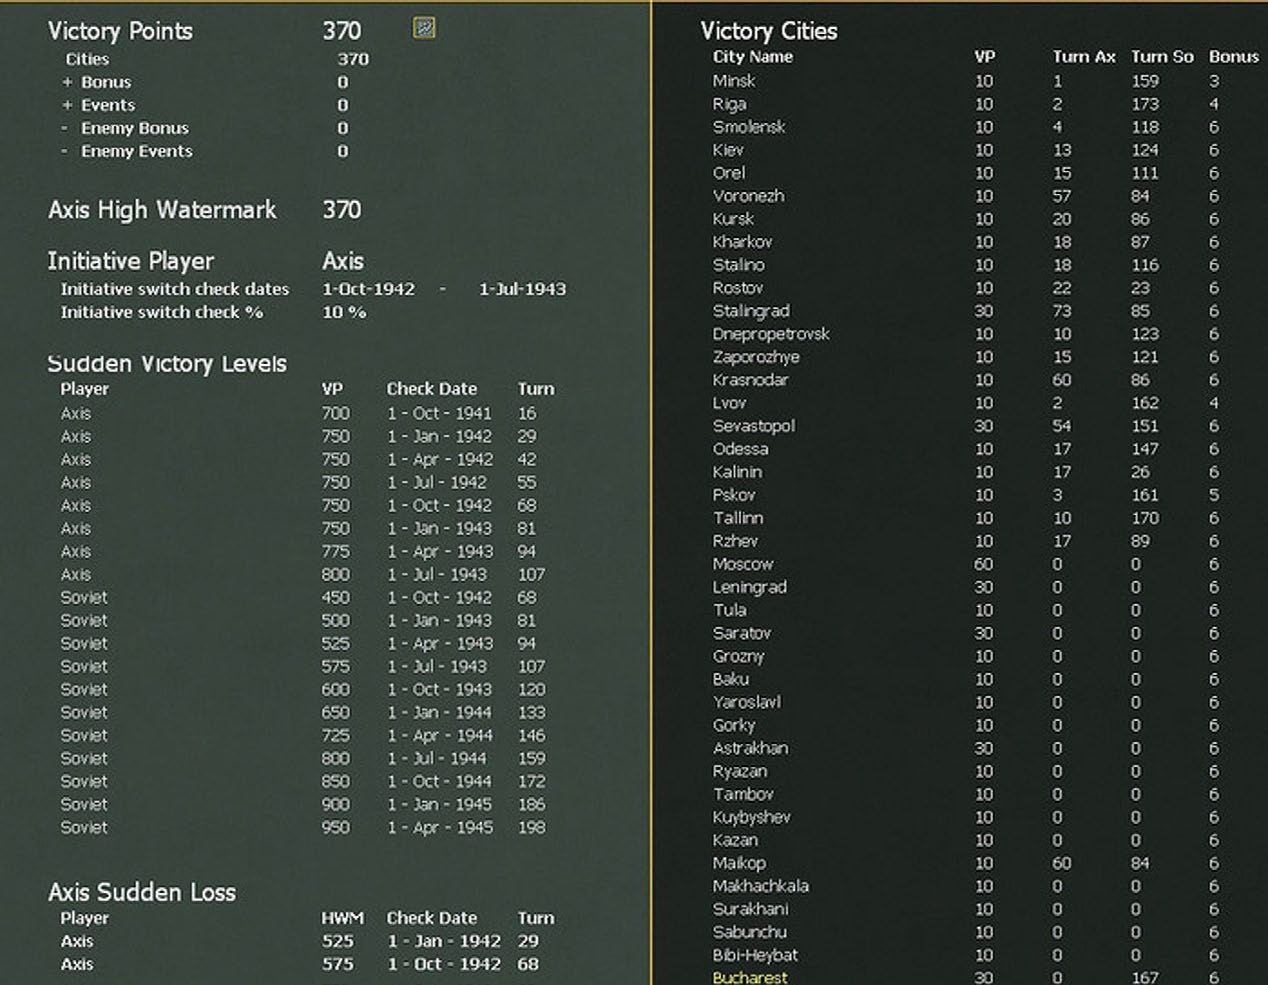
The image on the previous page shows the screen on T1 before any German moves. On the left hand side are the current VP level, that the Axis has the Initiative and the VP score needed for either sudden victory or sudden loss. On the right are all the cities that can contribute to the VP score, their basic value and the bonus if they are captured this turn.
On map display
If you select the appropriate map mode (the victory
location tab or shift+v or by right clicking on a hex), the
map will display all the cities that have a VP value, the base
value for their capture and the bonus score if they are
taken in the current turn.
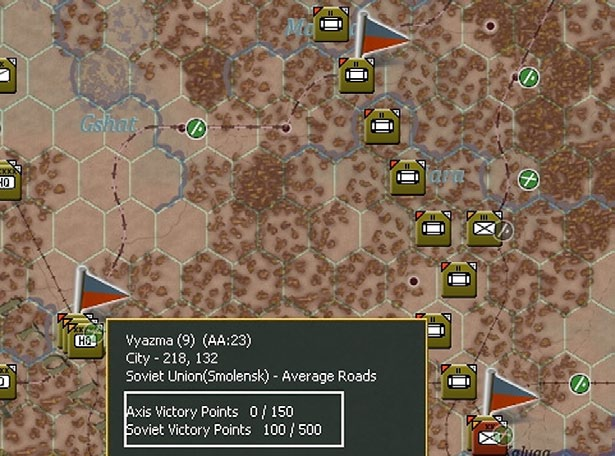
This shows some of the victory locations for the Typhoon scenario. Note that all the flags are both grey and red (indicating that both sides gain VP for that location). If you place the mouse over one of these hexes, the pop-up screen will show the VP award for that hex. In this case, the Germans gain no VP during the game but 150 if they hold that location at the end of the scenario while the Soviets gain 100 VP each turn they hold Vyazma and a bonus of 500 for holding the city at the end of the game.
4.17 Using the Commander’s Report
Learning to use the Commander’s Report is an art all in itself. You can actually play WitE2 without ever accessing the Commander’s Report however most players quickly learn to use it as a means to access vital information. There is no right or wrong way to use the functionality offered by the Commander’s Report – after all it’s your Report. Take time to explore the information presented and the various tools available to sort and select different views.
The Commanders Report allows you to carry out actions on groups of units such as sending them to the Reserve Box, setting them to refit mode or changing their ToE. You can also usually click from the CR to the relevant map location.
More information on how to use the Commanders Report can be found in Appendix F (chapter 35).
4.18 Event Log & Metrics
This Topic provides a basic overview of the Logistics Phase Event Log & Metrics feature included in WitE2 (36.4 and 36.9).
Logistics Phase Event Log Overview. During the Logistics Phase the game performs thousands of calculations on your behalf from building forts to training pilots. The Event Log (Hotkey-Shift-E) provides a summary of that process so that you can see what has happened.
The event log is particularly useful if you are either reviewing the turn (for example all the air missions are recorded here) or trying to work out why something unexpected happened.
Metrics. The Metrics Screen (Hotkey-Shift-M) provides the player with a number of graphs so that you can track the progress of some key variables such as Production, Troop Strengths and Victory Points over time. The ability to identify trends in the data will allow you to modify your game play accordingly.
The one page guide, Metrics (figure 4-75 opposite) summarises how to read some of this information.
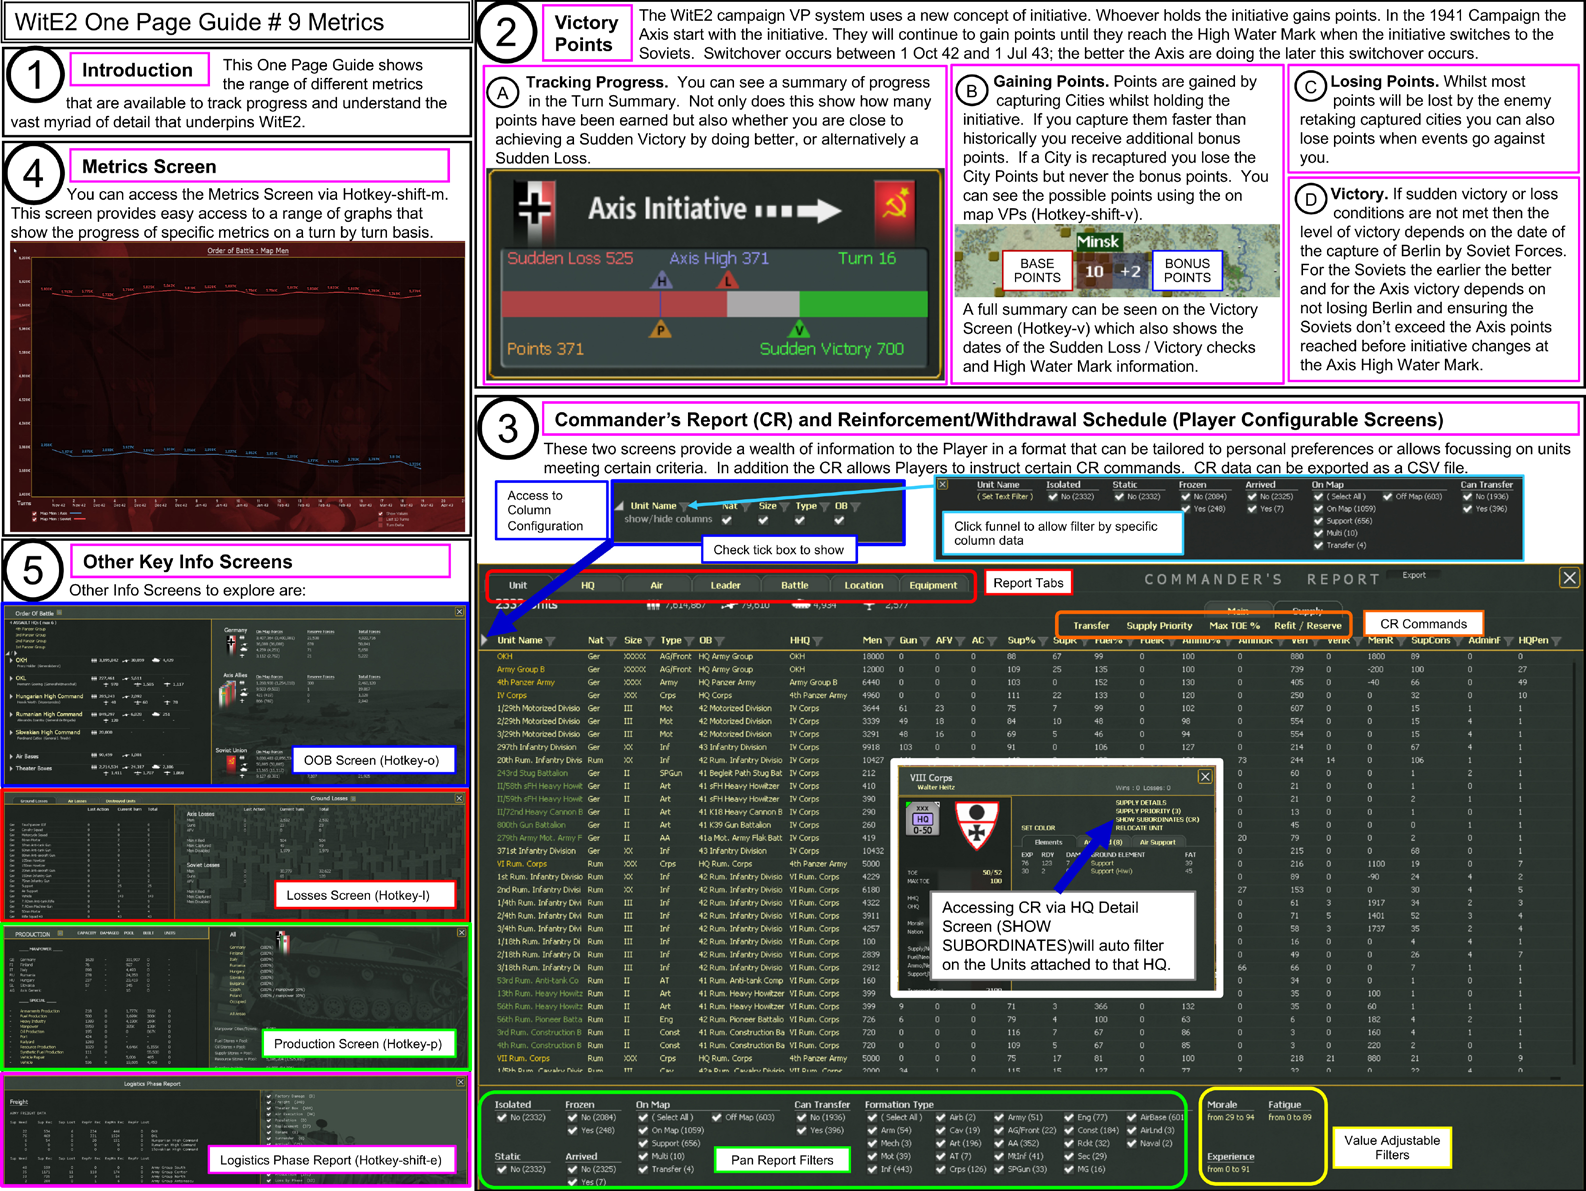
Turn Summary. This provides a quick overview of changes (36.16) in the last game turn and allows you to identify units that are isolated or have low supply as well as to track the victory conditions (this section will be different if you are using the turn summary for a campaign game or a shorter scenario).
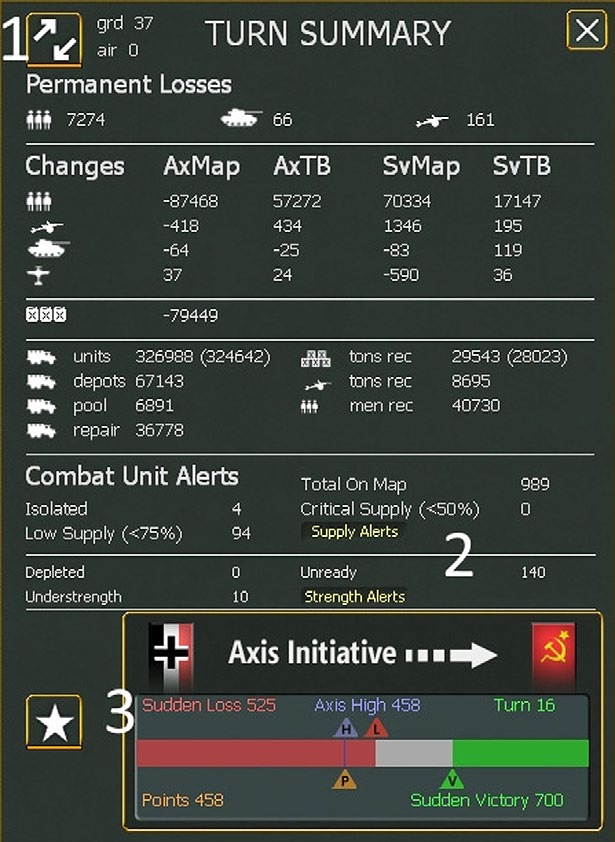
This screen will open by default when you open a game and can also be accessed from the tabs, right clicking on the map or CTRL+S.
Not only does this provide a quick overview of the previous turn but you can click from it to other screens (or the map). 1 will take you to the reinforcement screen for the current turn, 2 will highlight the affected units on the map and 3 will take you to the victory screen.
4.19 Starting the Introductory Scenario
This section brings together the information already presented in this chapter and takes you through the first turn of the Velikie Luki scenario in detail as well as providing an outline of how to play out the future turns.
Historically this was part of the wider Soviet Mars offensive designed to destroy Army Group Centre at the same time as the Soviet offensive at Stalingrad aimed to destroy Army Group South. Whereas the wider offensive was a disaster, Velikie Luki itself was captured by the Soviets in January 1943. The vital rail junction both helped Soviet resupply efforts and broke the direct connection between AGC and AGN. In turn, the threat to Smolensk forced the Germans pulled out of the Rzhev salient later in 1943.
The order of battle is as historical as possible and includes the various specialist combat and command formations the Germans created to defend this sector. The map layout is slightly ahistoric (in that the Soviets start controlling Rzhev) simply as this made designing the scenario and issues such as connecting to the off-map logistics system easier.
While setting up the game, in addition to following the steps below, you might also want to review the first of the one page guides (game introduction), as the play through develops the appropriate guide is indicated for that section.
4.19.1 Setting up the Scenario
To set up the scenario, open your copy of WiTE2, if you have previously watched them, you can skip the introductory videos by pressing the ESC key.
Once you reach the opening screen, configure it as shown below.
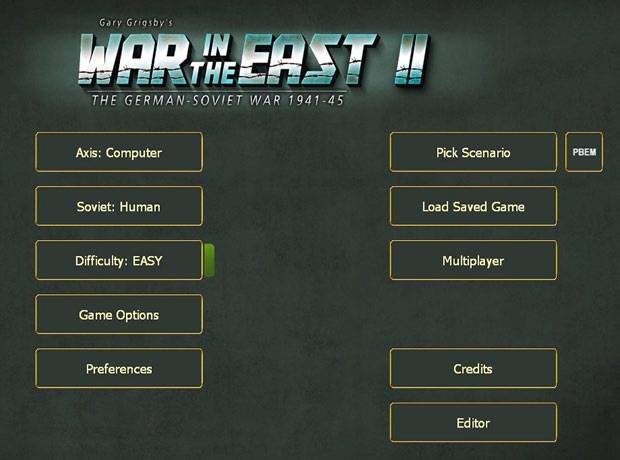
The key variables are to set the Axis to computer, the Soviet side to human and the difficulty level to Easy. So you, as the player, will have substantial advantages over your computer controlled opponent.
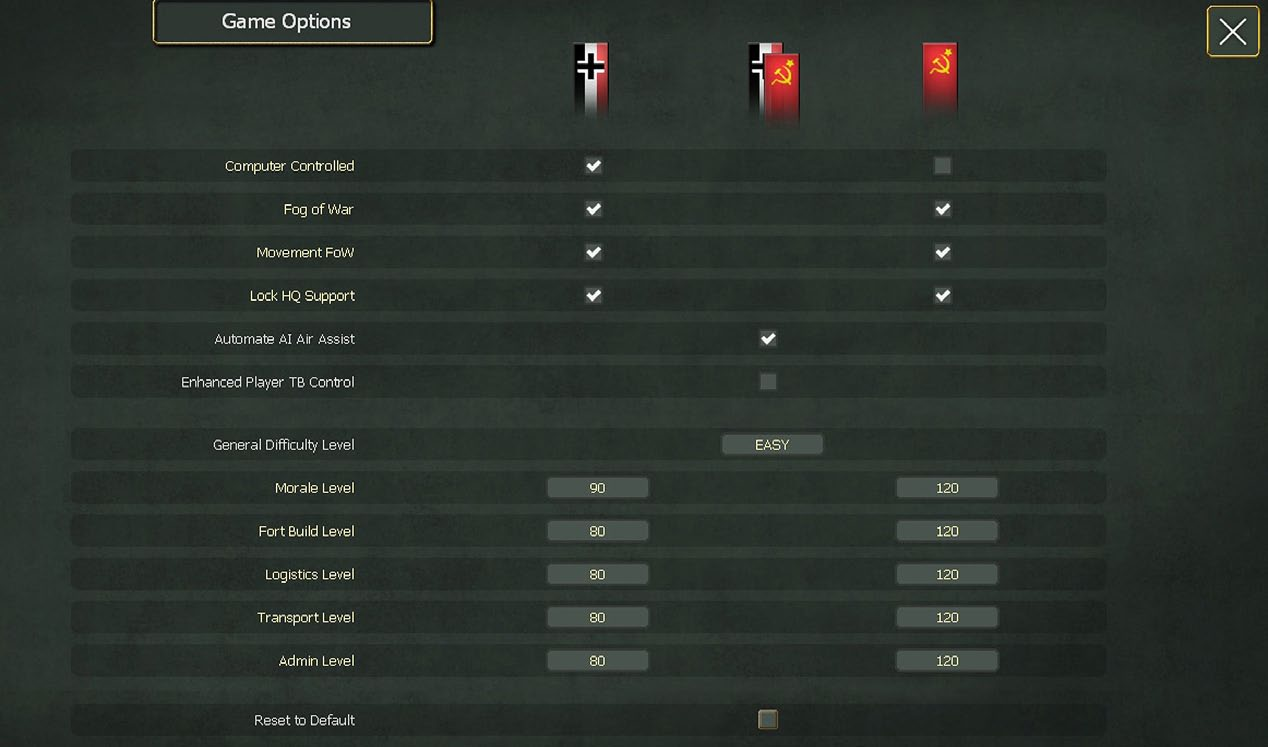
This is configured automatically and will reflect the choices you made on the opening screen. However, for this initial game we want to make some additional changes. Click on the Fog of War box on the Soviet column and the screen will change to:
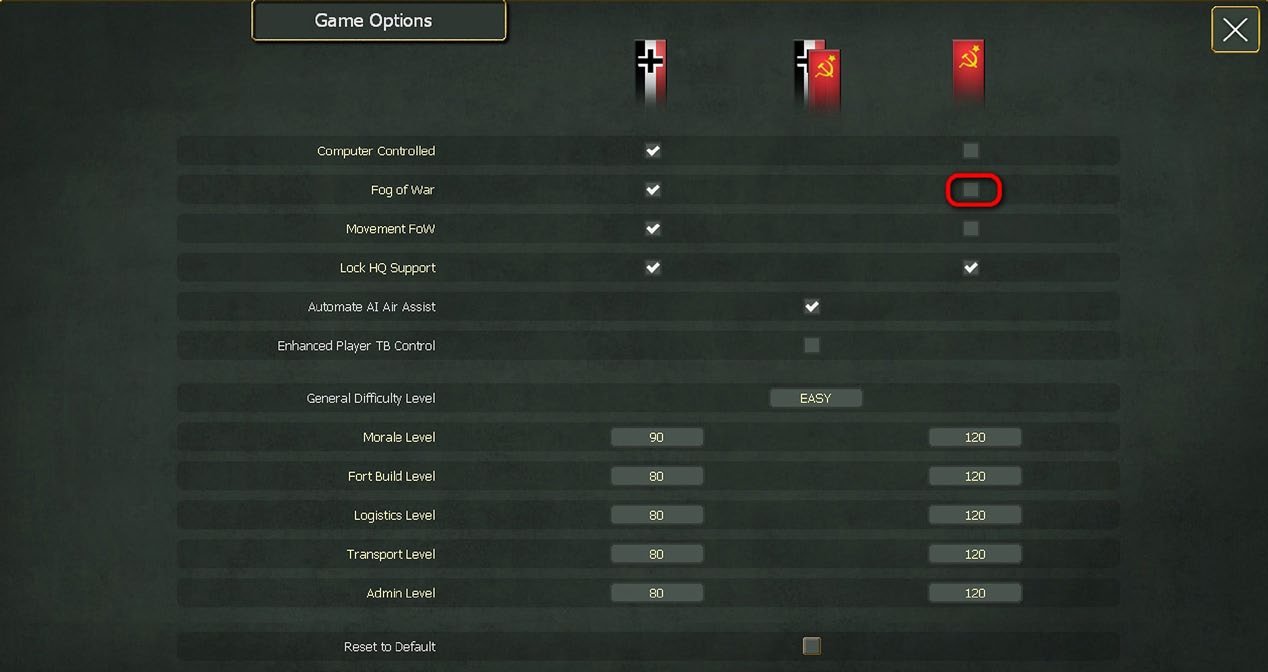
This change means you will be able to see all the AI’s formations and the moves it will make in its turn. This is another substantial bonus especially is it improves your ability to plan your moves and estimate how the AI will react.
Leave all the other boxes as they are. In this game we are going to use the Automated AI assistance for the air war (4.5) and there are no-off map theatre boxes (apart from the National Reserve) to use (4.14). Note that you can alter any of the difficulty level variables to produce what is called a custom set up. In general, the single most important variable is the Morale Level (2.6.2) as this will have a direct effect on the AI’s performance (30.7). Once you have made the changes you want, close this screen (click on the X in the top right hand corner) and you will return to the opening screen.
In a game against the AI you can amend any of those settings in the course of the game. In a game against a human opponent, they cannot be amended.
Before actually starting the game, you may want to review the user preferences (2.6.3 and 36.17). For this game, leave almost all these on default (you can explore what difference they make later), apart from turning ‘move animation’ off. In a small scenario this will make relatively little difference but in a larger game it will soon become boring watching the counters move hex by hex (with this option off they will simply move to the final hex that you selected for their move).
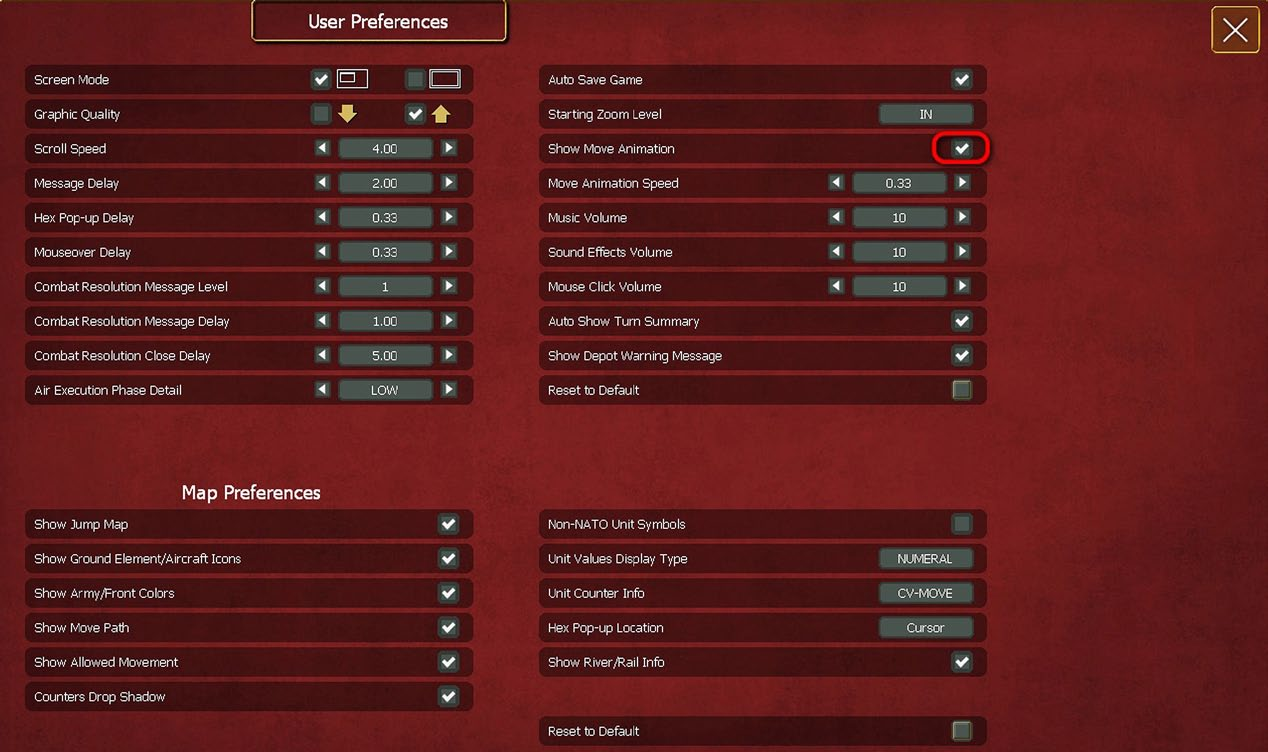
Again, you can change any or all these variables as you wish during a game (even one against a human player) as all they affect is how the game displays or behaves.
You should always follow this order as the settings you adopt will influence how the game plays when first opened. So if the first turn belongs to your AI opponent then they will run with the default settings rather than any you wish to implement.
Now return to the main menu and select ‘pick scenario’ (do not click the PBEM box as that will set the game up for you to play against another human opponent) and you will find.
This is the full list of all the scenarios currently in the game (including any you may design yourself). The date indicates when the scenario was last modified.
Click on ‘Introductory Scenario 1 – Velikie Luki and the screen will change to:
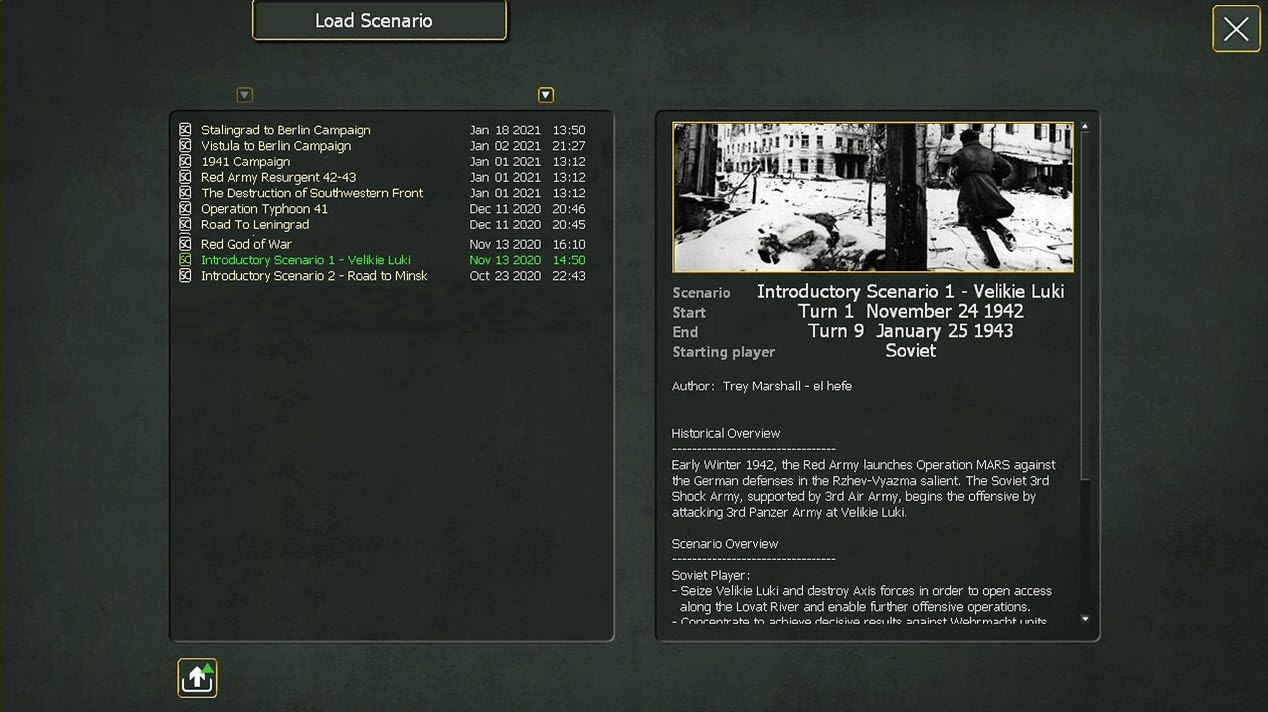
The chosen scenario is now highlighted in green and on the right is information about the scenario (it is 9 turns long, there is no Axis turn 1 so it starts with the Soviet turn), a brief historical context and some player notes.
Note this also tells you how many Administrative Points you receive each turn (4.3.2) if the game is on the neutral settings. If you have set up so one side or the other has an advantage in terms of admin level (as above) then this base number will be modified. So in this case, the Soviet 5 AP per turn will become 6 (5 times 1.20). In this scenario these are relatively unimportant (4.3.12) but the Soviet player may wish to spend some to create new depots as they advance westwards.
To set up the chosen scenario, press on the arrow/load symbol at the bottom left hand side.
After the game has been created, it will suggest a folder where the turns will be saved, such as:
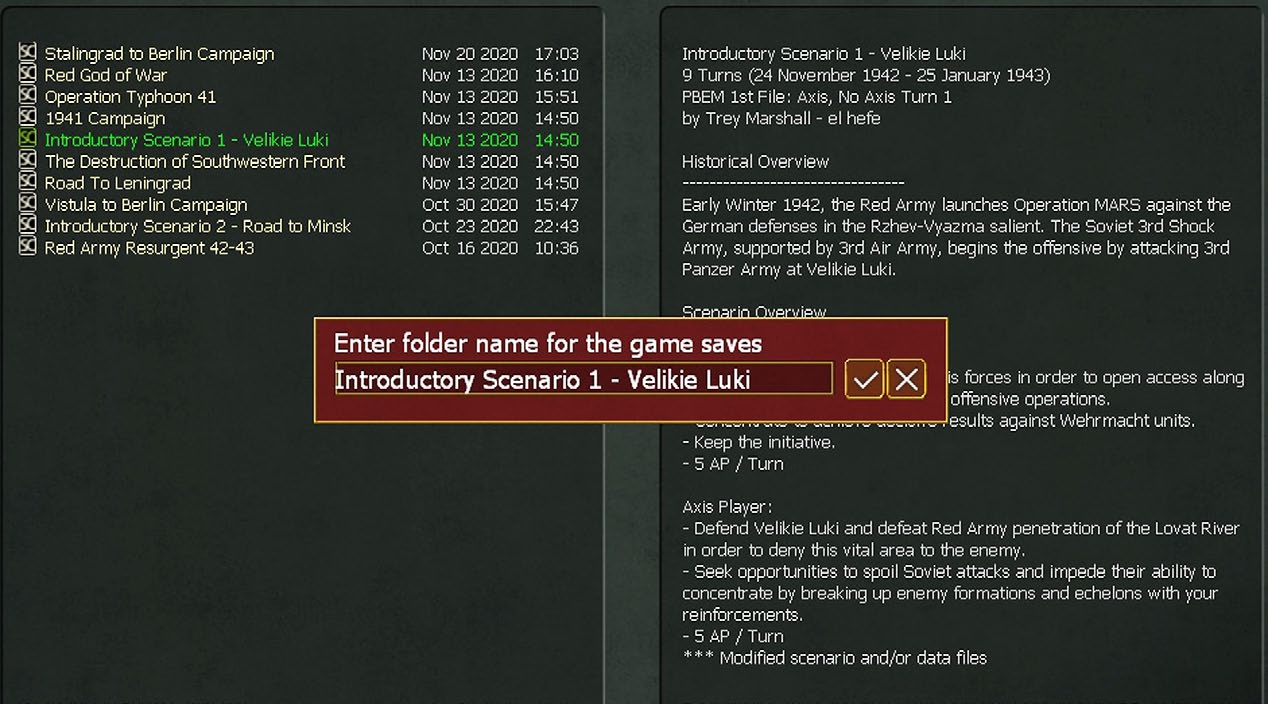
Unless you have a strong reason not to, it is usually as easy to accept the proposed folder. Note that if you are playing the Soviet side this interface will be a reddish- brown, if the Axis a dark grey. This convention is used many times in the game.
Click on the tick and you will be taken to map.
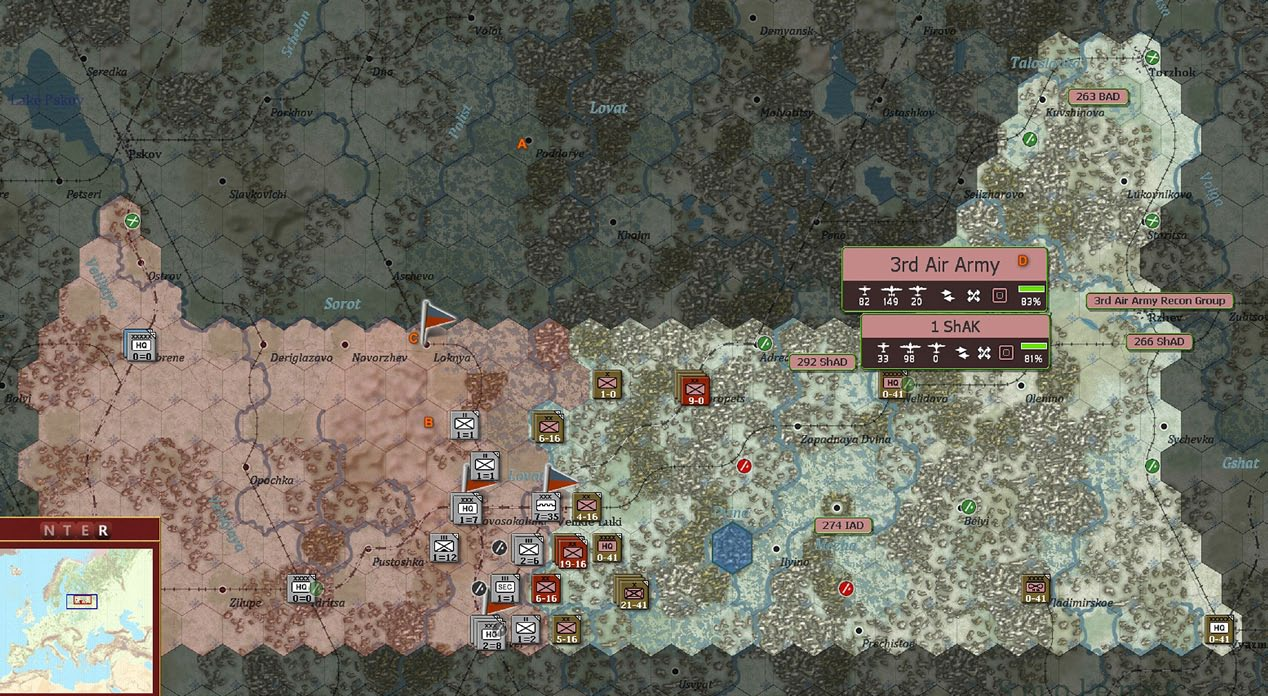
During the game, you can save at any time. You do this by shifting to the ‘ADMINISTRATION’ tab and clicking on the save icon as:

At this stage, it is a good idea to review the one page guide #2 game interface as that will provide useful context for what you can now see.
4.19.2 Using the AI Assistance for the Air War
When you open the game, you will see something like this (on the right will be a summary information screen, for the moment just close that as we will review it later in this walk-through). For this game, we are going to use the AI assistance (as we set the game up that way) so now might be a good time to review the one page guide #4 (AI assistance) and section 4.6.1.
The area marked A is out of bounds for this scenario, B is Axis controlled territory, C is one of the locations you need to capture to win (we will come back to various ways you can configure the map display later) and D is one of the labels that indicate where your air force is deployed (4.5.4).
How much information is shown on this label will depend on how zoomed in or out you are when looking at the map (6.8.1).
Since WiTE2 is divided into distinct phases, we will focus first on setting up the air war (remember there is no logistics phase on the first turn of any scenario (4.3.3).
As a brief review of the concepts behind the air game, remember that your air force consists of individual planes and in this scenario you have 251 ready planes – you can see this on the 3rd Air Army label (82+149+20 of the three types of planes) – and 83% of your potential planes are ready (so you actually have 291). Those planes are divided into 5 Air Operational Groups, some of those groups report to the 1 ShAK air corps, others direct to the Air Army.
There is a lot of functionality available even just by viewing and manipulating the labels. If you simply hover the mouse over the 1 ShAK, it will show which air operational groups report to that command:
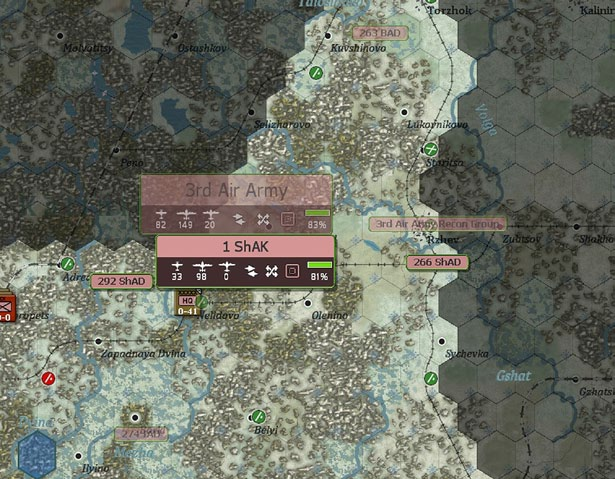
So the 2 air groups with the ground attack aircraft report to the corps, as you can see all the other labels are now much fainter. This is the sort of thing that is more important in a large scenario as it allows you to see a lot of information about the layout of your air force just by using the on map options.
The other element in the air war management is the actual HQ that controls the planes. The label (3rd Air Army) is located as centrally as possible to the actual deployment of your planes at the air bases (so will move as the air groups are redeployed).
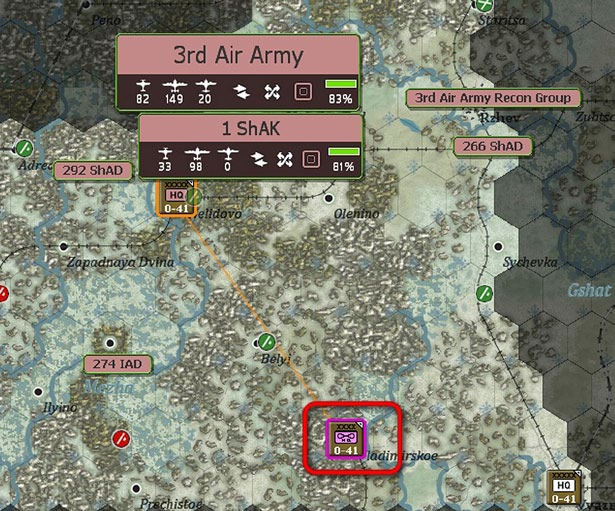
It plays two important roles in the game but for this scenario we can ignore it completely. It allows you to change the leader of the air army (4.13.1) and it is used to assign support squads to active airfields. Since it will do that automatically up to 90 hexes from its location (4.7.4) it can be left where it is for this scenario.
You can review all this, open and close air labels, look at airbases and so on. We will now set the orders that will influence how the AI acts.
In WiTE2, while the AI will carry out much of the air war for you, we need to set some basic parameters. We could use the ShAK formation if we wanted the ground attack planes to do something different but in this case we will work with the air army.
Click on the 3 Air Army label and the screen will change to the image overleaf:

This gives us a lot of information that for the moment we are going to ignore. You can see the airbases in use (the blue labels), if you click on one of these it will even show you the planes present at that base. All this information is also summarised on the right hand side of the screen.
Notice that the information shown here is very different to that available from the on-map counter.
All we are interested in is the information box for the 3 Air Army at the top of the screen.
We can make all the changes we need from this box.
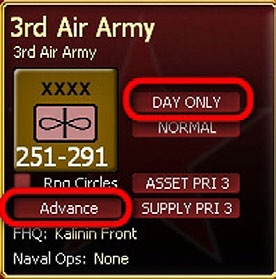
We will change two variables. We will tell it only to fly at day (so change the top filter to show ‘day only’ from the current ‘MIX MISSION’) and alter the stance from ‘Flexible’ to ‘Advance’ (as we hope to be moving forward and need the short range Soviet air assets to stay in range. We have only one valid Soviet Front command HQ (Kalinin Front) so there is no need (or scope) to amend this.
We can revise those settings each turn if we need to but those rules should be good enough for the entirety of this scenario so we can more or less ignore the air war from now on.
That is all that is needed, the AI will now generate a set of air directives using its available assets and the information you have provided. In some scenarios, you will find that on T1 there is a set of scripted missions, if these exist then the AI will default to those and make its own changes for a later turn.
So now, either press the F12 key or the arrow on the top right of the screen.

You will often find that WiTE2 allows you to carry out an action by right clicking on the map, pressing a hot key or clicking on one of the tabs at the top of the screen. In effect, use which ever one is easiest for you.
At this stage you might want to save the game, so you can return to this point and review your choices.
Select the admin tab and then the save option.

That will then open this screen (which will show all the saved games for this particular scenario). In this case there are none, so select the left hand arrow at the bottom
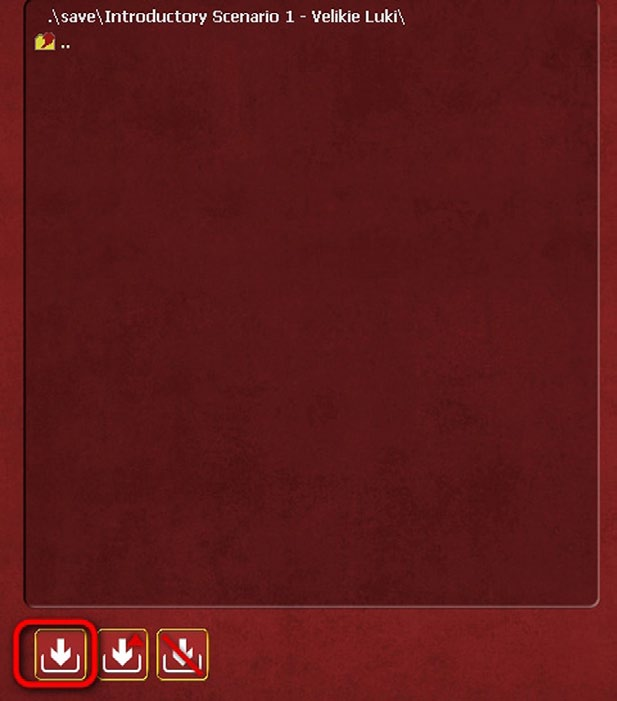
And then enter the name for the save. I have used 1a to indicate it is from turn 1 and the air planning phase. But you can use whatever names make sense to you.

Press on the tick and the game will save and you will return to the main map.
So now, let’s run the air phase, once you press F12, you will be asked to confirm. As the turn runs you will see the summary box on the lower right hand side of the screen (4.5.7).
You will be presented with a summary of the missions that took place (in this case only some reconnaissance missions), close this screen and you will be returned to the map.
Every game will be slightly different, especially in terms of reported losses and actions chosen. However, it is unlikely the AI-Assist will decide to do something radically different to how it worked during this play through.
The reason why there were so few missions reported there is that the AI assist has put all the combat aircraft onto ground support. This is the most useful mission in the game but the planes will now only fly in support of actual combats in the ground phase.
4.20 Starting the Ground Phase
War in the East 2 rewards planning your operations. Even in a simple scenario like this it is worthwhile to review your forces, the terrain, what you know of the enemy and your objectives. In effect, creating a rough plan will mean you don’t move units (or make attacks) that you later realise reduce your options to secure your main goal.
Some of this becomes second nature. In the main it is less about a detailed understanding of the exact game rules and more about understanding how all these factors (what Clauswitz called the ’terrain’) combine to create opportunities and limit your options. As a simple test, in a later play through of this scenario, ignore Velikie Luki and commit the Soviet forces to an offensive on the top corner of the map – it is likely you will fail badly due to the poor terrain and lack of decent supply lines.
Before moving any formations it is useful to review the situation and carry out some administrative tasks. Generally it is a good idea to generate a save once the air phase is completed. So again set up a save as before and you will find the air phase save. Generate a new one for this point. Again you can use any naming system you wish.
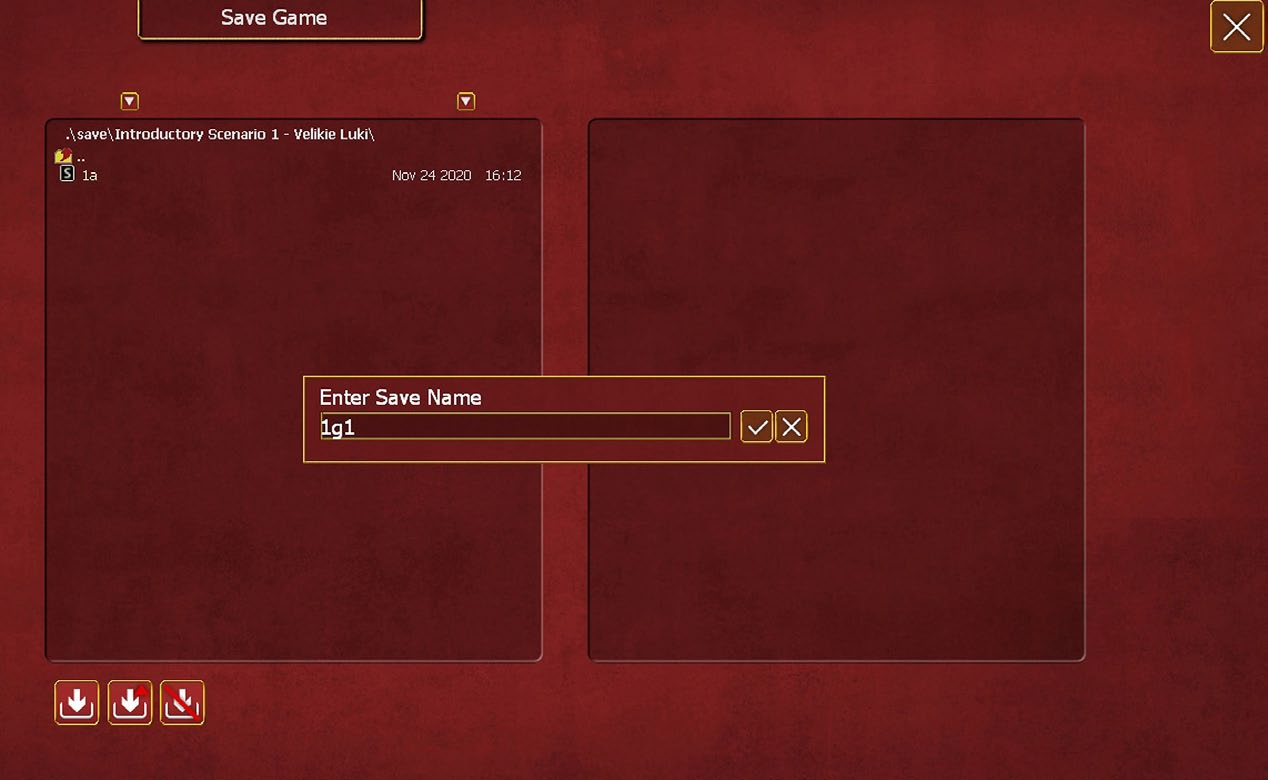
4.20.1 Housekeeping
Before considering any actual moves it is useful to review the overall situation and adjust the map to fit your immediate interests.
If you are reloading a saved game, or have just run a turn, you will see the turn summary on the right hand side of the screen.
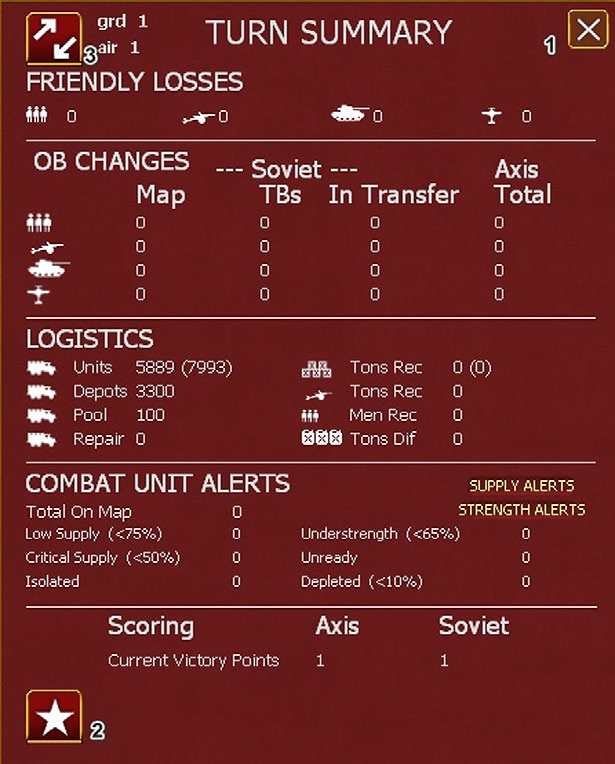
You can dismiss this by clicking on the X at the top (1) and it is not very informative on turn 1. However, it gives access to two screens that are useful. One (2) is the Victory Point table and the other (3) is the reinforcement screen.
Click on the VP screen and you will be presented with:
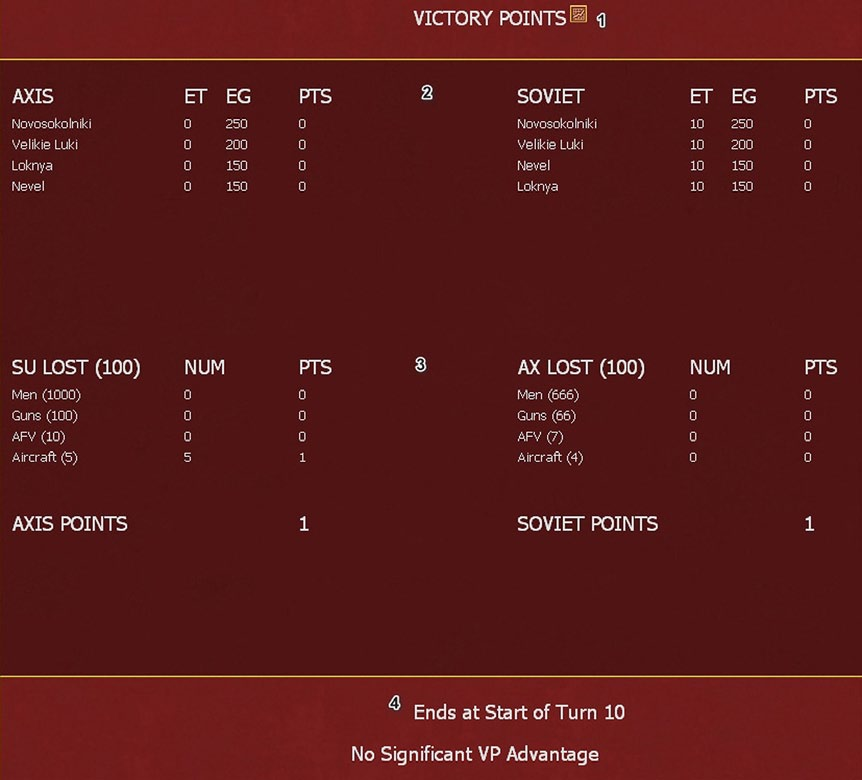
There are four key parts to this screen. The symbol at the top (1) allows you to access a graph that will show the VP score by turn so you can track how it changed as you play the scenario.
The next two (2 and 3) indicate how VP are scored. In this scenario there are 4 VP locations (currently shown on the map as discussed above). The Axis side will gain VP for these locations if they hold them at the end of the scenario, the Soviet side gain both points at the end of the scenario and if they hold them for any turns during the game. In effect, there is a strong incentive in terms of VP for the Soviet player to try and capture these locations as early as possible and for the Axis to delay this – or to try and recapture them.
In addition each side gains VP according to the losses of the other side. So the Axis will gain 1 VP for every 1,000 Soviet losses and the Soviets will gain VP for every 666 Axis losses.
Since the Soviets lost some planes during the recently conducted air phase (the exact number will be different in your game), the Axis side already have 1 VP. Broadly this means that both sides have an incentive to inflict losses and a reason to try and minimise their own.
At the bottom will be an indication of how well one side is doing. At this stage, there is no advantage. If you close this, you will return to the map, and we can review the reinforcement schedule. Click on this, and you will see:
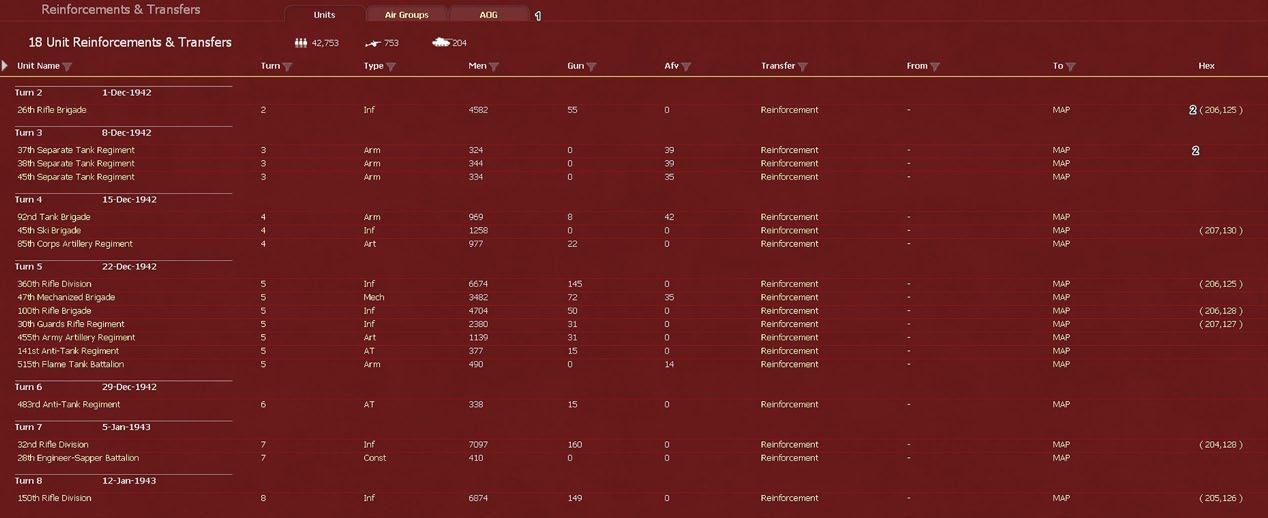
By default this will open to show ground unit reinforcements but you can view air unit transfers (1).
In the campaign, this screen is quite complex with arrivals to the map, transfers between theatres and withdrawals. Here, the main thing to note is the relatively substantial reinforcement on turn 5 which might provide a useful boost to your forces. Note that some formations have an arrival hex and others do not (2). Those with an arrival hex are treated as on-map combat units (4.7.2), those without one are off-map support units.
We will explore the implications of this difference as we move through the scenario.
Close this screen and return to the map. Now close the turn summary screen as well.
The on-map display in WiTE2 can be configured in lots of ways to make it easier for you to see the information you need – and you will find your own logic in this respect and may also find that some views you only use occasionally. By default, you have the enemy controlled hexes shown and the locations of the VP cities.
I am going to add 4 more overviews.
The fortification level of a hex can be useful for planning so we select that (you can see this by placing the mouse over a hex but the visual display quickly shows where the enemy has well prepared defensive lines). In addition, I want to see the road network (7.2.2), the supply network (4.10) and to change how the weather is shown so that it only shows the ground conditions. Since we have automated the air war, we do not need to pay that much attention to the air conditions and as the weather worsens it can become harder to see important terrain differences until you are used to reading the map.
The combination will alter the display to:
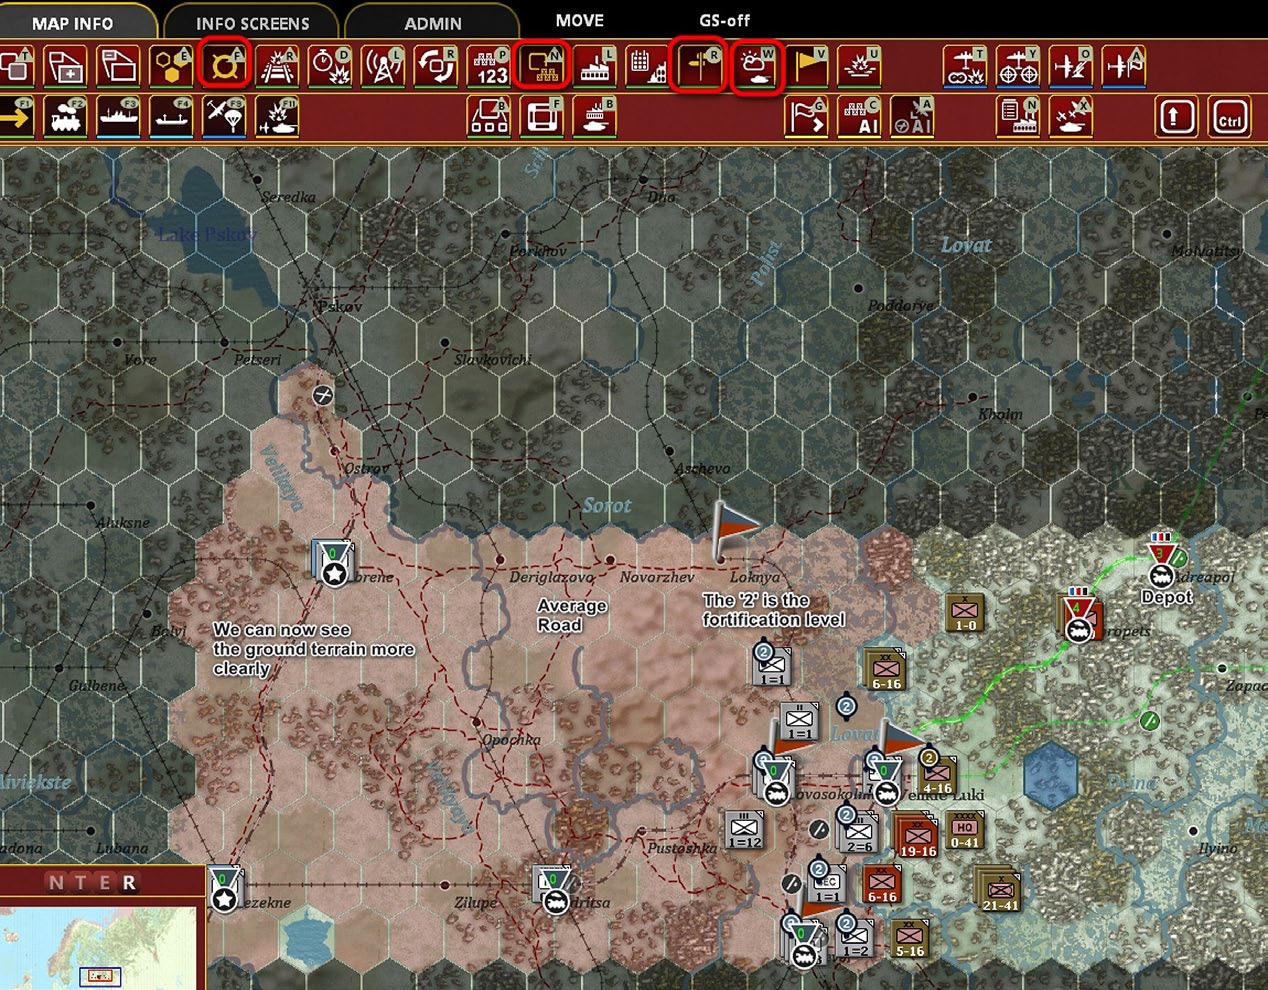
Feel free to explore the rest of the options. Everybody has their own preferred combinations and often find these alter over time. Here the counters show attack cv-move, if you are on the strategic defensive it may be more useful to see attack-defend cv?
You can make these adjustments by pressing the tabs at the top of the screen or right click on the map and access the ‘Map Info’ menu.
The logic to the changes is that supply is really important in the game and seeing your depot network will help you to manage this. Equally, especially as the weather worsens, the few better roads become important.
While the in-game movement routines will find the quickest path for you and calculate the costs, knowing where the roads are can help. Not least they reduce the cost in trucks used to resupply your formations as you move into enemy territory.
As you can quickly see, the Axis have an advantage here
- historically the poor roads badly hampered the wider Soviet Mars offensive especially as there are also not many rail lines.
We will come back to logistics, but now may be a good time to review the one page guide #7 on logistics.
As part of setting up the game display we can also alter how the counters display (4.7.7 and 6.5). By default the enemy counters will show their attack-defend combat values (this may be incorrectly shown when you play with Fog of War) and your own will show attack combat value – movement points.
This is probably the most useful version but if you are on the defensive you might find it useful to alter your counters to show attack-defend CV as a guide to how well your defensive layout is.
Practice doing this by pressing CTRL+Z and you will see the second value alter.
You can explore all the various ways to display the map and counters. You may find in the end that the map becomes too cluttered or that some displays obscure other information. They are all useful but you will find a few that really help your gameplay.
One good thing, the game will re-open with the map layout you last chose so you do not need to revise it every time you play the game.
With the map and counters displayed as we want, we can now plan our first moves.
In a full game, you may want to use this planning/ administrative phase to move units to and from the reserve, re-assign weakened units to the rear, revise your depots and so on. Equally you can always do these things later in the game turn – you will find your own systems to manage this game.
4.20.2 Preparing Your First Moves
Before we do anything else with the ground units, now is a good time to review the one page guide #6 on the ground war.
Some of this pre-move interaction will become second nature as you gain experience. Equally in many games, you will restructure your order of battle so it fits with how you wish the game to develop.
However, it is useful to carry out some steps before actually committing your army to combat.
One step is to review your chain of command. Each type of HQ has a range (4.7.4) beyond which it will not offer any useful support to the combat units. In this scenario, the Soviet player has 3 HQs.
You have the Stavka counter that represents your senior command. In the campaign game this will often be deployed in Moscow, but here is it placed at the bottom right hand side of the playable map area. It is only included to enable certain game functions and can be ignored during this scenario.
Of more importance is the Kalinin Front HQ which can be found at Poldova. If you click on this, the map will change as per the image overleaf.
Some hexes have been shaded as grey (1) in addition to those out of the scenario area. They are too far (in movement points) for the HQ to move to this turn or there is some other reason (in one hex the HQ would be on its own next to an enemy combat unit).
Some other counters are now outlined in blue (2). These are all directly commanded by the chosen HQ. The blue connecting line is to some combat units that report to the Front, the turquoise line indicates the link is to a HQ that is subordinate to the chosen HQ. Finally (3), the Stavka is outlined in orange and there is an orange line indicating the HQ reports to that one.
This check is useful, as much of the value of a HQ is lost if it is out of range.
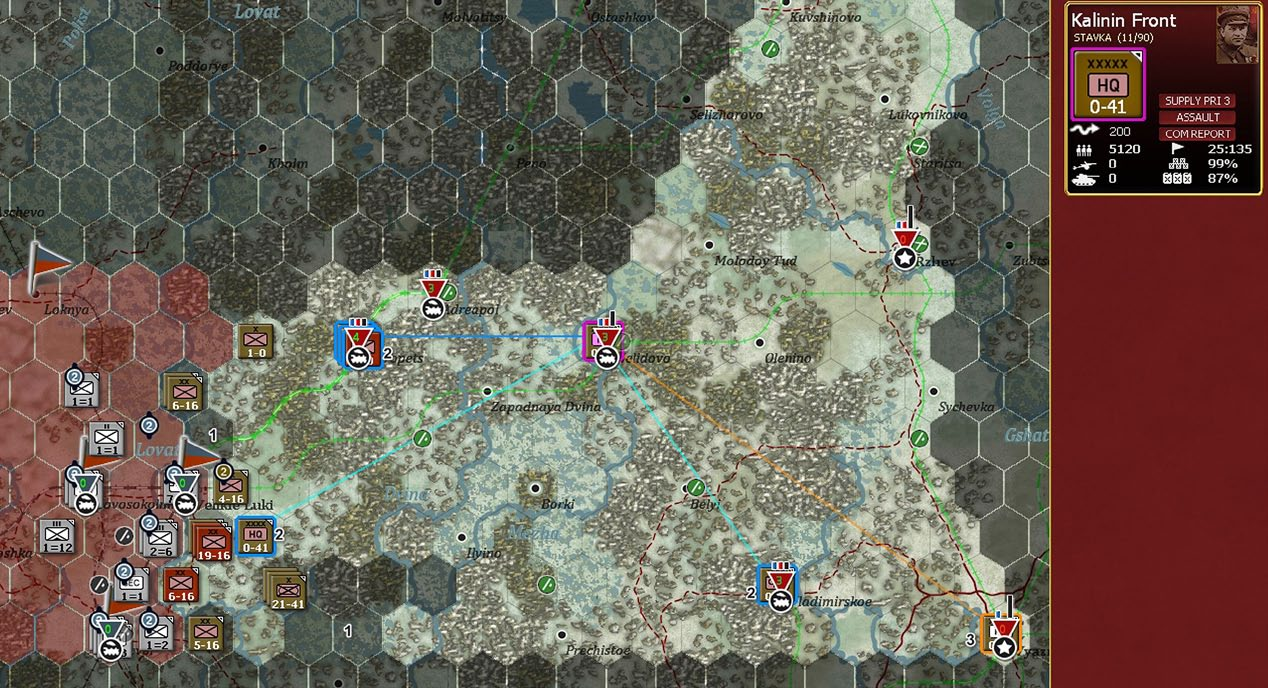
Looking at the Kalinin Front counter, you can see that it is set as an Assault (4.13.3) HQ, this matters as it increases the command capacity and the speed at which units regain lost Combat Preparation Points (4.8.2). For the moment, leave the Front HQ and move onto the 3rd Shock Army HQ.
Again, left click on this and the map display again changes.
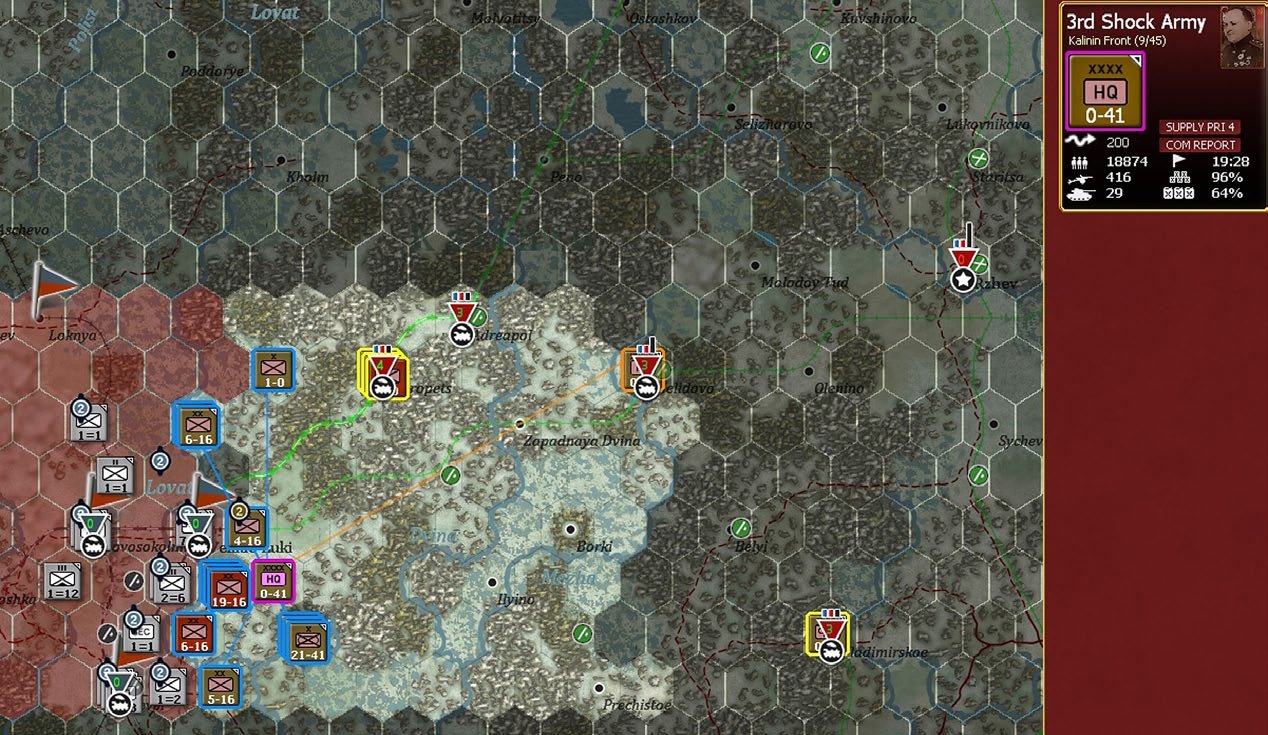
For a Soviet Army HQ (or an Axis Corps) perhaps the most important test is whether the combat units it controls are outlined in blue.
If you right click on the unit display (right hand of the screen), then you will see all the units that report to it.
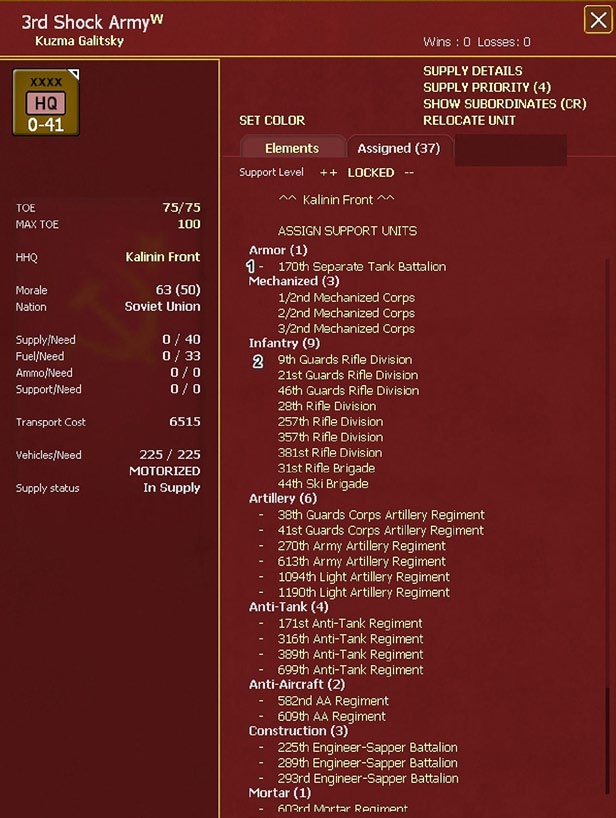
We can ignore most of the information on this counter for the moment but note there are 2 types of units under its command. Off map Support Units (1) are marked with a ‘-’ before their name. Some of these could be attached directly to Combat Units (2) but left in the HQ they will be allocated into combat by the computer routines. The important part is they will only be committed if the combat occurs in the command range of that HQ.
So the most important aspect of your HQ counters is to keep them in range of their subordinates.
However, before moving onto planning the attack, there is one aspect that is worth noting. If a HQ is on a depot, it increases the capacity of that depot (4.10.11). This is really important as it improves the ability of that depot to receive, store and distribute supplies to the combat units.
Capacity is shown by the black bar on the depot symbol, move the Kalinin Front one hex south-west.
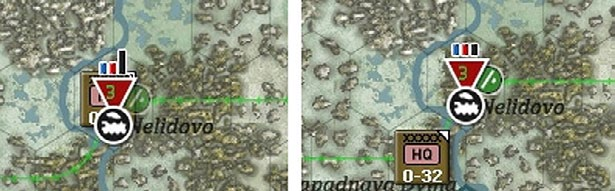
As you can see, the capacity has dropped. Undo that move, using the ‘U’ tab on the third row of tabs at the top of the screen (this will return the Front HQ to the depot).
You can also view the implication of that move by hovering the mouse over Nelidovo (6.4.2). Again ignore this for now but that information can be very useful if you have a more complex supply system.
Now click on the 257 Rifle Division (in the hex due east of Velikie Luki), and again the map display will change.

The selected unit(s) are now outlined in purple (1), the other units reporting directly to the same HQ are in yellow (2) and the HQ is outlined in orange (2). The three units that report to the Front HQ (3) are not outlined as they have no command relationship to the selected unit.
The enemy controlled hexes are now either shaded dark or light (4) brown. The lighter hexes are currently enemy controlled hexes that the chosen unit(s) can reach without actually having to fight a battle. Since we have Fog of War set off, you can see this for all the map – at other times this information is often missing due to a lack of knowledge of enemy deployments.
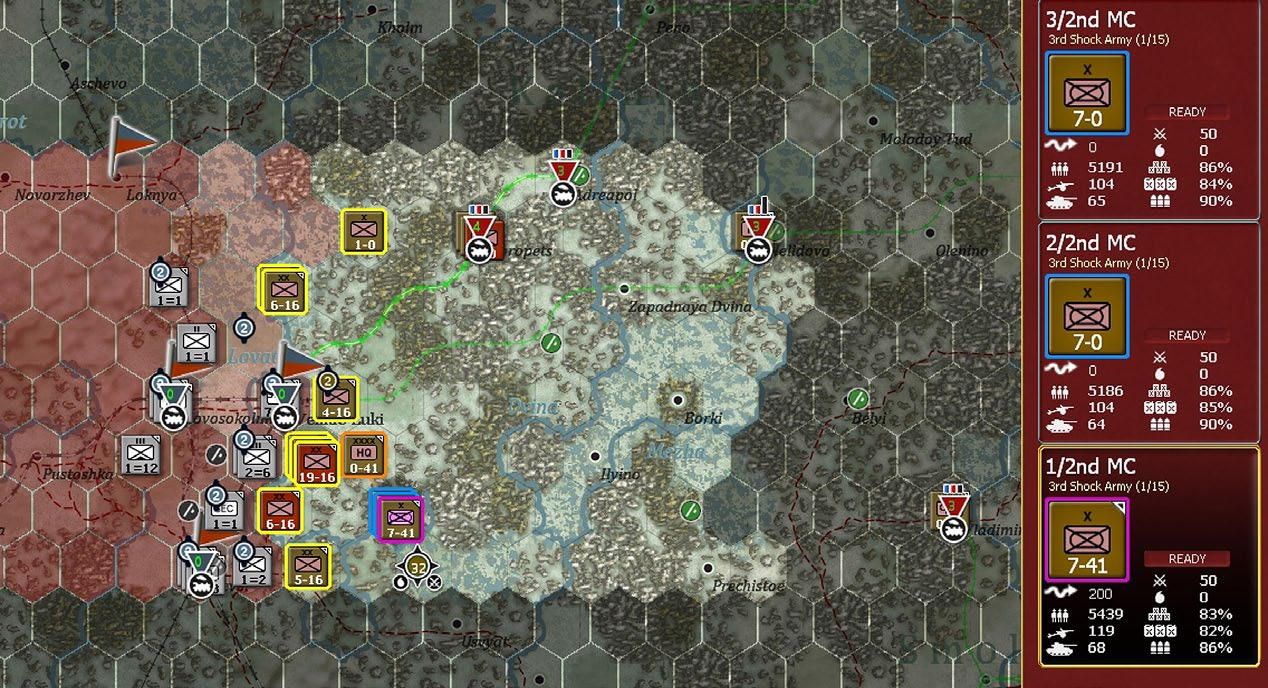
As an experiment now select the 1-2 Motorized Corps counter (located in hex 203, 131). You may need to left click on the stack a few times till this one is chosen. Again the map display will change.
Single left clicks will cycle through the units stacked in a hex, a double click will select all the units in that stack.
First note the other brigades of the Corps are in blue (this tells you they are part of the same combat unit), but now note that the hex to the west of Velikie Luki is also shaded light brown. Unlike the Rifle Division you first selected, this brigade can actually cut the rail line to the city and potentially surround the city.
At this stage, we can start to plan our offensive.
The victory locations are relatively close to the front but Velikie Luki is the most valuable. You basically have 2 choices, you can try to attack it directly and it may well fall on the first turn but the German defenders will fall back safely (remember you also gain VP for inflicting losses). Or you can try to surround the city. If it remains isolated in your next turn, then any later attack may well be easier (the enemy will weaken when cut off) and, even better, they will surrender (yielding even more VP).
There is no right or wrong in your choice – both have advantages and disadvantages. The biggest risk of a direct attack is you fail, the risk of an encirclement is the Axis forces manage to break in and re-establish contact.
To help with the choice, it is now useful to alter the map display to remove both the depots and the VP locations.
This restructuring of the on-map display becomes second nature after a while, in effect you can often configure the display to show exactly what you are interested in at any one time.
What now is clear is relatively how strong the defenders are. The combat engine in WiTE2 is complex (4.8.2) but essentially to push the defender back (4.8.5) you need to have double their combat value at the end of the battle. Given you will struggle to match the defender’s at start value it is unlikely you will achieve this with a direct assault. Equally if you fail, your units will be weaker as they will lose half their CPP (4.8.3) making a subsequent attack much harder. On the other hand, the defender will be weakened during such an attack so, perhaps, a second attack might succeed where the first failed.
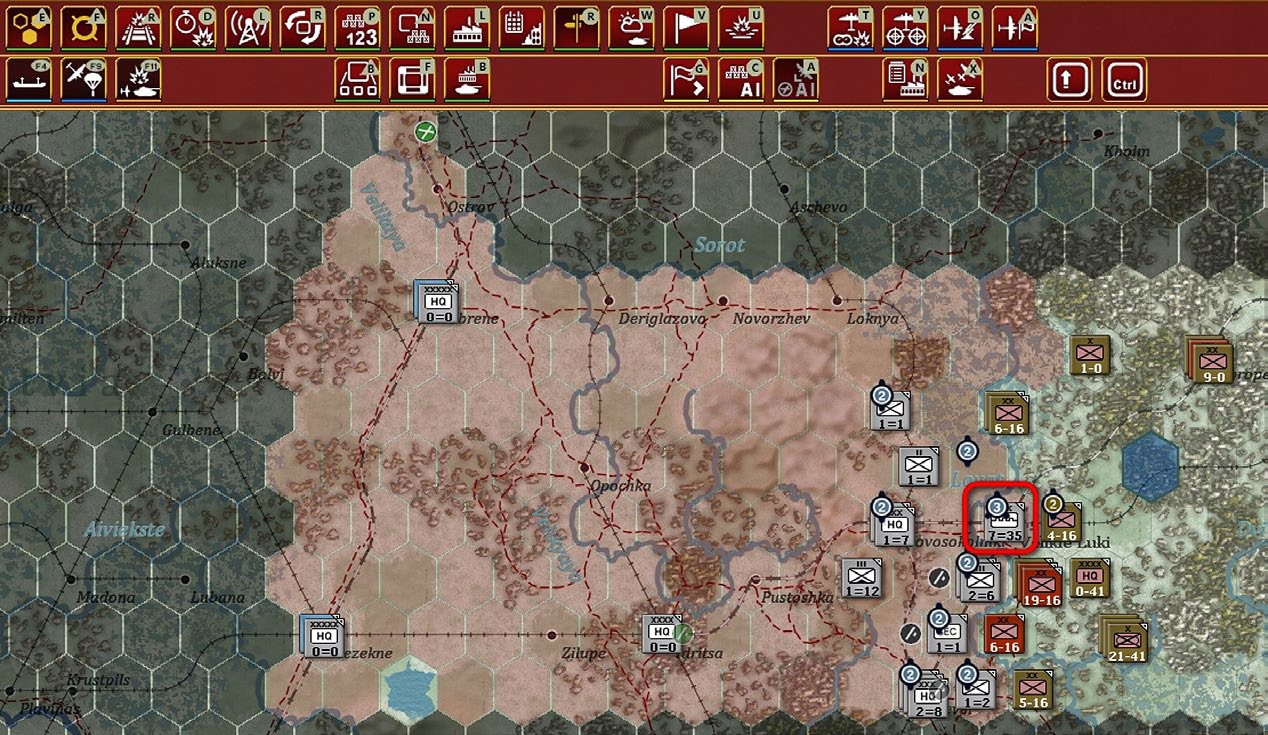
This sort of decision making is key to good game play. Clearly one way to take a strongly held hex is to attack many times, but to rotate the attacking units so each time you are using fresh units. Often you can avoid a direct attack and rely on movement to force the enemy to fall back (or risk encirclement). You lack the forces to bring in fresh units for a new attack in this situation.
With all this in mind, we are going to try to encircle the city first.
4.21 Soviet First Turn
You actually have a number of choices for how to manage this turn but the key goal is to encircle Velikie Luki.
So start by left-clicking on the stack in hex 201, 107. Note that both these units can move into the hex to the west of the city.
By default, this will select the Rifle Brigade (31) and note it can move into the target hex.
This can only happen as you have your morale set at 120, the bonus is enough to reduce the costs of that move allowing you to advance these units to the hex. If you play this scenario with 100 morale, you will find you need to rely on the Mechanized Brigade alone to complete the encirclement.
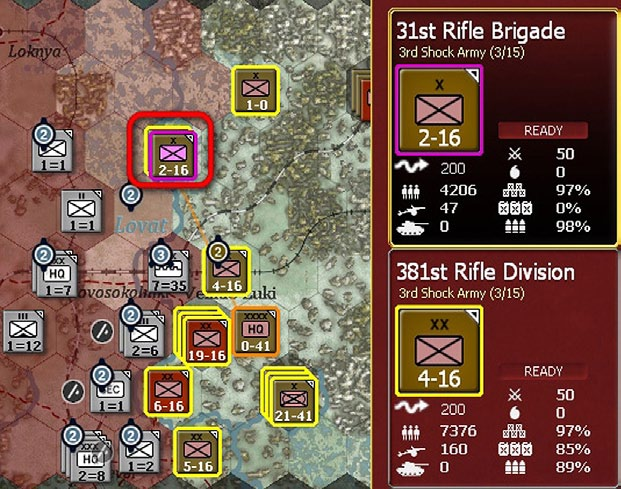
For the moment, leave the brigade and move the Rifle Division (381). Make the change by left-clicking on the hex again, the display will change. Note that now the division is outlined in purple both on the map and in the counter display.
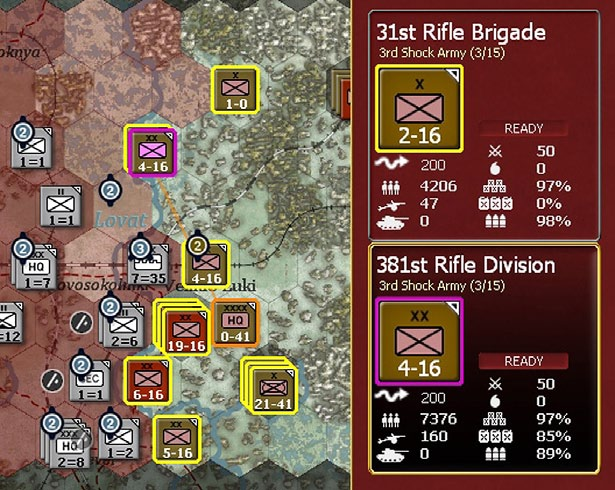
Now move the mouse to 200,129, note as you do this the movement path for the unit is marked out, showing 11 in the first hex and 0 in the second. These numbers are the MP that unit will have remaining if it moves to the proposed target hex.
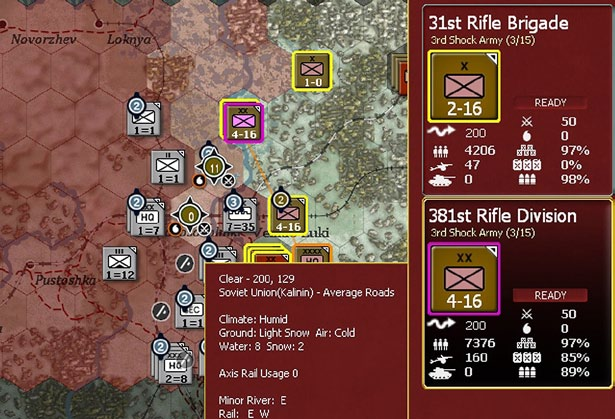
Right click on the target hex, this converts the possible move into a move order. The 381 RD will now appear in the target hex (if you had selected ‘show move animation’ you would see it move hex by hex).
The situation should now look like:
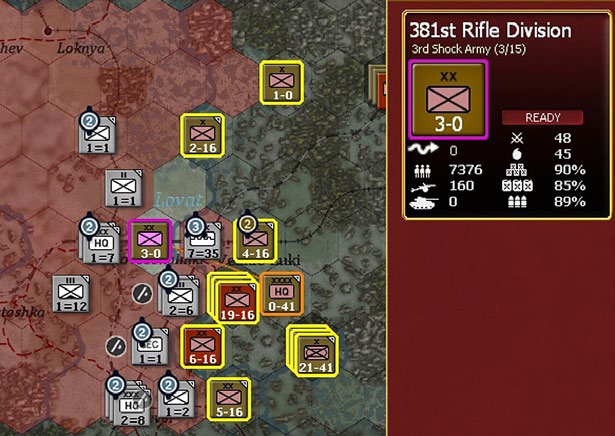
Note the change in map shading, the unit you still have selected has 0 MP remaining so every hex on the map is now out of reach.
Another aspect of that move worth noting is that the CPP % dropped from 50 to 48, as you lose 1 point for every hex you move into during the turn.
Now click on hex 203,128, note that the 2 hexes entered by 381 RD are now a different shade. That is because they were Axis controlled at the start of the turn but have been entered by a Soviet unit. They are treated as ‘pending’ Soviet control and this limits their usage and affects the cost to enter them (4.8.1). In particular, no Soviet unit can use ‘Administrative Movement’ in those hexes (and this will include the cost of any supplies sent forward at the end of the turn).

We are now going to re-organise the other units to support the encirclement. Select the 257 RD (due east of Velikie Luki) and move it to hex 201,128 (this will protect the line of communications to the units cutting off the city). Move the 28 RD from 202,138 (the hex at the south end of the line) to 202,129. This will uncover the southern part of the front but there is little risk of an Axis offensive.
The layout now will be:
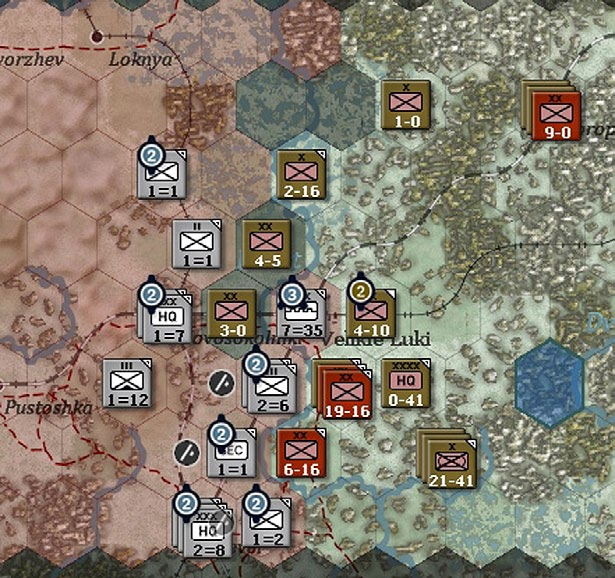
You now have a choice. You can continue re-organising the layout of the units to optimise the partial encirclement or try to take the hex SW of Velikie Luki to complete cutting it off.
4.21.2 Attacking to Complete the Encirclement
We are going to try that option with the 4 Soviet divisions adjacent to the ‘2-6’ Axis stack. This will also allow us to explore some important concepts when attacking just with infantry formations. Due to the way movement costs and Zones of Control (4.8.1 and 22.2.4) work none of those 4 units will have the MP to both attack and enter the target hex this turn. So we need to plan this attack with some care.
Start by left-clicking on the stack shown as 19-16
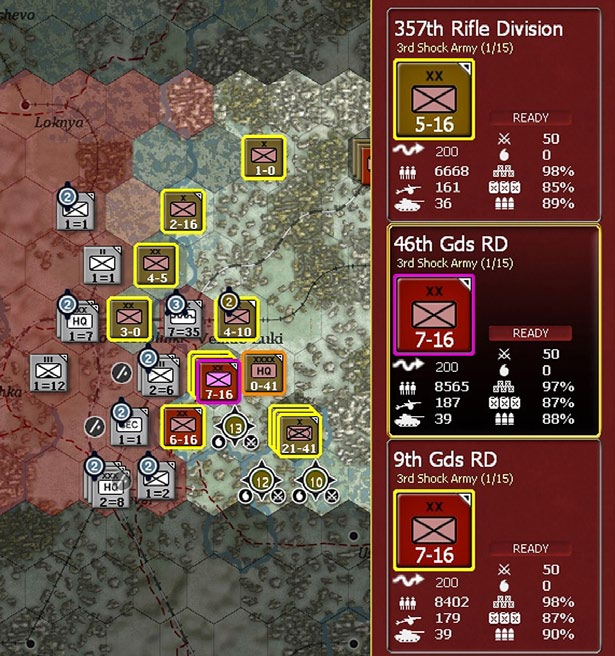
Now hold the shift key down (or click on the shift option on the information tool tabs) and move the mouse SW to the hex occupied by the 6-16 unit. The display will now look like:
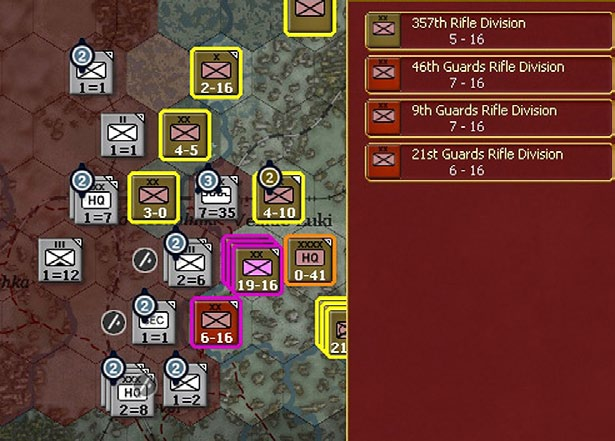
All 4 divisions are outlined in purple (they are selected) and all four divisions are shown on the right hand side of the screen in a short hand manner.
Now click on the entry for 9 Gds RD on the right hand of the screen (we are going to leave it out of the planned attack). You do this by clicking on the counter symbol not on the text.
This display will now change to:
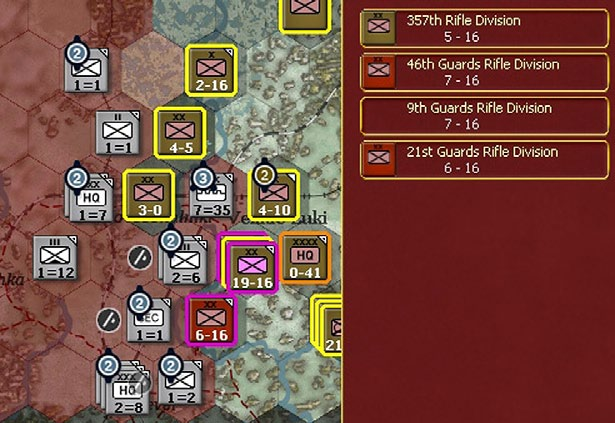
We now want to consider the attack.
Keep the shift key depressed (either on your keyboard or use the tab) and move the mouse over the Axis units, the display will now give you an estimate of what might happen if you attack.
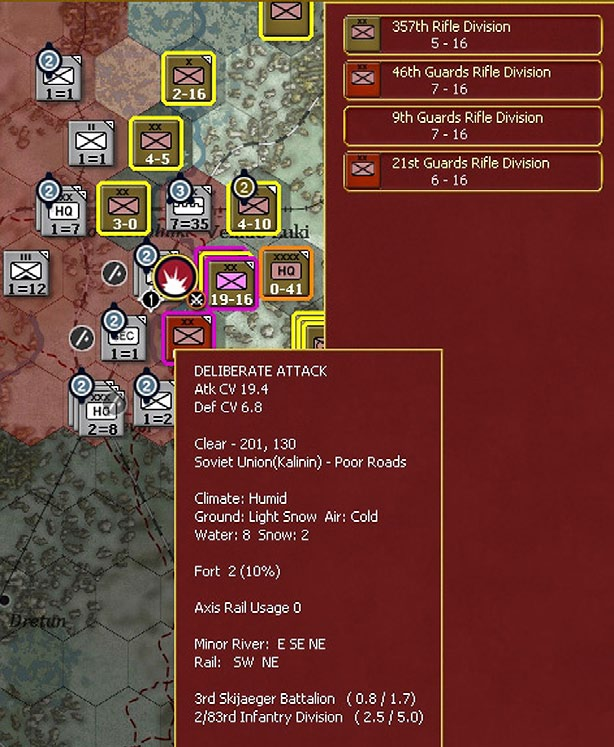
The combat engine in WiTE2 has many variables (4.8.2 and 4.8.3) but the key concept is that if the attacker has double the Combat Value of the defender – at the end of the actual fighting – the defender will be forced to retreat (at the least – 4.8.5). The starting CV is a good clue to the final position but the relationship is not linear and can be misleading (due to fog of war) or if one or both sides has substantial artillery or air assets available.
But you have starting odds of over 3-1 and you outnumber the defenders. You are attacking with 4 divisions and the defenders are a regiment (2/83 ID) and a battalion (the ski troops).
This sort of interpretation of the pre-attack odds becomes second nature over time. The shown CV are a useful guide but experience will help you understand when they are misleading. As an example, a Soviet rifle division in the summer of 1941 might appear strong but might also collapse in combat due to low morale or experience, especially if it is in clear terrain and attacked by German mobile troops.
So this is a worthwhile gamble.
You can choose the level of detail to watch the battle by pressing 0-7 (at 0 you will see nothing, at 7 you will see the results of every infantry squad, gun and plane firing). Select 2, this will give you chance to check over the summary outcome and consider if you want to see more details after the battle.
Now simply right click on the target hex (so the same as if you were ordering a move). This will trigger the attack and at the end you will see the screen opposite. For the purposes of that image, I changed the game display to show battle sites.
So the Germans retreated relatively quickly with low losses on both sides. You can use the ‘show details’ option on the battle report to explore that combat in considerable detail but for the moment let’s move on to the rest of the moves.
Inevitably the losses will be different to what is shown above as each combat relies on many dice rolls and the interaction between the various combat elements engaged (21.2.1).
Clearly in your game, the actual details will vary. In particular, the AI may have allocated aircraft as Ground Support (4.5.5) which can be very useful in terms of disrupting the enemy before the actual ground fighting commences.
If, like me, you reviewed that battle after it happened, press F1 (or the left hand tab) to return to moving units.
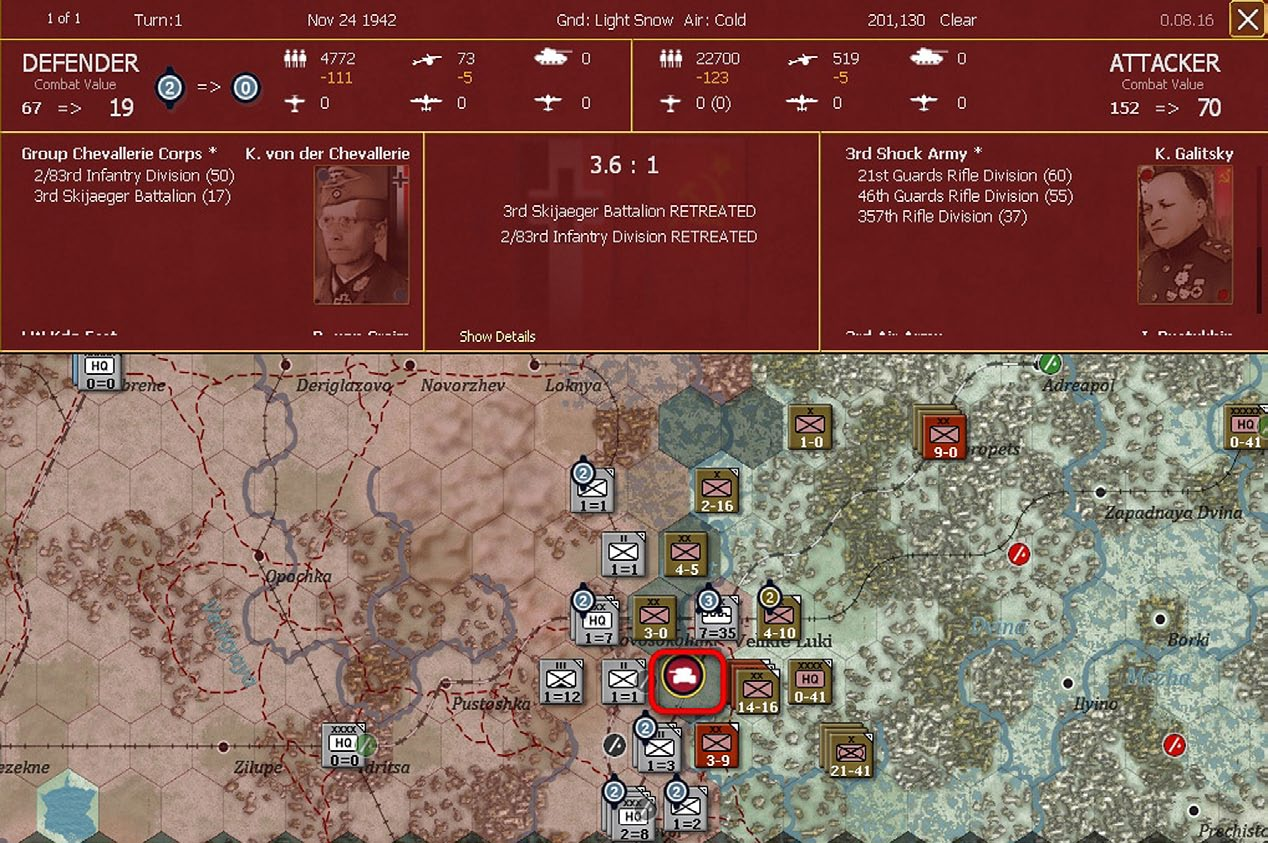
4.21.3 Final Moves
Of the three units in 202,130, the 9 Gds RD should have its full movement allowance so advance that into the hex you have just driven the Germans from. This is why we left it out of the attack. Given the layout of the defenders, all the other rifle divisions now lack the MP to both move through a Zone of Control and enter the target hex (38.7.1).
To complete your moves place the 31 Brigade in 202,128 (that will stop the defenders breaking out easily) and the 1 brigade of the Mechanized Corps in 200,129 (so you have a powerful force blocking the direct relief route).
When moving your HQs it is a good idea to return to showing the logistics and depot display. All things being equal, a HQ is better placed on a depot as long as it is also in command range of its subordinates. In this case, there is no suitable depot that also meets the desire to move the Front HQ, but you could construct one at the airfield. However, this will be costly (in terms of supply demand to construct the infrastructure and in a short scenario probably not worth the cost).
Finally move the Kalinin Front counter to the airbase at 205,126. This is not essential but will help the AI redeploy your aircraft closer to the front (remember we set the Air Command to ‘follow’ the HQ).
You should have a layout similar to:
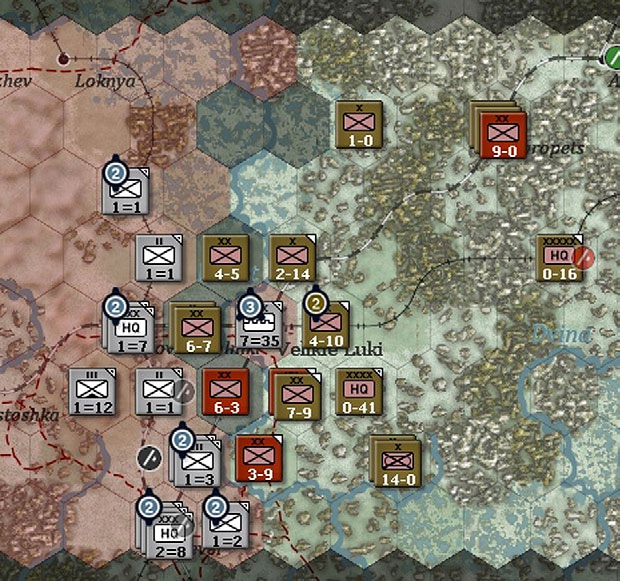
Depot layout is a complex issue but basically you want a chain running back to your National Supply Sources (4.10.2) and then close enough to the front so that your units do not have a long supply chain. But you do not want too many as then you will lack trucks to move your units and their attached artillery as all your trucks are allocated to the depots.
Save the game (in case you wish to return to this step) and press F12. That will commence the end of turn routines. For this turn, click on Yes when asked about the AI Depot Management option as there are no locations where it is worth adding an extra depot.
4.21.4 The AI Response
The map will change, you will see the AI routines first for logistics, then its air phase and then the movement of combat units (remember you have Fog of War off).
How the AI responds will vary from game to game and the difficultly level you chosen. In particular giving the AI a morale setting over 110 will change how it behaves (and as you become more experienced, produce a more challenging game).
4.22 Turns 2–3
At this stage, the game returns to your air planning phase. And you will see something like:
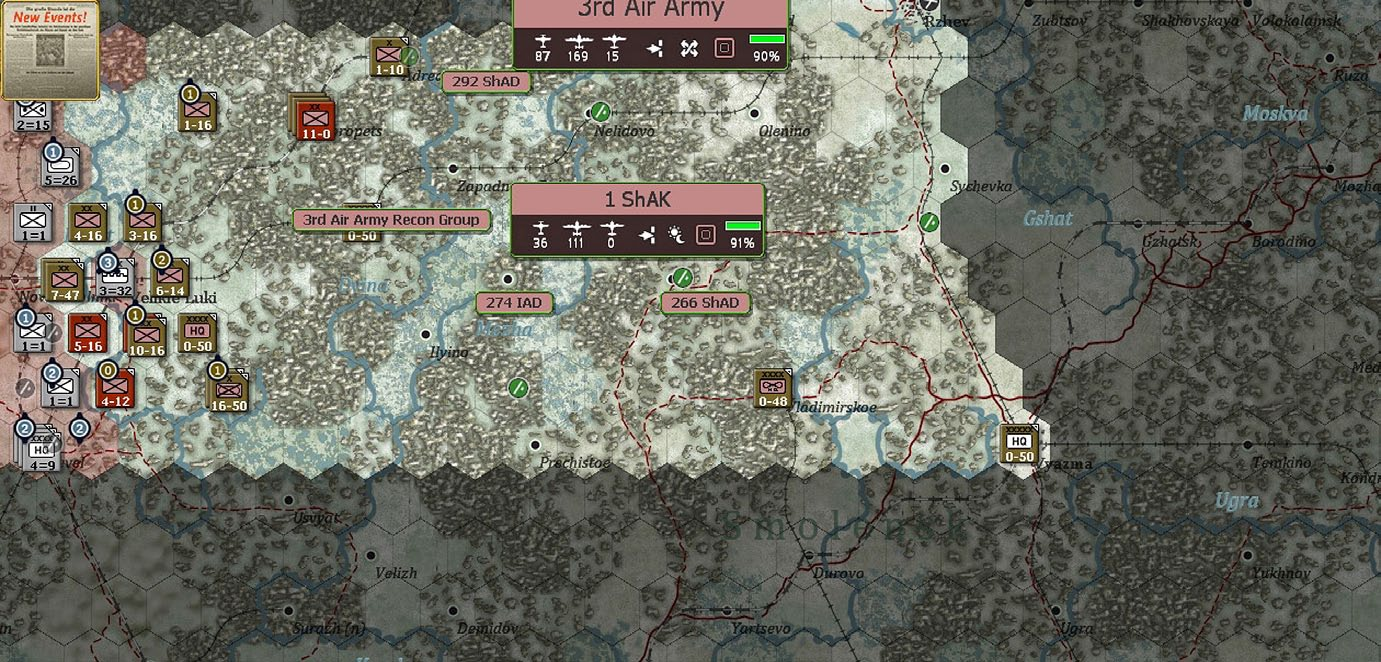
You can dismiss the events message by opening it, marking all messages as read and closing it.
Note that on map, you can see how the AI has redeployed your air force. On the right hand side is the turn summary chart and this is worth looking over. More details on how to interpret this screen can be found in section 36.16.
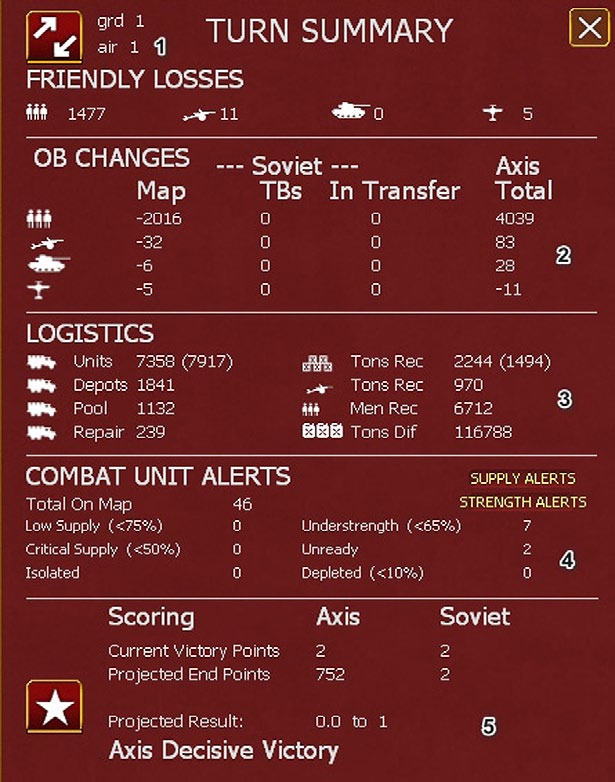
At the top (1) you can see you have had 1 ground and 1 air reinforcement. Clicking on the symbol will take you to the reinforcement chart and you can see you now have an extra Rifle Brigade.
Below this are some information screens. At the top is your total losses (combat and attrition in the last turn) and (2) how the on-map forces have changed (note the Axis must have had some reinforcements), (3) can be very useful as a quick glance over your logistics situation. In this case trucks in units is important as it determines how mobile your formations will be (4.8.1). (4) can be used to find weak or poorly supplied units on the map (just click on the ‘ALERTS’ options).
Finally (5) tells you if you are winning or losing. And this looks terrible. But remember the VP scoring is very dependent on the Soviets capturing cities.
At this stage of any turn, you can review many factors using the Commander’s Report. This is a good time to carry out any administrative tasks you feel are useful. Over time you will develop your own routines and the Player’s Notes (Ch. 30) contain some advice in this regard.
For the moment, we can move onto the ground phase by pressing F12 (there is no need to amend our air orders).
As before, you will see the air phase run, be shown the phase summary, close that and return to the map.
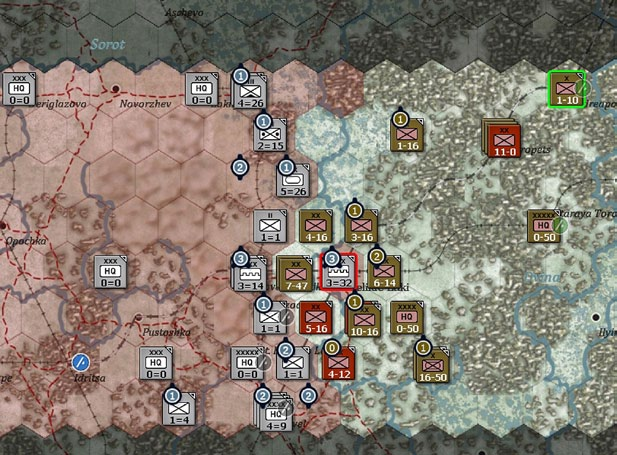
For this display I have selected the unit modes tab (shift-r) as it tells us two useful things. First the reinforcement is outlined in green so we can easily find it. Second, the German defenders are isolated (outlined in red). You can see what all the possible options are in section 6.5.3.
You can turn that off once you have reviewed the situation. The other major changes are that the rest of the Mechanized Corps are now available to move as is the Ski Brigade (44) in hex 203,126.
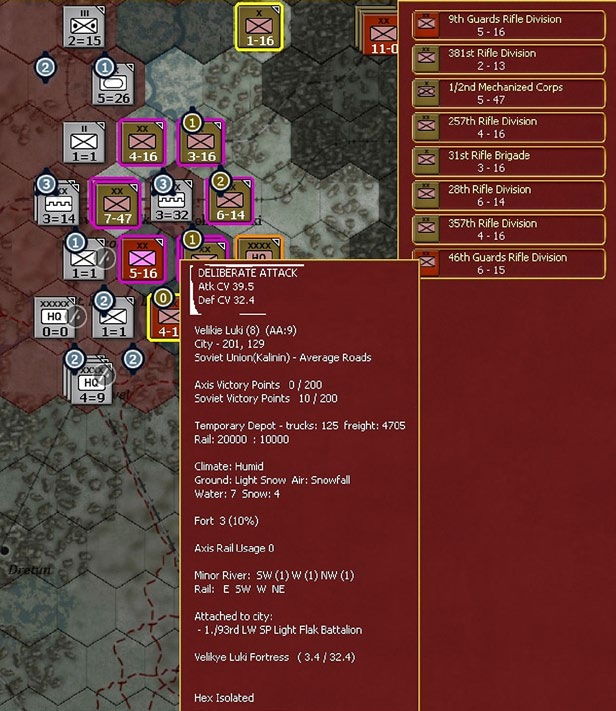
You may find the AI has laid out its forces differently to those shown but it will try to cover the front line. At higher difficulty levels it may well have tried to break through to Velikie Luki.
Practically, only one thing matters this turn, capturing the city.
If you select all the units surrounding the city (as above) you will see the odds are something like 39-32. Now this might be enough, you probably outnumber the enemy, they may be low on supplies (actually they are not – due to FOW being off you can see how much freight is in the depot – see if you can work out how to view this information).
If you attack and fail, all your units will lose half their remaining CPP making it harder to attack in such strength again.
The only powerful units you have available in addition are the two Mechanized brigades so move them to 202,129 and then select all the possible attackers. The odds should have improved to around 55-32 and given your other advantages this is probably likely to work. Your final choice is to add the 4-12 division at 201,131 but that is securing your flank.
We will gamble on leaving that where it is.
So make the attack.
In this case the post-battle symbol has changed to show the enemy surrendered.
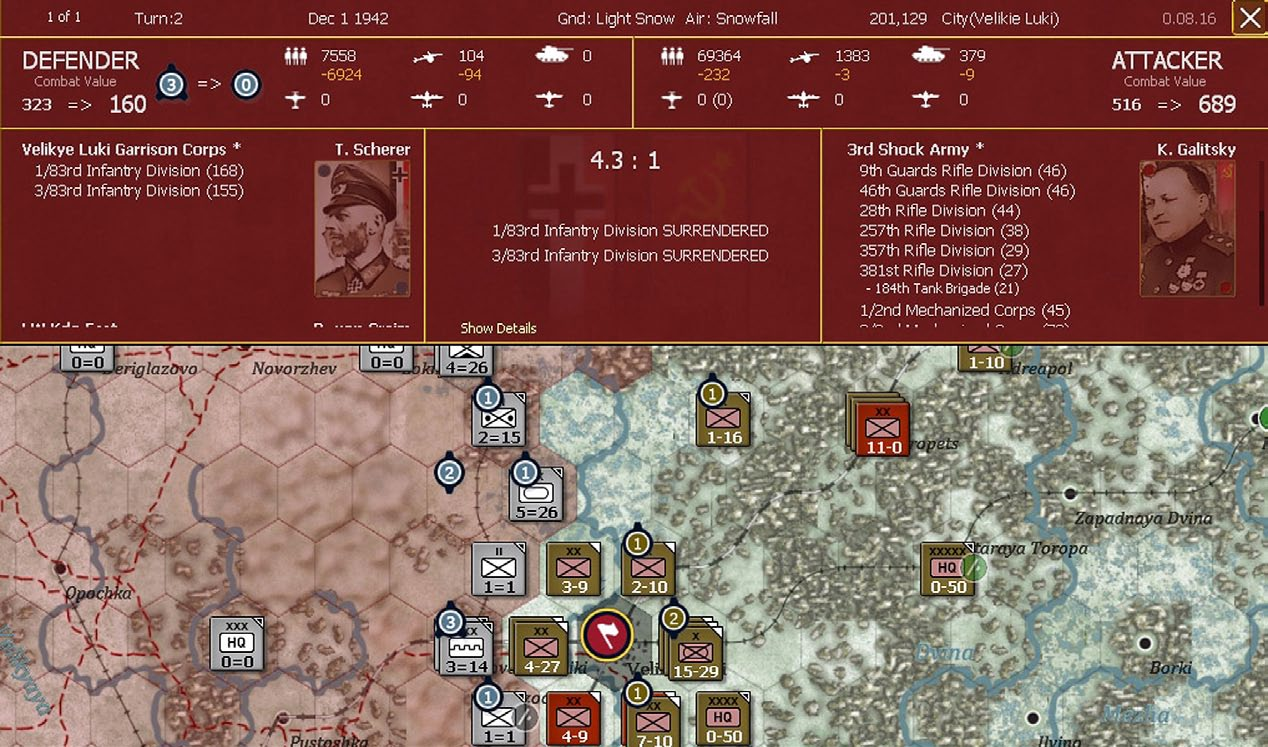
From here, there are many options.
First let’s explore the different ways you can use the Rifle Brigades. They can be on the map and treated as a combat unit or assigned to either a HQ or combat unit (this can significantly improve your combat power in a hex). To allocate one directly to a combat unit will take several turns (due to the scenario set up), so first move the newly arrived brigade to the hex with the Shock Army HQ.
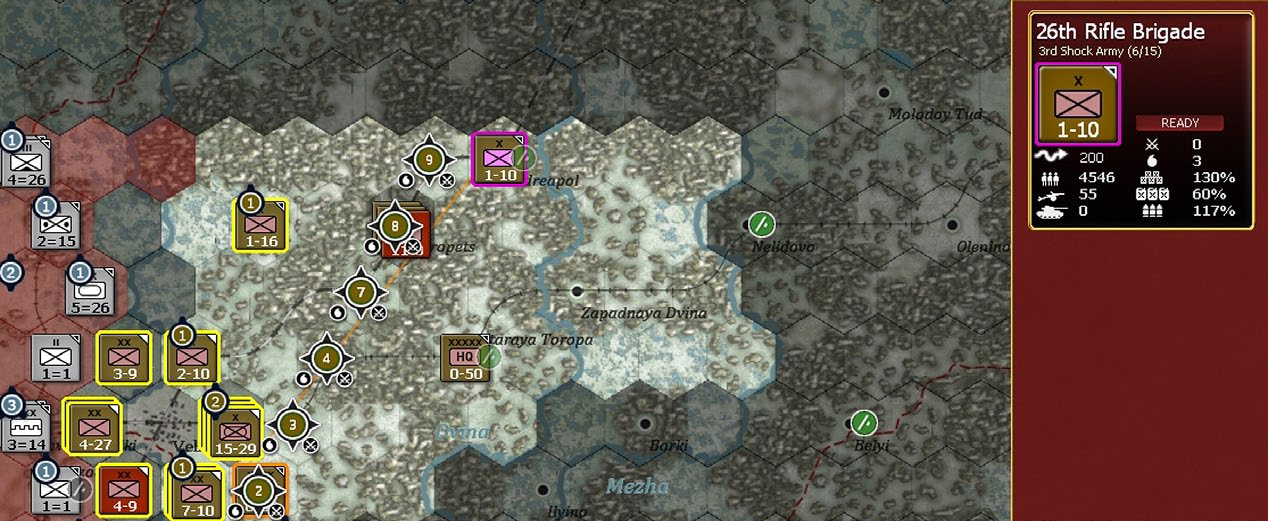
Right click on the unit counter (on the right hand side of the screen) and you will see the detailed unit screen: Since it is now in the hex of its HQ and has at least 1 MP left, we can convert it from being on the map to being attached to the HQ. Click on ‘CONVERT UNIT’.
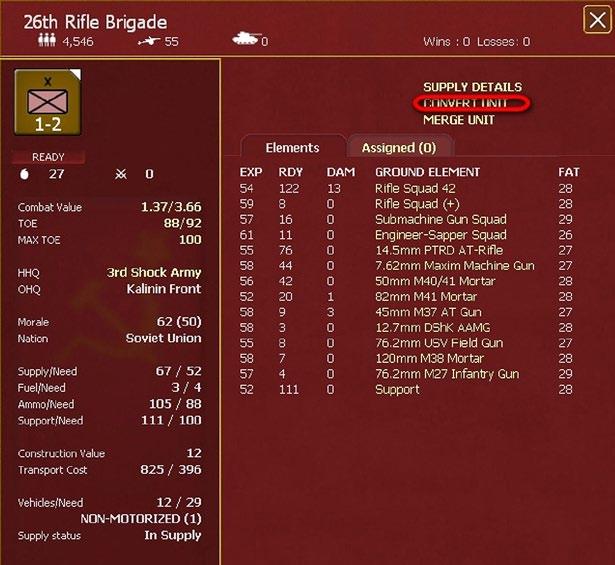
If you then open the detailed tab for the Army HQ and go the list of ‘assigned’ units, you will see the 26 Brigade now marked as being off map and with a * (that means it has changed status or HQ this turn and cannot do so again till next turn).
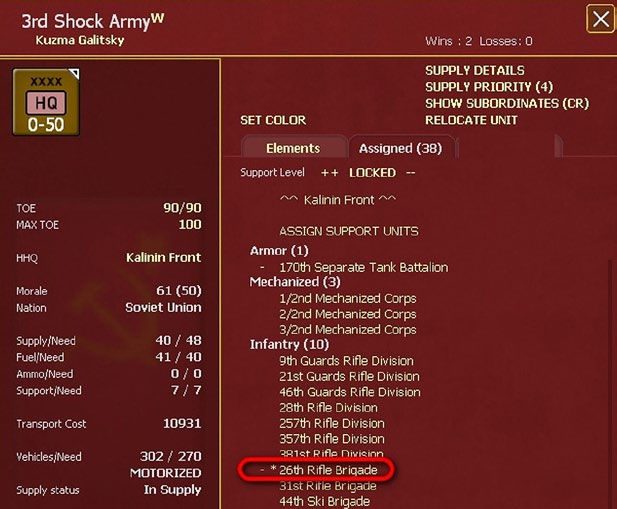
A valid alternative use of that unit would have been to leave it where it was and place it in ‘RESERVE’ mode (4.7.8). The advantage of that option is it may well be committed to support any attack nearby (especially as brigades are more likely to be selected for this than divisions).
For the rest of the turn, it is a good idea not to move the assault units again if you can avoid this. They will regain more of their CPP if left static and in hexes you owned at the start of the turn.
To complete the turn, move the 44 Ski brigade one hex west (this will prevent any easy Axis incursion on your northern flank). Also advance the 28 RD into the city (leave the other units outside – they will regain more CPP if left in a hex you owned at the start of the turn). Just move one formation into the city so that it is garrisoned in case of a counter-attack.
And then attack with the 9 Gds RD (201,130) to the SW. The odds for a deliberate attack should be over 4-1 and this will make it easier to take Nevel (another victory location) in a future turn.
It is quite likely the defenders will rout (they are a security battalion) and move 21 Gds RD from 201,131 to 200,131. In the test game this moved them adjacent to a German HQ that was on its own so that too retreated when the Soviets advance (23.13).
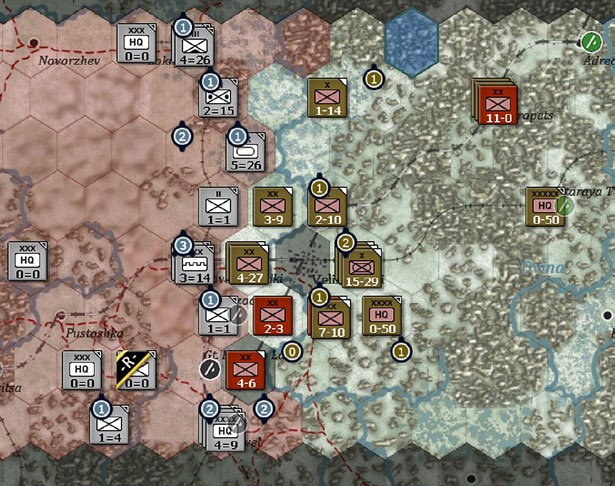
Again, you maybe faced with a different layout. If so, and the defenders are relatively strong, leave this attack to a later turn. WiTE2 does not reward just attacking ‘because you can’.
One last thing you can do is to build a depot in Velikie Luki. This will not fully function until the associated rail line is repaired but you will need it later.
If you have played WiTE1 this maybe one of the biggest changes. Preservation (and recovery) of CPP is more important over the game than taking a single hex just because you are stronger than the defenders.
You can do this by clicking in the hex and selecting from the depot tab on the top row, by right clicking on the hex and select ‘Build Depot’ or opening the tab with the city name and order the creation of the depot that way.
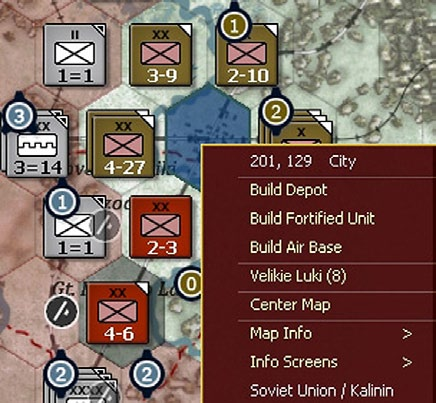
Note in every case, your available Administrative Points will drop from 11 to 10.
All the information on these steps can be found in chapter 6 and One Page Guide #7.
Save the game and progress to the next turn.
By this stage, it is likely your game is becoming quite different as the AI will make different choices. In mine, it started a significant offensive from the NW of Velikie Luki (and was held off by the division I advanced after combat and the unit falling back after being attacked). You can usefully review the AI turn by looking at the on-map combat sites.
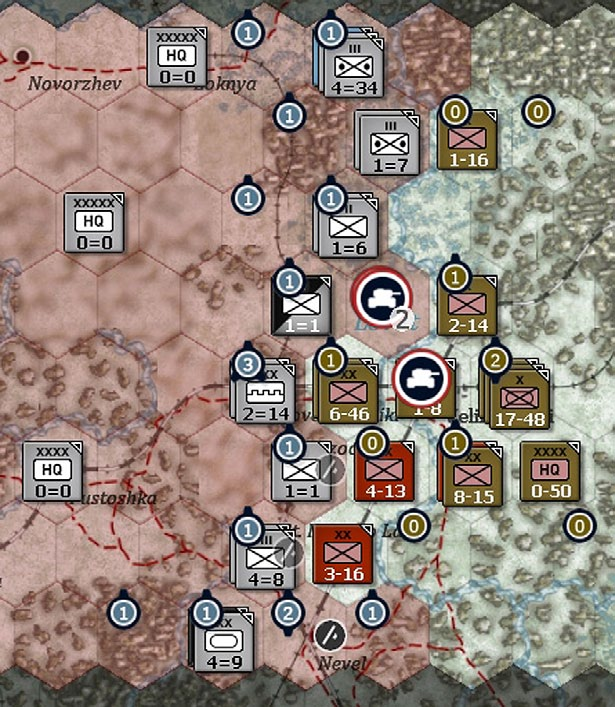
In other games it may react differently.
The summary screen suggests you are still losing as it assumes the AI will hold onto the other three victory cities. However, as of turn 3, you should be slightly ahead due to the VP gained for forcing the garrison to have surrendered and one turn of holding Velikie Luki.
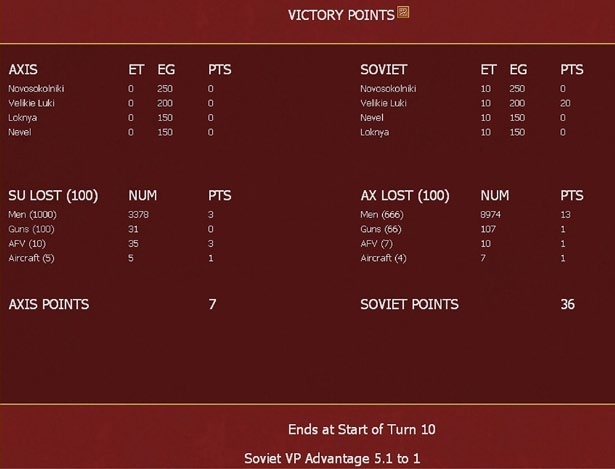
Before completing this discussion, let’s look at how to assign support units to combat units (not all support units can be directly attached in this manner). Select the 381 RD (200,129) and open up the unit screen, select ‘assign Support Unit’ and you will see the Rifle Brigade we converted last turn.
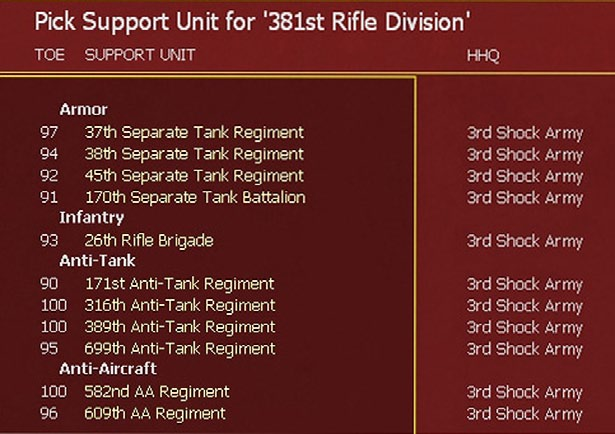
Assign that to the division and you will see its combat value improve to 4.8. This can be a very useful way to improve the direct combat power of a unit or stack.
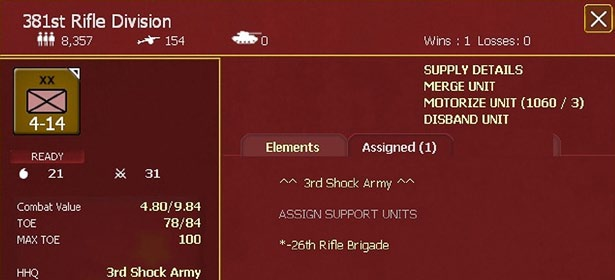
This is one of the many trade-offs in the game. A support unit attached to a combat unit will always be in action if the combat unit is involved. One assigned to a HQ may not be committed (as ever this is decided in part by random chance and in part by the quality of leadership) but, on the other hand, may fight more than once and be assigned to a combat that matters.
4.23 Completing the Scenario
Up to this stage of the game, you should be able to follow the steps above fairly closely but increasingly any replay of the game will vary. The AI will react in different ways, you might make different decisions about the importance of resting units as opposed to exploiting opportunities.
So take the game forward and see how you do. It is probably a good idea to show the VP locations on the map to remind you of where they are. Remember you now have the 3 Rifle Divisions in 205,126 available and will gain more reinforcements over the next two turns (but so will the Germans).
Having completed that, you could replay the scenario at the normal settings and with the Fog of War set. This will remove the advantages you had above (and the malus that affected the AI) and may well make the fighting around Velikie Luki much more difficult.
The scenario is also worth playing from the Axis side as it covers concepts such as City Forts and you can explore how to first slow and then stop an offensive.
4.23.1 Other Scenarios
Once you feel you have completed this scenario, move onto Introductory Scenario 2 – Road to Minsk. That is a two turn study of the opening offensive by Army Group Centre in June 1941. In this case, it is best played from the Axis side (as the Soviets have little to do).
Unlike this one, it is more about rapid movement but you can use it to practice important game functions such as rail repair, how to secure pockets and the need for careful force allocation.
Beyond that, the Road to Leningrad has a low unit density and the Destruction of Southwestern Front is more demanding in terms of unit numbers and scale. In combination they will allow you to explore the main thrusts of the German invasion in June 1941.
The Red God of War scenario will allow you to place the actions around Velikie Luki in more context as that covers the entirety of the Soviet ‘Mars’ offensive. Typhoon is useful to become used to the effect of the autumn rains and then the winter blizzards on movement and supply.
4.23.2 Campaign Games
The other campaign starts in the game allow you to explore specific phases of the war. Many of the testers have reported how much they have enjoyed Stalingrad- Berlin and the Vistula-Berlin campaigns. Even if you no longer have the broad sweep of the 1941 Axis offensive, Stalingrad-Berlin is well balanced and you can explore how the game handles the phase where the Red Army is still learning and the German Panzers remain devastating when concentrated. Vistula-Berlin may seem one-sided but there is much to learn about how the Soviets conduct a major offensive and the very different logistics demands to 1941 as the Axis.